Inventory : Configuration: Delivery
Purpose
The purpose of this document is to show you how to create different shipping methods in the Odoo 13 Inventory app.
Process
To get started, navigate to the Inventory app.
Once there, go to Configuration > SHIPPING Methods.
Creating a Shipping Method
Your initial view will be a listing of all current shipping methods. Click Create to add a new Shipping Method, and you'll be presented with the following options:
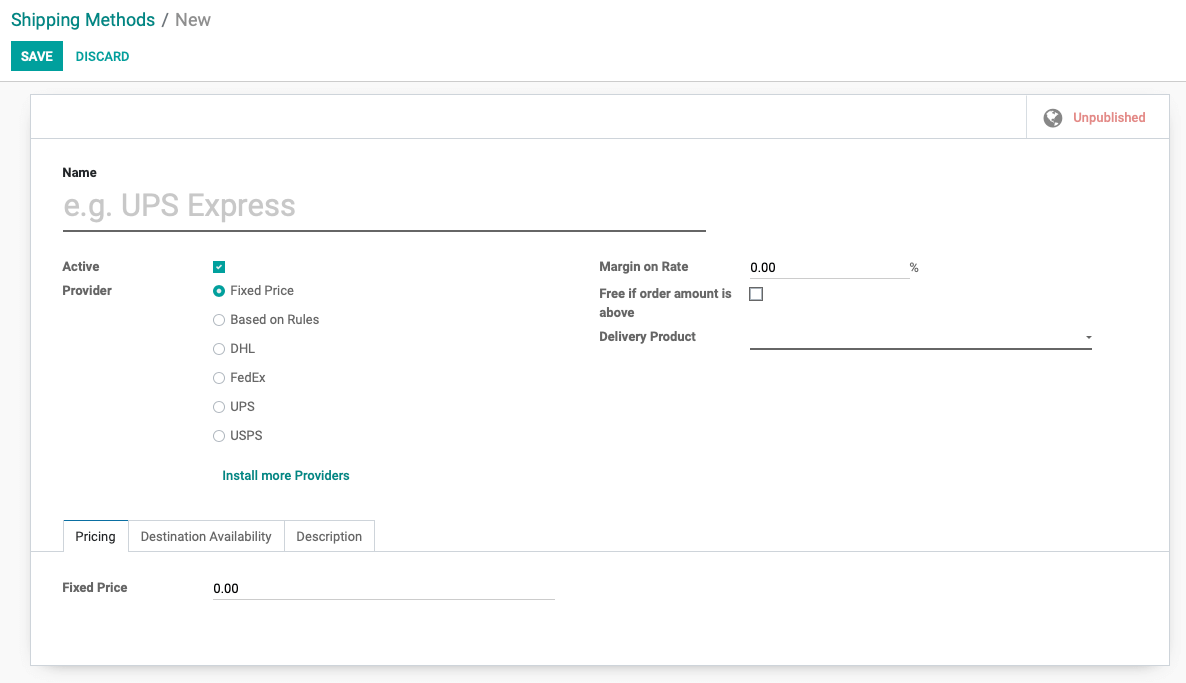
Name: Give your Delivery Method a specific name for reference.
Provider: Set the pricing that will be used for this shipping method from various sources. We will only cover Fixed Price and Based on Rules right now because we will go over the 3rd party carrier set up in the next section.
Fixed Price: This gives you the option to set a fixed shipping cost for all orders that this Delivery Method is applied to.
Based on Rules: This will allow you to set specific rules for your shipping costs based on weight, price, quantity ordered, volume, and weight * volume. For example, you could set your rules so that, if an order contains more than five units and the price is over $200, then that customer gets free shipping.
INSTALL MORE PROVIDERS: Takes you to a page where you can install additional logistics provider modules and Shipping Connectors.
Margin on Rate: Set a percentage of increase over the calculated shipping rate.
Free if order amount is above: If enabled, you can set an order price that if reached, will give your customers free shipping.
Delivery Product: Delivery Products are used for internal accounting purposes. By having an associated Delivery Product with your Delivery Method, you can track how many times a Delivery Method is used. Delivery Products also add a line item to all orders that use the associated Delivery Method for accurate billing of the shipping costs.
We will go into detail about how to create Delivery Products below.
Pricing Tab: Set the price, and pricing rules, for the Fixed Price and Based on the Rules options above.
Destination Availability Tab: Restrict your shipments to certain regions by country and state or zip code, if desired.
Description Tab: Enter a description for this item that will display on the eCommerce application, and in online quotations.
Once configured your new Shipping Method, click the Save button.
Delivery Products
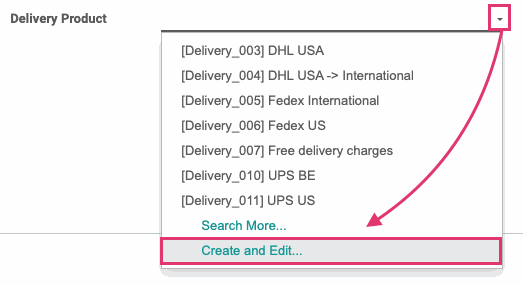
Delivery Products are accessed by the associated dropdown menu within any Delivery Method.
On any selected Delivery Methods page, click the dropdown menu next to Delivery Product. In this dropdown menu, you will see all of the Delivery Products that have already been made as well as the preconfigured Delivery Products that came along with your selected Shipping Connector(s).
From the dropdown menu, select Create and Edit....
You'll be presented with the following options to create your Delivery Product.
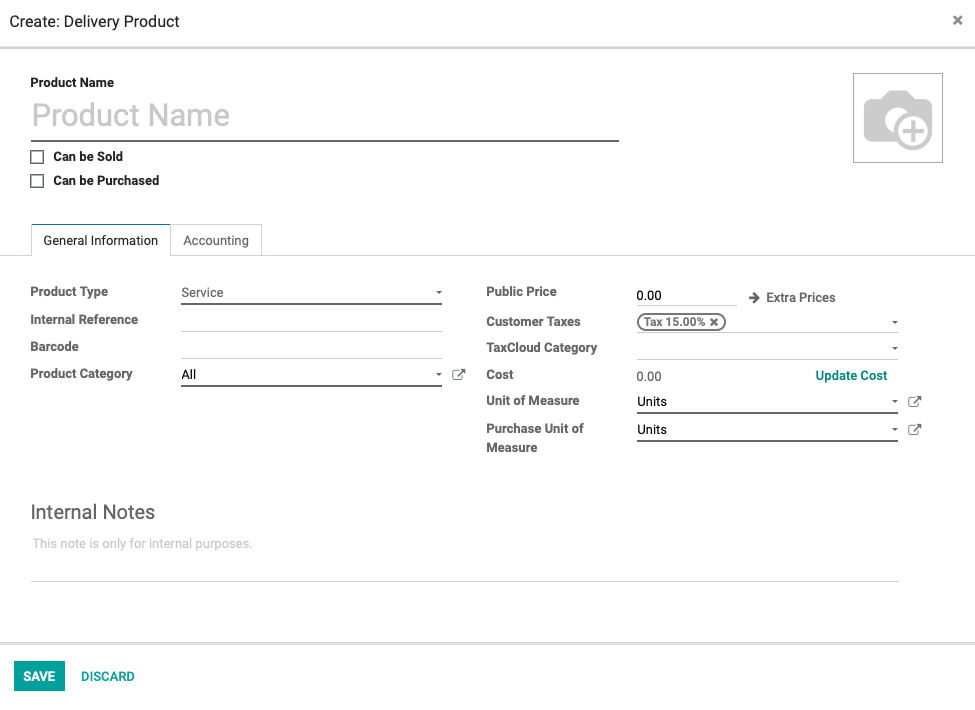
A Delivery Product is managed like a regular Service product. Enter all information, according to the Master Data: Products documentation. When you're readon, click Save.
Shipping Connectors
Go to Configuration > Shipping Methods. Here you'll see all of the pre-built Shipping Methods in the system for the Shipping Connectors that have been activated.
Select a Shipping Method from the list, then click Edit.
To get started with connecting your selected carrier's account with Odoo, navigate to the Configuration Tab, fill in the necessary account details, and follow any instructions listed.
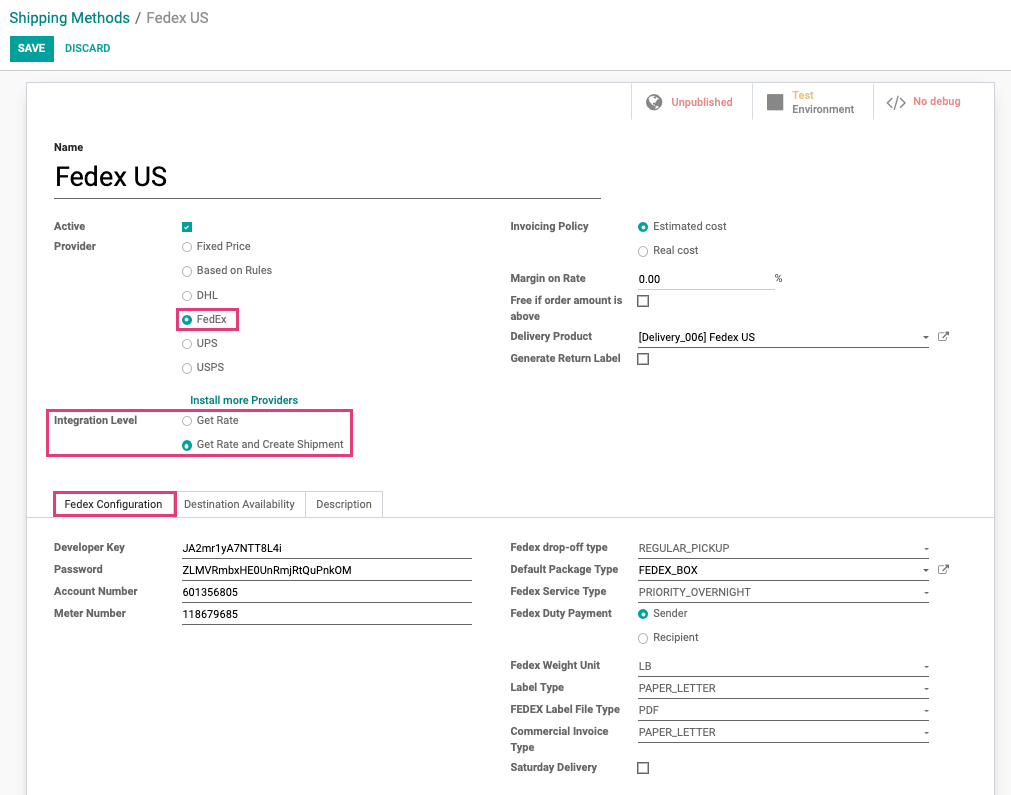
Integration Level: This option allows you to choose how much of the shipping process will be handled within Odoo.
You can opt to just get shipping rates or you can opt to get rates and then create a shipment as well.
The other options shown to the right of the account details section under the FedEx Configuration tab are specific to the FedEx shipping connector. These options are specific to each carrier, but generally, they will determine what kind of packaging you will use, allow you to set delivery preferences, the format you want your labels created in, and the type of shipping service you would like to use.
Smart Buttons
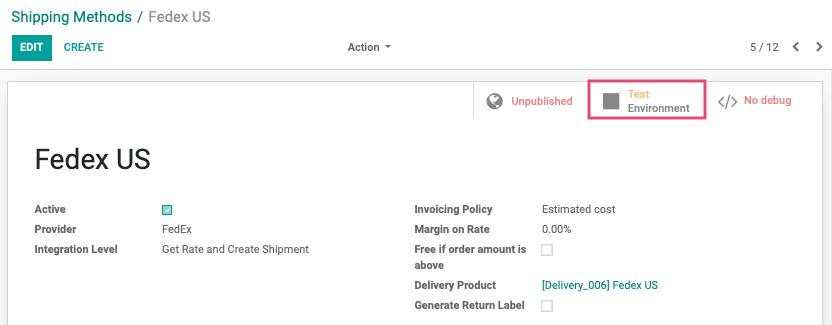
You may notice up to three Smart Buttons at the top of your Shipping Methods screen:

Unpublished / Published: When toggled to Published, this Shipping Method becomes available to use throughout your Odoo database.
Test Environment / Production Environment: When toggled to Production Environment, the connector will connect with your carrier and be ready to use for live orders.
No debug / Debug requests: When toggled to Debug requests, processes and errors will be logged for your review.
Important!
Test vs. Production
Once you have your Shipping Connector activated for a carrier and you create a Delivery Method, you will have the option of switching between a Test Environment and a Production Environment for that carrier.
While testing your connection and making sure that your preferences are correct, you should be in the Test Environment. Once you are ready to start processing live orders or doing testing in a live environment, you can switch to Production Environment.
To toggle between the two environments, just click the Test Environment/Production Environment button on any Delivery Method that you are editing. If you are on Test Environment, a single click will put you on Production, and vice versa.
Generally, your test credentials and your production credentials from the shipping provider will be different. Please contact your shipping provider to receive both sets of credentials.
Delivery Packages
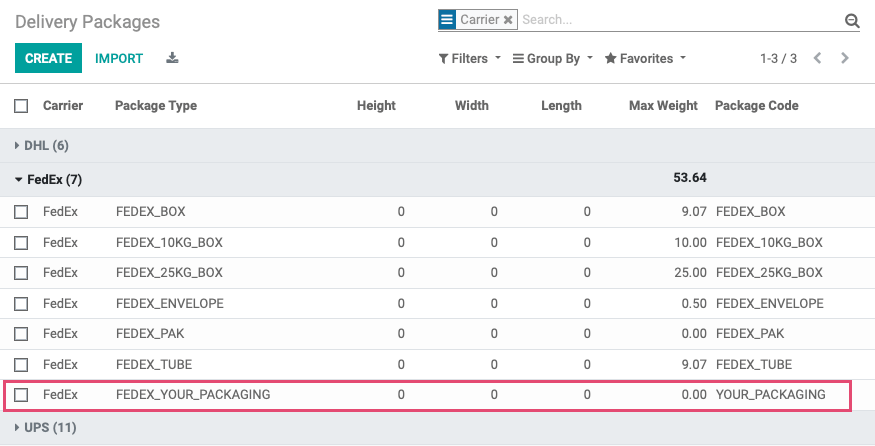
Knowing the type of packaging you're using is helpful to determine accurate shipping rates. To see the currently configured packaging types, go to Configuration > Delivery Packages.
Good to Know!
All Carriers' Configurations Differ
Some carriers, like FedEx, UPS, and DHL, have pre-built Delivery Packages within Odoo; however, not all do. For example, the USPS rates within Odoo are calculated based on service type (First Class, Priority, and Express), along with weight, and dimensions. For this reason, you won't see Delivery Packages listed for USPS.
Custom Packaging
Not all carriers have prebuilt packaging codes. If they do, you will see it in the Default Package Type dropdown menu. For example, if you want to ship with FedEx using your own packaging, the code is FEDEX_YOUR_PACKAGING.
To edit this custom packaging, click the record from the list, then click Edit on the next screen.
On the next window, only modify the fields outlined below in pink.
Do not modify the Package Type, Carrier, or Package Code and do not input any measurement symbols like " or ' into the Height, Width, or Length fields. Input the dimensions in Inches.
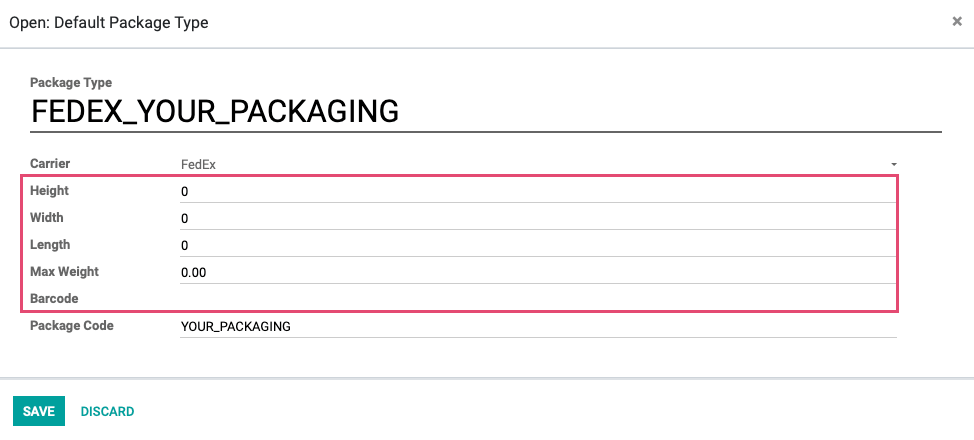
When the settings are configured to your requirement, click SAVE.
You can also access Packaging Types by navigating to CONFIGURATION > Shipping PACKAGES where you can create, delete, and modify all of your available packaging types for all carriers.
Good to Know!
Custom Packaging
It’s not uncommon to need multiple packages that are your own custom dimensions. In this case, you can have multiple package types that use the same custom packaging code. Set the package name to something identifiable by your team and ensure the Package Code is configured per the shipping provider's requirements.
To see what we've outlined in this document in acdtion, see the Inventory > Delivery Methods Workflow documentation.