Inventory : Inventory Workflows: Product Creation
Purpose
This is a step-by-step guide to creating and configuring a new product in the Odoo 14 Inventory application.
Debug Mode
Some steps in this document will require you to be in Debug Mode.
Process
To get started, navigate to the Inventory app.
Once there, click products > PRODUCTS to list all active products in kanban view. Click CREATE to add a new product and complete the Product form, as shown.
Product Name: Enter the name of your product.
Allowable Actions: Select each that applies. The options here will vary based on the configuration of your database.
Can be Sold: This product can be added to a Sale Order.
Can be Purchased: This product can be added to a Purchase Order.
Can be Expensed: This product can be added to an Expense Report.
Image: To add a product image, hover the camera icon and upload the image from your computer.

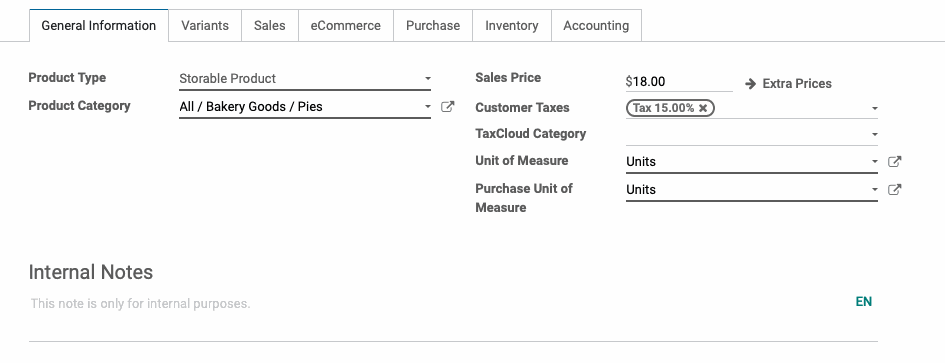
Under the General Information tab:
Product Type: Select the appropriate option. The value selected here will effect other fields on the product template.
Consumable: This product type can be sold and/or purchased, but is used as needed, and does not track inventory. A good example would be envelopes you purchase from an office supply store and use in daily business operations.
Service: This product type is not tangible. It could be a block of time you offer (e.g. for website development or product repair), or additional service-based fees.
Storable: This product type is tracked in inventory and will display an "On Hand" smart button with the quantity in stock. You'll be able to adjust inventory, create reordering rules, replenish, etc.
Product Category: Select a category for this product.
Internal Reference: Allows you to set a custom unique reference, such as a SKU.
Barcode: If the Barcode app is installed, scanning a barcode with the digits entered here will pull up this product in the Point of Sale and Inventory applications.
Sales Price: Allows you to set a default sale price for the item that will populate on sale orders. Use the EXTRA PRICES button to add or modify pricing rules.
Customer Taxes: This field pulls from the Accounting application to assign a tax rule to the item.
TaxCloud Category: This allows you to assign TIC categories, codes, and descriptions to your products to streamline tax collection.
Company: In a multi-company environment, the product will only be available to the selected company. Leave it empty to allow all companies access.
Cost: If Standard Price, this field allows you to create a fixed cost for the purchase of the item. In Average and FIFO valuations, this field will be updated based on purchasing and other product movements.
Good to Know!
The product cost can only be set manually if the costing method on the product’s category is Standard Price. In Average and FIFO costing methods, this field will be updated based on purchasing and other product movements.
Unit of Measure: The measure by which this item will be counted in inventory.
Purchase Unit of Measure: The measure by which the item can be purchased from vendors, (e.g. cases, dozens, units).
Internal Notes: This information will be displayed to internal users only.
Variants
Variants are a way to set all available options for a base product, thus allowing Odoo to automatically create individual products (Product Variants) for every possible configuration.
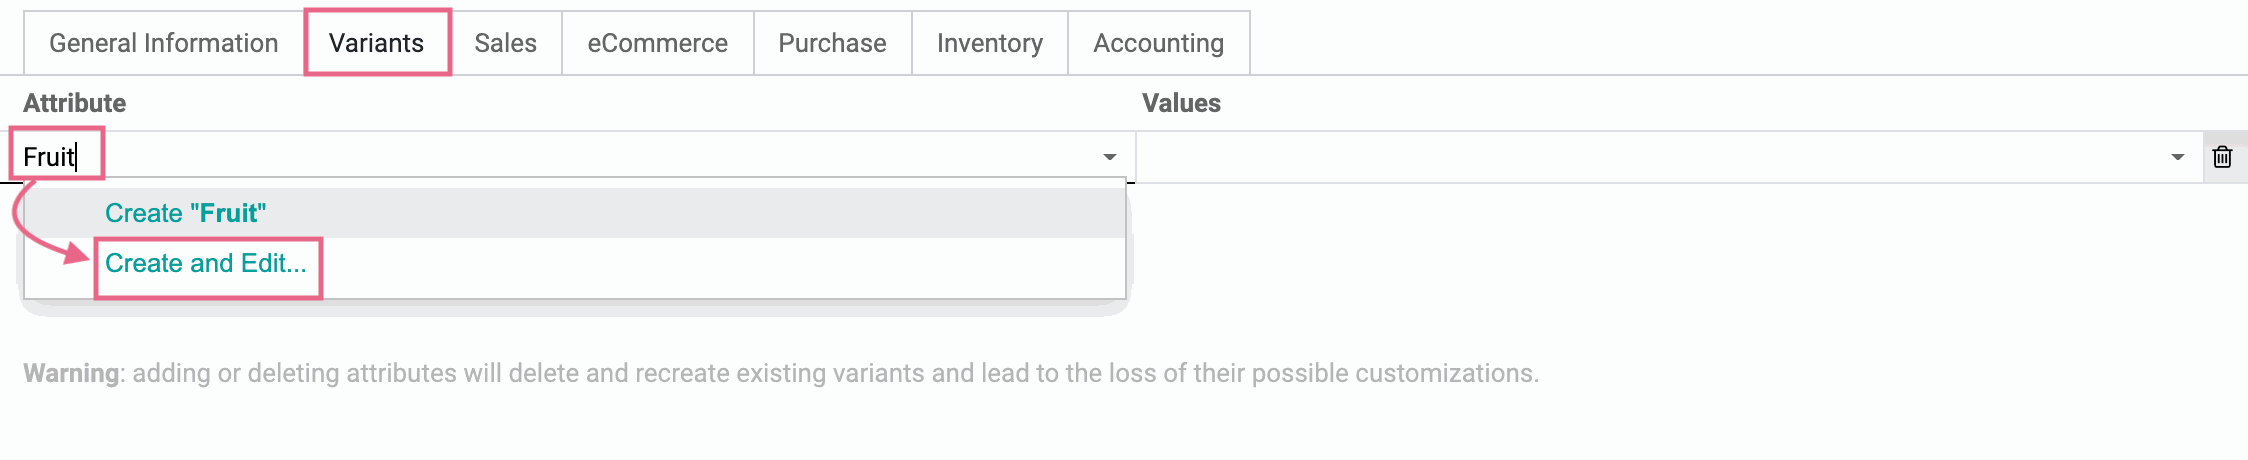
In our example, we're adding the "Fruit" attribute to Fruit Pie. Within that attribute, each fruit type will be represented an an option.
You can create Attributes and Variants in Configuration > Attributes, or you can do it directly from the product creation form. You can learn about this, in detail, in the Master Data > Product Variants documentation.
For now, we'll outline the method of adding directly from the product.
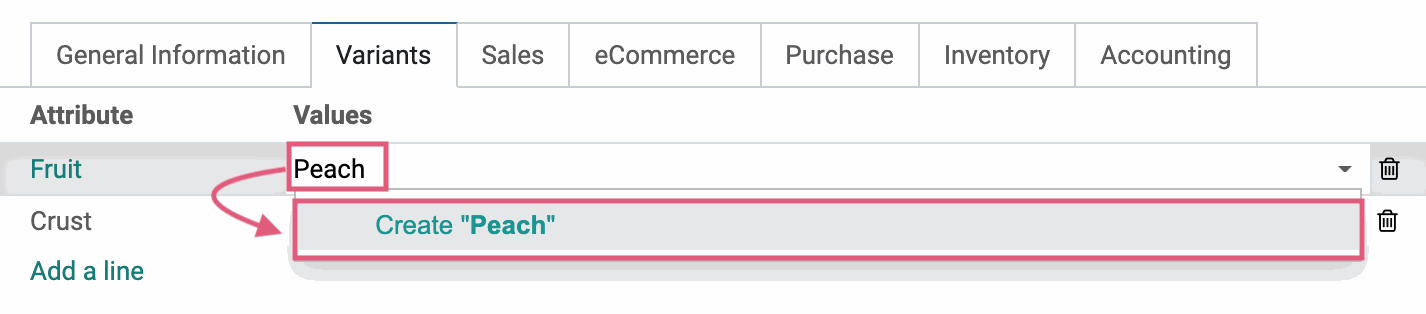
Under the Variants tab, click Add a Line then type your attribute name in the new line that appears. Our example will be "Fruit". Because this attribute doesn't exist, we'll then click Create and Edit from the drop-down menu.
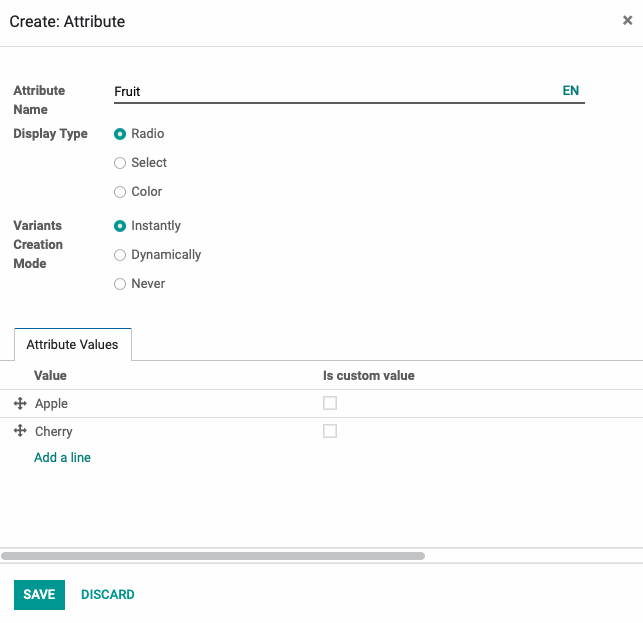
On the modal window, select your preferred Display Type and leave the Variants Creation Mode at Instantly. This will allow us to add attribute values on-the-fly from our product page. Click Save.
After saving, you'll be back on your product creation form. You can start adding variants to your attribute simply by typing them in and clicking enter, or clicking Create from the drop-down menu. Enter as many as you need.
Configure Variants
If some of the values will increase or decrease the product price, you can click the Configure Variants button to make those adjustments. You will be able to assign a price to each attribute value under the variant so that it automatically calculates the price difference on the sales order line.
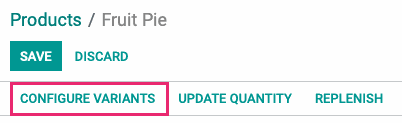
Once on the Configure Variants page, click the variant that you would like to create the custom pricing for, then click EDIT.
You will be presented with the option to adjust the cost based on that variant. You can also create a list of other Attribute Values that will be excluded if this Attribute Value is selected. This can be useful to indicate an incompatibility between choices.
Take a look at the following example product: Pumpkin Pie
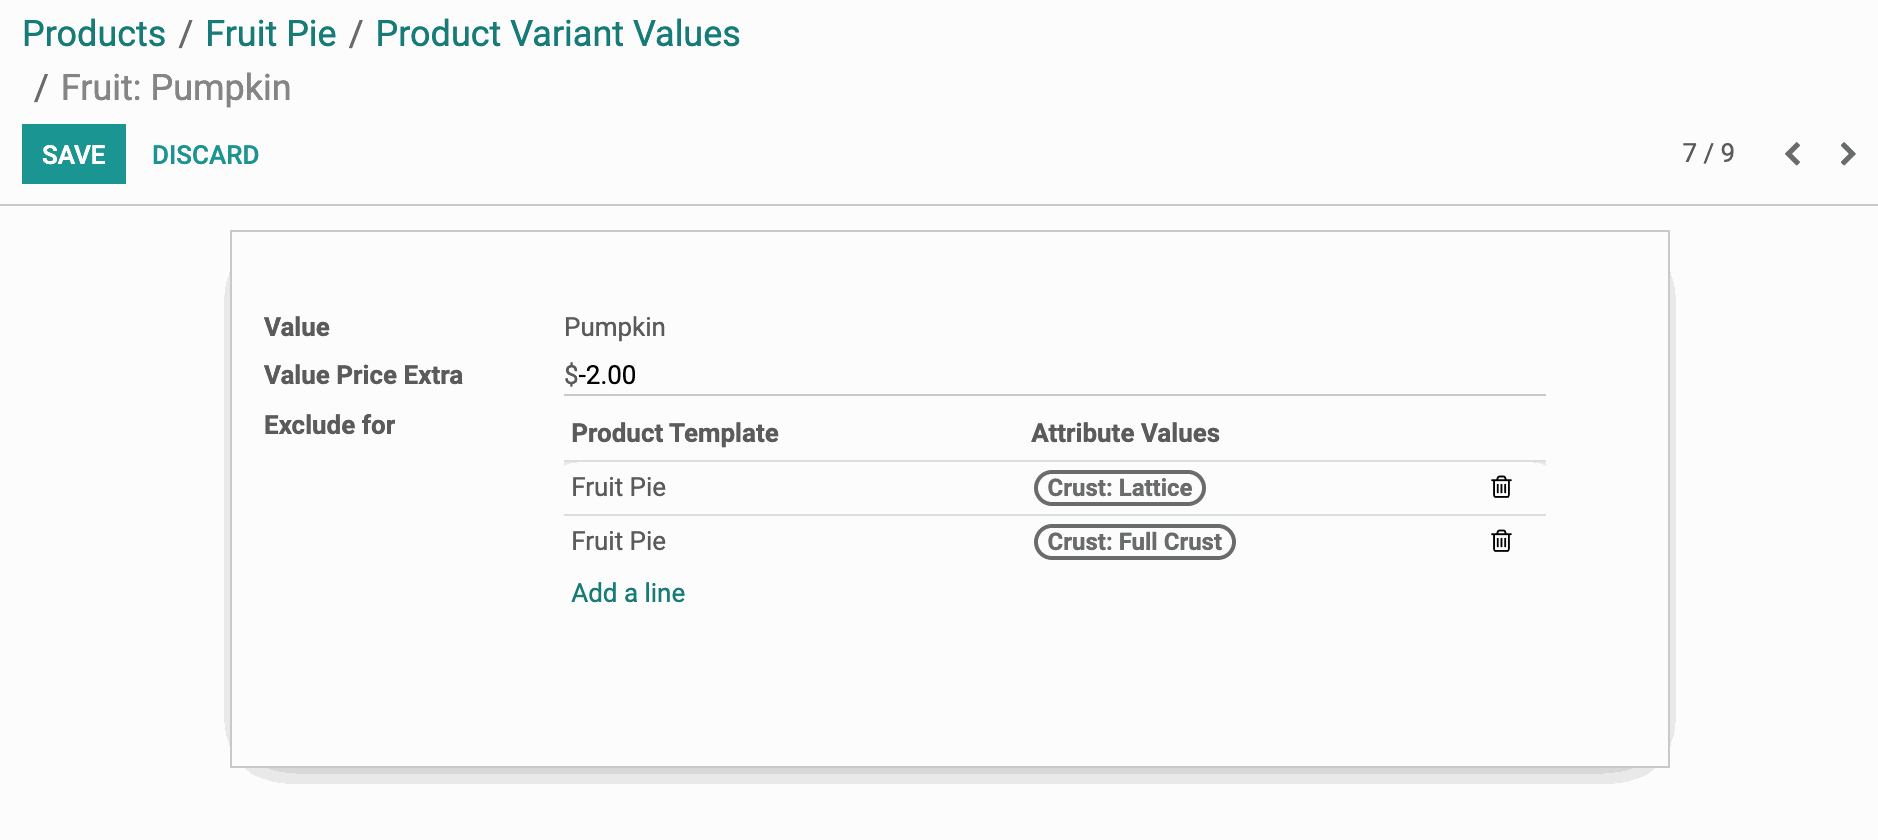
Value: Pumpkin is the variant we've chosen to modify values on.
Value Price Extra: In this case, pumpkins are less expensive for us to manufacture so we're decreasing the cost by $2.00 (-2.00).
Exclude for: Pumpkin pie doesn't need a top crust, so we're excluding those options here.
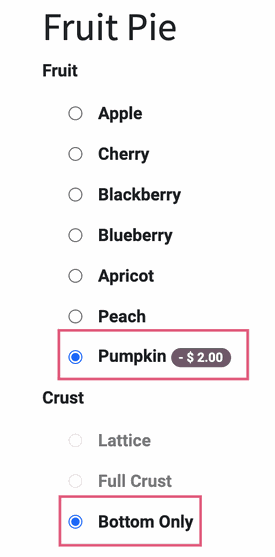
Now, when you select Pumpkin as the fruit, Lattice crust and Full Crust are faded indicating they are not options. You can only chose Bottom Only crust.
If you've modifed any of your variant configurations, be sure to click Save. Use the breadcrumbs to navigate back to your product record.

From the product template, click Edit again to enable form fields.
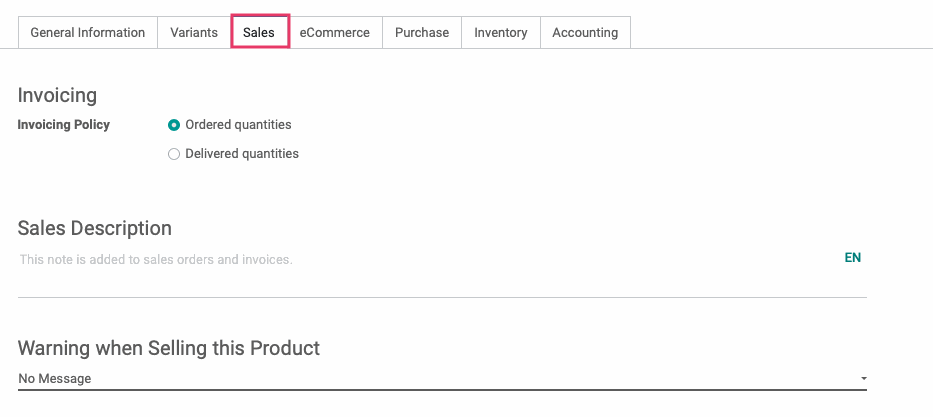
Sales
Under the Sales tab in the Invoicing section, select an Invoicing Policy.
Ordered Quantities: Products can be invoiced when a Sale Order is confirmed.
Delivered Quantities: Products can be invoiced when the product is delivered.
Sales Description: Enter a description for the product. This will display on Sales Orders and Invoices.
Warning when Selling this Product: Select the type of message to display when a product is added to an invoice or RFQ.
Warning: This option will display a pop-up with the text you enter on the following line.
Blocking Message: This option will throw an exception, using the text you enter on the following line, and it will also block the flow of adding the product.
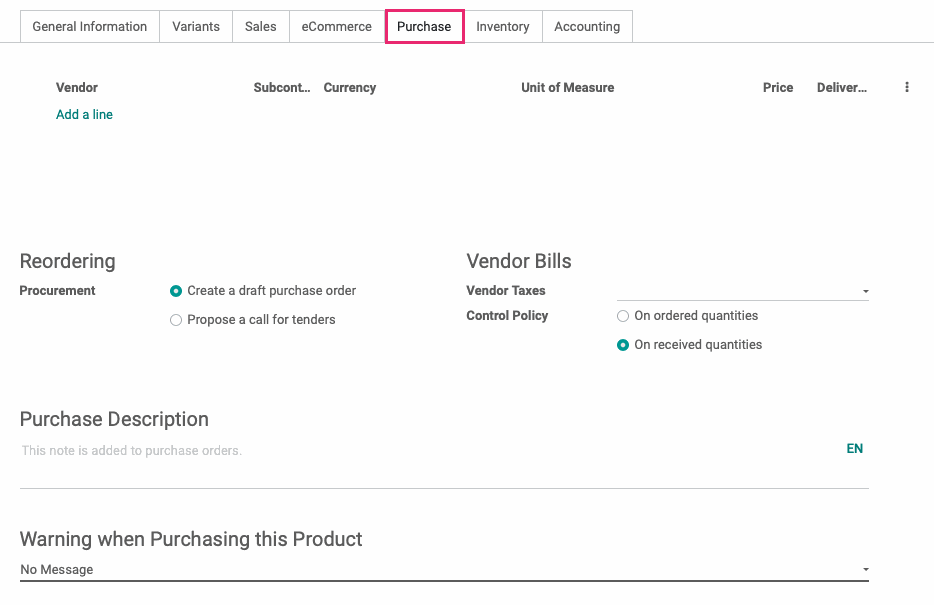
Purchasing
Under the Purchase tab, click ADD A LINE. Add each vendor from which you may purchase this product, along with the agreed-upon prices and quantities.

You can list multiple vendors under a single product so that if one is out of stock, a secondary Request for Quotation can be made to keep the sales flow moving. You can also specify that a particular product variant is only available from a certain vendor.
In the following example, we used the ellipses menu to the far-right to display all vendor details. This shows clearly that the vendors we've listed specialize in different variants of the same product.
Reordering > Procurement: Select the method of reordering when this product reaches the minimum quantity on hand.
Create a draft purchase order: Based on your product configuration, the system will create a draft purchase order.
Propose a call for tenders: If the Purchase_requisition_stock module is installed and this option is selected, the system will create a draft call for tender.
Vendor Bills
Vendor Taxes: Enter applicable taxes for this product.
Control Policy: Select the method by which control bills are based.
On ordered quantities: Bills can be invoiced based on ordered quantities.
On received quantities: Bills are invoiced based on received quantities.
Purchase Description: Information here will display on Purchase Orders.
Warning When Purchasing this Product
Warning: This option will display a pop-up with the text you enter on the following line.
Blocking Message: This option will throw an exception, using the text you enter on the following line, and it will also block the flow of adding the product.
Inventory
Under the inventory tab:
Operations > Routes: Select the manner in which this product will be procured. You can select as many routes as apply.
Traceability: If this product needs to be tracked, select the method of tracking. See Lots/Serial Numbers for more information.
Counterpart Locations
Production Location: This stock location will be used as the source location for stock moves generated by manufacturing orders instead of the default location.
Inventory Location: This stock location will be used as the source location for stock moves generated when you make an inventory adjustment.
Packaging: Create packaging data to aid in the tracking of inventory and how it is processed in your warehouse before being transferred to stock.
Logistics
Weight: Enter the weight of the product, if needed.
Volume: Enter the volume of the product, if applicable.
Manufacturing Lead Time: Enter the lead time needed to manufacture the product.
Customer Lead Time: Enter the lead time between order confirmation and delivery.
HS Code: Enter the HS code for international shipping and customs, if applicable.
Description for Delivery Orders: Information here will display on delivery orders.
Description for Receipts: Information here will display on receipts.
Description for Internal Transfers: Information here will be added to internal transfer orders.
Accounting
Under the accounting tab:
These fields are for reporting purposes and can all be left blank to use the associated default accounts.
Receivables
Income Account: If left empty, it will use the default setting from the product category. You can override it here, as needed.
Payables
Expense Account: If left empty, the product wil use the expense account set on the product. You can override it here, as needed. If anglo-saxon accounting with automated valuation is configured, the product will use the expense account set on the product category.
Price Difference Account: Select the account to use to record price differences between a purchase order and its related vendor bill when validating the vendor bill.

When all fields and tabs have been completed, click SAVE.