Accounting: Customers + Vendors: Customers: Customer Invoices
Purpose
This document will cover the general workflow of creating an Invoice, registering a payment for it, and dividing a lump sum payment across several invoices within the Odoo 13 Accounting application.
Process
To get started, navigate to the Accounting app.
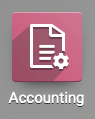
From the Accounting Overview, you will see a kanban view of your journals. Customer Invoices will have smart buttons for Invoices that need to be validated/sent to the customer, unpaid invoices, and quick totals of each. You will also have the option to create a new invoice manually or by import.


Important!
Odoo has an automated checks-and-balances approach with most applications. For this reason, you should always aim to create invoices and payments from the original sales order, or invoice, respectively. Doing so will keep the records linked so Odoo can apply payments, credits, stock moves, etc. all within the same realm of that original transaction.
Creating manual invoices and payments for existing records can cause more work in the future because those original orders would then need to be updated manually.
Creating Invoices
Creating a Manual Invoice
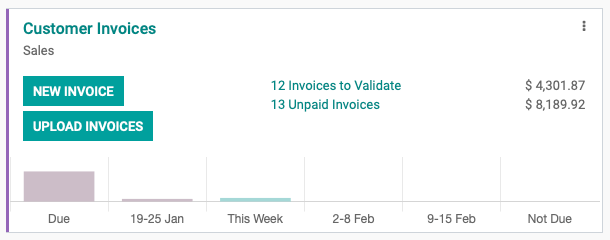
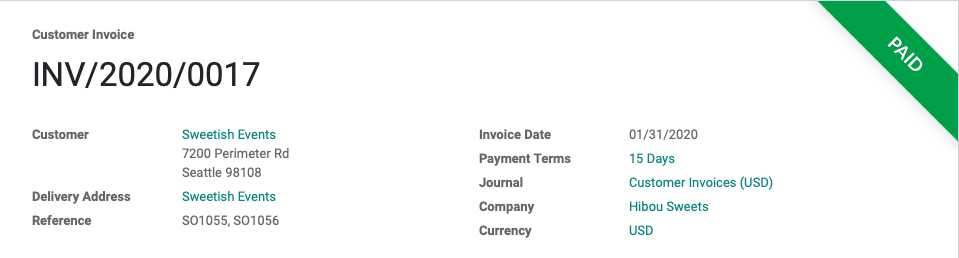
To create an Invoice manually, click Customers > Invoices, then click Create. On the New Invoice form, fill out the fields as follows.
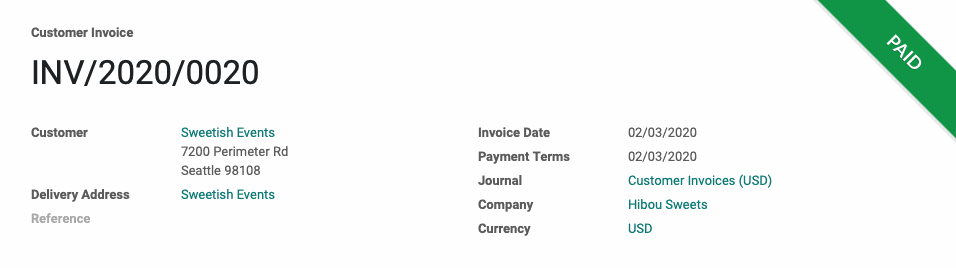
Customer: Select the customer to be invoiced.
Delivery Address: This field should auto-populate with the customer's delivery location.
Reference: Enter the reference number(s) for the sales order(s) being invoiced against.
Date: Enter the date the invoice was created.
Payment Terms: Here you'll determine the due date for the invoice. You can either select predefined terms (e.g. 15 days, 30 days) from the first drop-down or select a specific date from the next drop-down.
Journal: The Journal where entries for this invoice are recorded.
Company: This will prepopulate with your company name.
Currency: This will prepopulate with the currency set for this customer but you may override it.
Under the Invoice Lines tab, click Add a Line to enter the items or services that you'll be invoicing, as well as the quantity and price for each.

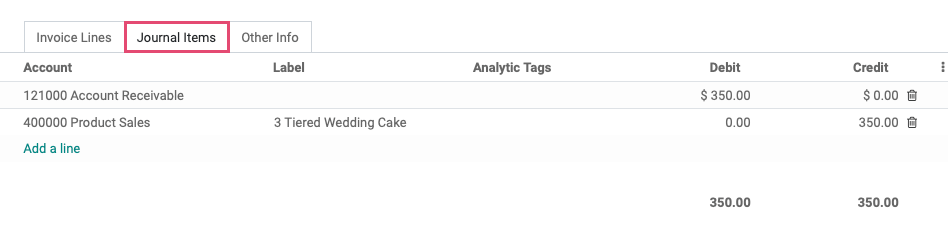
Under the journal items tab, the fields will be pre-populated with the accounts on the product template; however, you can modify or Add a Line to if necessary.
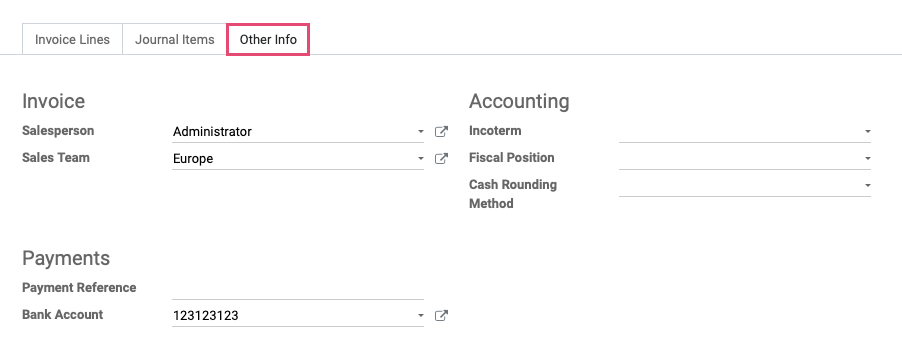
Under the Other Info tab:
Invoice
Salesperson: Select the employee responsible for this invoice.
Sales Team: Select the Sales Team this invoice is assigned to.
Accounting
Incoterm: Pre-defined commercial terms used in international transactions.
Fiscal Position: Define the taxes that should be applied for this customer, IE state-specific tax rules.
Cash Rounding Method: Defines the smallest coinage of the currency that can be used to pay by cash.
Payments
Payment Reference: This field will auto-populate a reference to be used when registering payments through the invoice record, with the Register payment function.
Bank Account: The bank account number to which the invoice will be paid.
When you're done, click Save to keep the invoice in Draft status. Click Post to confirm that it's ready for payment.
You can click SEND & PRINT so your customer will have access to the invoice, and the ability to make payments. Move to the next section to register a payment on an invoice!
Creating an Invoice from a Sales Order
Navigate to the Sales app.
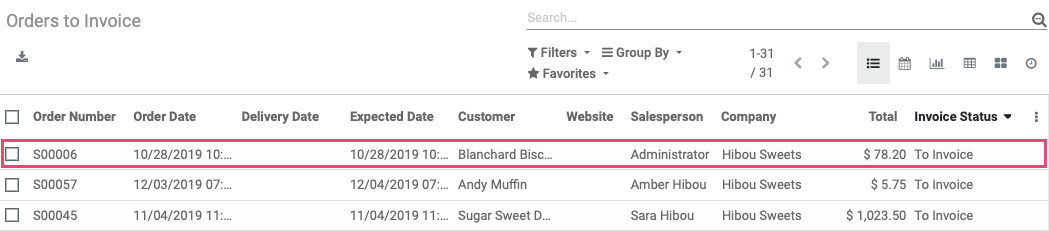
Under the To Invoice > ORDERS TO INVOICE. This will take you to an overview of sales orders that need to be validated and billed in order to receive payment.
Click the order you wish to invoice.
Good to Know!
Deliver First?
If any product in the Invoice has "Delivered Quantities" selected for its Invoicing Policy, it will be displayed in blue. This means you should deliver the order before invoicing. Additionally, the Create Invoice button will not be a solid color if a product with this Invoicing Policy has not yet been delivered.
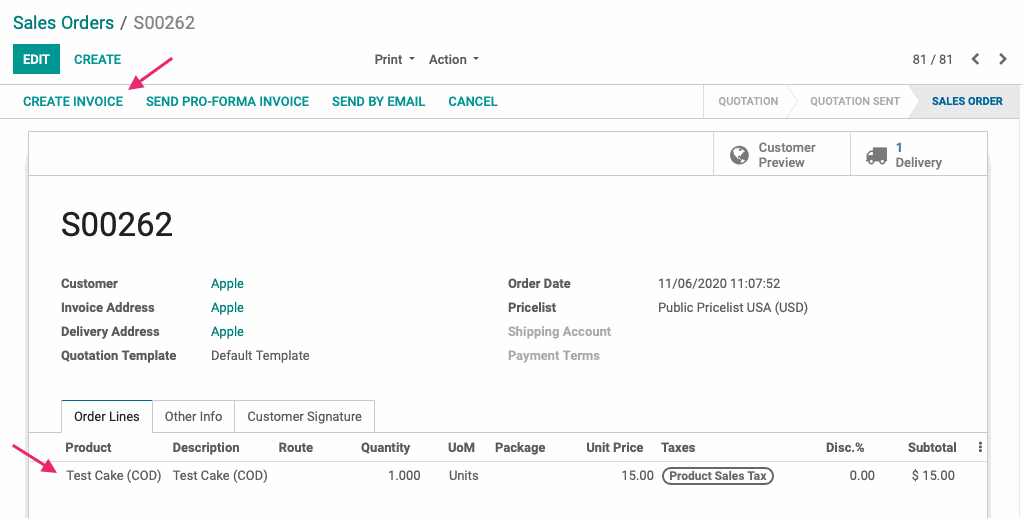
When you're ready, click Create Invoice.
Good to Know!
Pro-Forma Invoice
If enabled, you can Send Pro-Forma Invoice instead. A Pro-forma invoice is an estimate provided in advance of the delivery of goods. They are commonly used as quotations and are not a demand for payment.
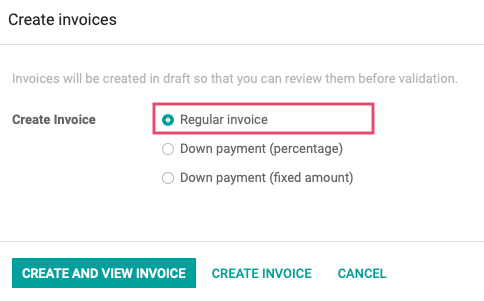
Regular Invoice: This will include all un-invoiced lines on the order.
Down Payment (percentage): Invoices a percentage of the total on order, leaving the remainder to be invoiced at a later date.
Down Payment (fixed amount): Invoices the down payment line alone to take an initial payment.
For the purpose of this tutorial, select Regular invoice, then click Create and View Invoices to immediately review the invoice.
Good to Know!
The Create Invoice button on this modal window will create the invoice and redirect you back to the list view. This is a time-saving feature for batch work!
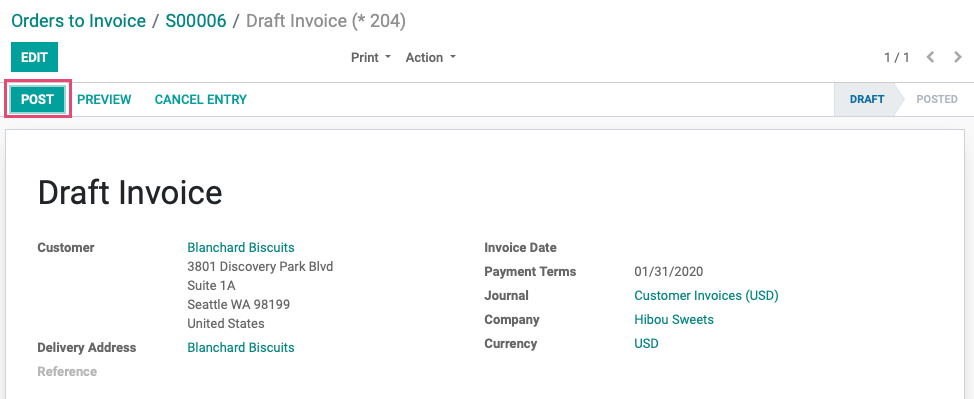
Click Post to confirm the invoice and make it eligible for payments.
You can click Send & Print so your customer will have access to the invoice, and the ability to make payments. Move to the next section to register a payment on an invoice!
Combining Invoices
Often customers will ask for one combined invoice, which is very easily accomplished. First, navigate to the Sales app.
Click To Invoice > Orders to invoice, then Group By > Customer.
Click the icon to expand the customer's invoices.
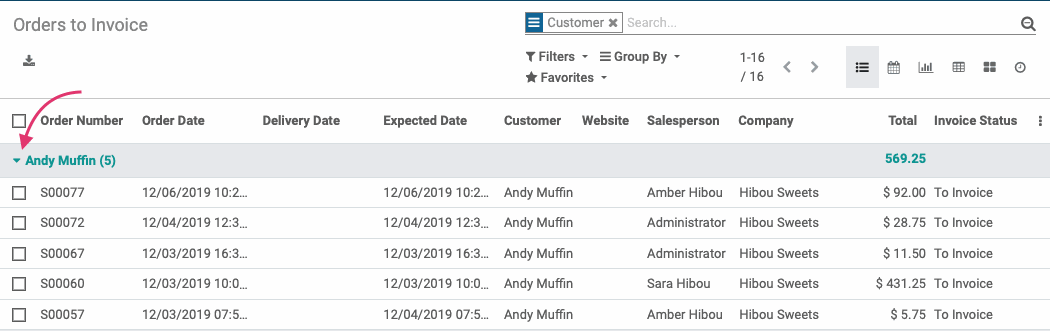
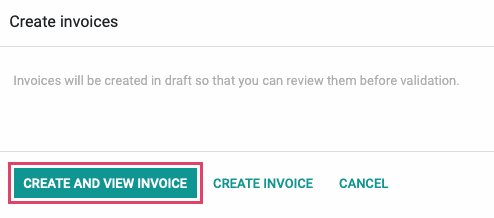
Tick all invoices to combine, then click Action > Create Invoices.
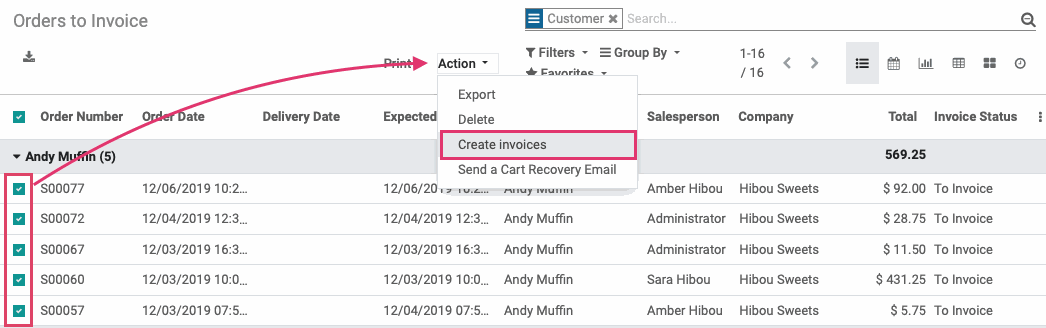
Click Create and View Invoice on the modal window that displays.
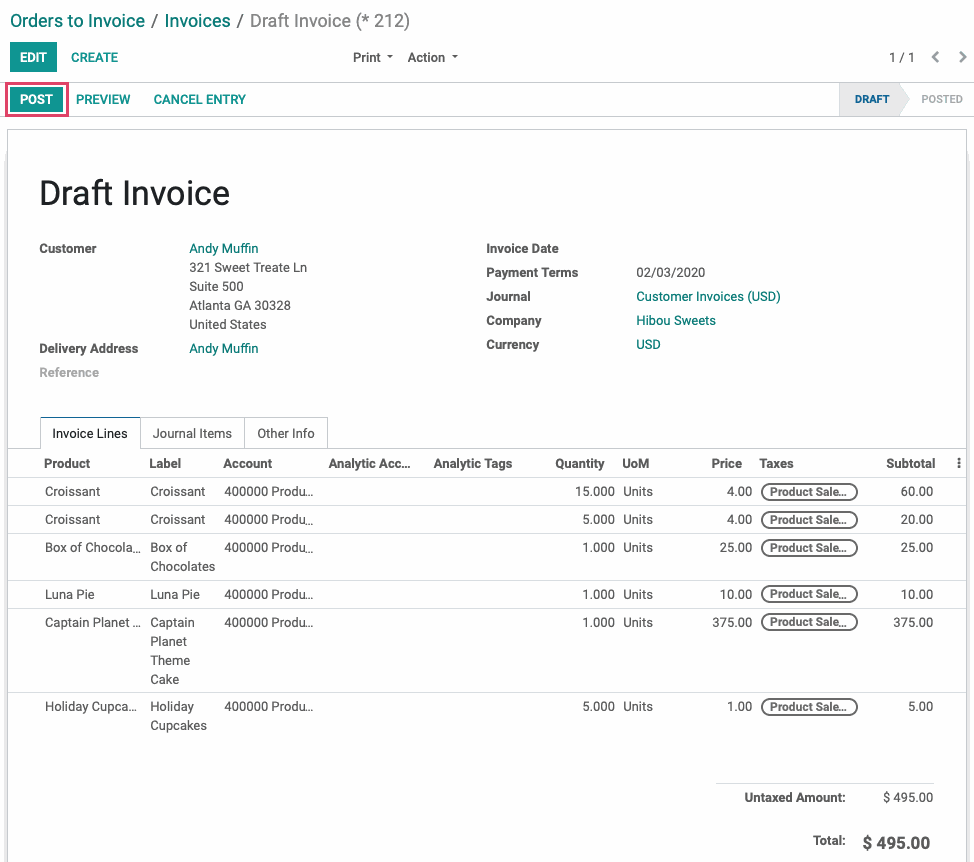
This brings you to the new invoice you just created. From within this draft invoice, click Post to confirm it. At that point, you'll be able to register payments against the amount due.
Registering Payments
In order to reconcile a debt, payment must be made by the customer. To get started, navigate to the Accounting app.
Post Payment to an Invoice
In this first example, we'll be posting a payment directly from the invoice. This is the recommended method.
Click customers > invoices. Use the Filters > Posted option to narrow your results quickly, then select an invoice to post the payment to.
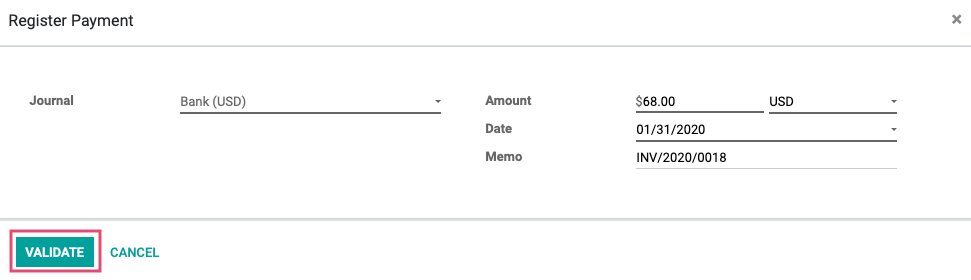
Click Register Payment at the top of the screen. This means you have the payment "in hand".

This brings up another modal window with the following fields:
Journal: Select the journal to record this payment.
Amount & Currency: This will auto-populate with the total due on the invoice.
Date: This will auto-populate with today's date.
Memo: This will auto-populate with the invoice reference number.
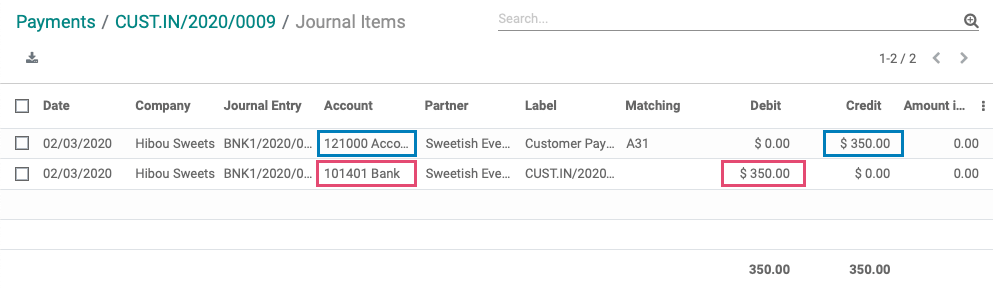
Click VALIDATE to record the payment.


From here we can see that $350 was moved from Accounts Receivable to our Bank journal. Now, when our monthly bank statement is imported, we will be able to Reconcile (match) this payment with the bank statement line that represents the credit - the deposit of funds into our capital account.
Create a Manual Payment
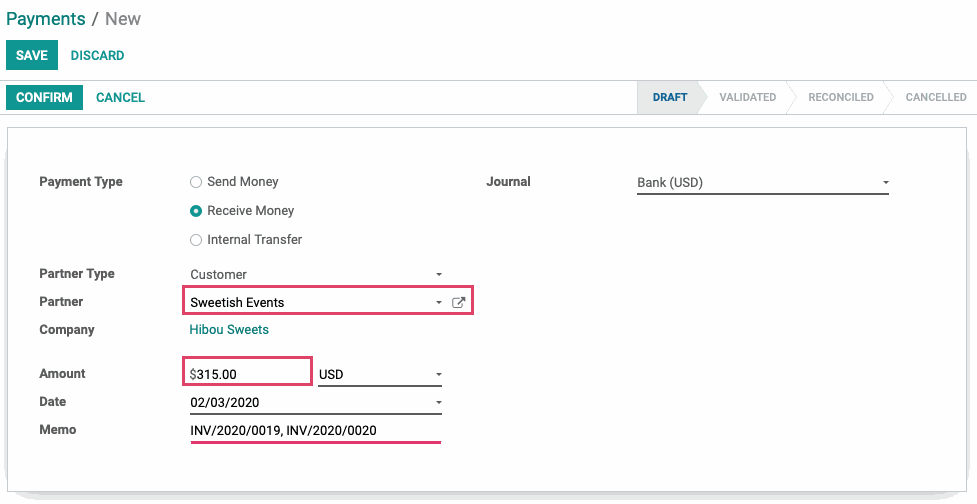
In this example, we'll create a lump-sum payment manually, then apply it to two different invoices.
Click Customers > Payments, then click Create.
Sweetish Events is writing us a check for $315 because we've sent them a summary of unpaid invoices, and that's the total due. In the following form, we're sure to specify the customer is Sweetish Events, the amount is $315, and we've added a note to the memo line indicating which invoices will be settled with this payment.
Remember, adding a reference to the memo line doesn't automatically link payments to invoices. We'll show you how to do that, next!
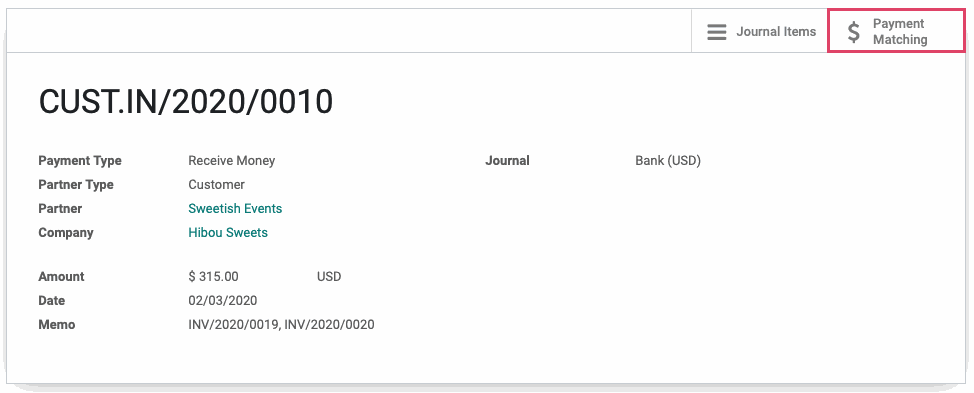
To validate the payment, click Confirm. The page will reload and you'll now see two smart buttons. Click the $ Payment Matching smart button. This option is available because this payment hasn't been applied to any invoices.
This will bring you to a reconciliation window for the client. From the list, you'll select the payment to apply, as well as the invoices to apply it to. As you select them, they'll transfer from the list to the grid above.
As you add the entries, you'll see any discrepancies show in gray. In order to reconcile, there must be amounts on both sides of the T.
Good to Know!
You also have the option to add records, to balance this transaction, under the Manual Operations tab. Again, we recommend using existing records and avoiding manual creation of records when possible.
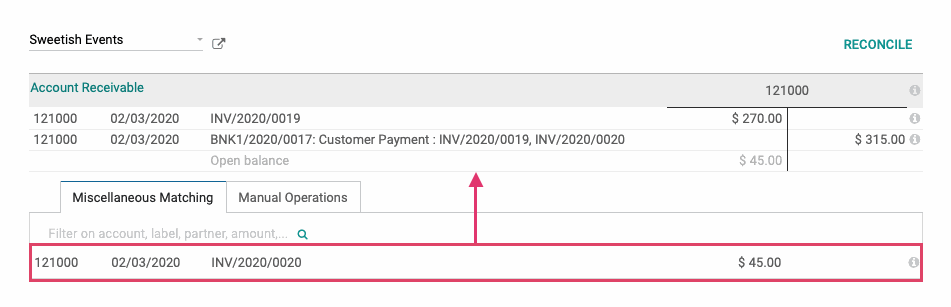
Once you've added matching amounts on each side, click Reconcile.
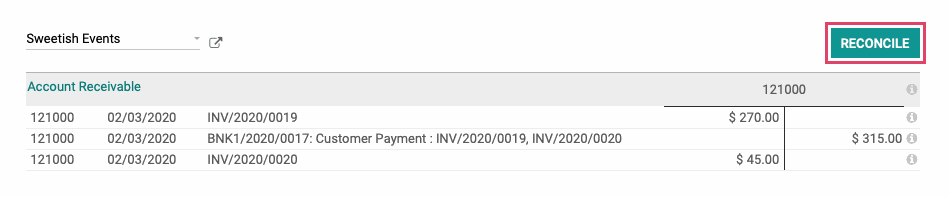
The form will clear, and that's your sign that the reconciliation is complete. Click Skip to finish.
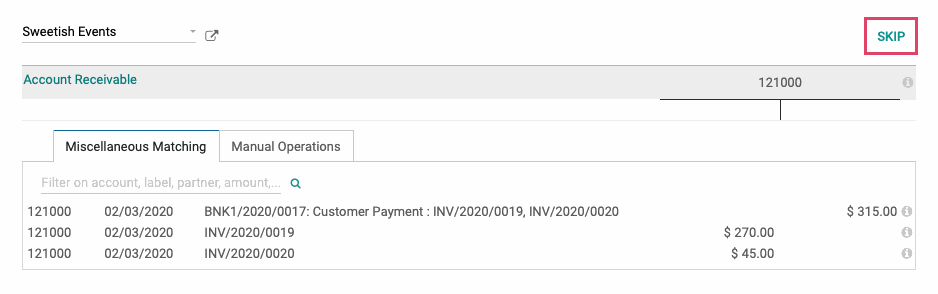
The progress bar at the top will fill in, then you can use the breadcrumbs to navigate back to the original payment.

Now you'll see an Invoices smart button. Click this button to see the invoices to which this payment was applied.
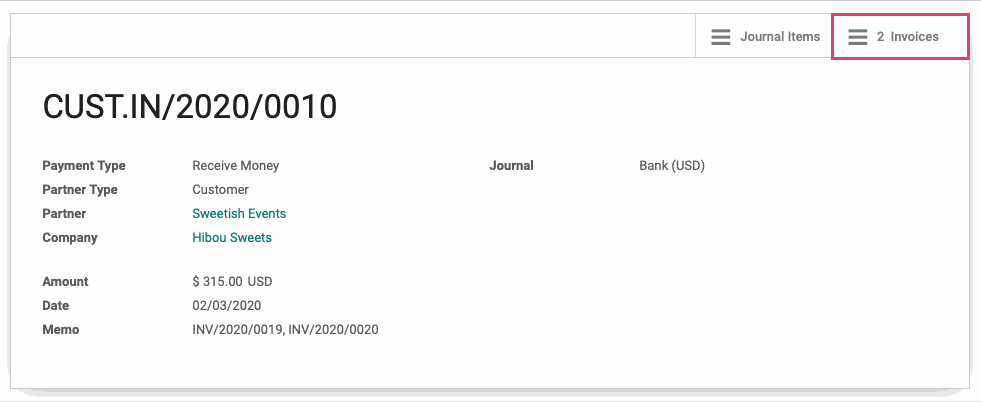
Select any of the invoices from the list for a detailed view.

You'll now see a "Paid" Label on this invoice.