Accounting: Accounting Workflows: Closing Fiscal Period to End the Year
Purpose
This document covers the process of closing a fiscal period in Odoo 14 to end the year and generate all financial statements that are used to review a company's business operations as well as performance. While you can set your fiscal year to whichever opening and closing dates you would like for your company, the most commonly used dates coincide with the calendar year, meaning it begins on January 1st and ends December 31st.
Before closing out the year and generating your statements, it is advised to complete the following first:
Verify all invoices, bills, and expenses have been validated.
Complete the reconciliation of cash and bank accounts as well as bank statements to ensure they are in line with bank balances within Odoo, and close suspense accounts to leave them with a $0 balance.
Verify balance sheet items and book entries for depreciated journal entries.
Verify that deferred revenues are correctly recorded.
Verify accrued revenues and expenses.
Process
To get started, navigate to the Accounting application.
Use the menu and go to Configuration > Settings, and scroll down to Fiscal Periods.
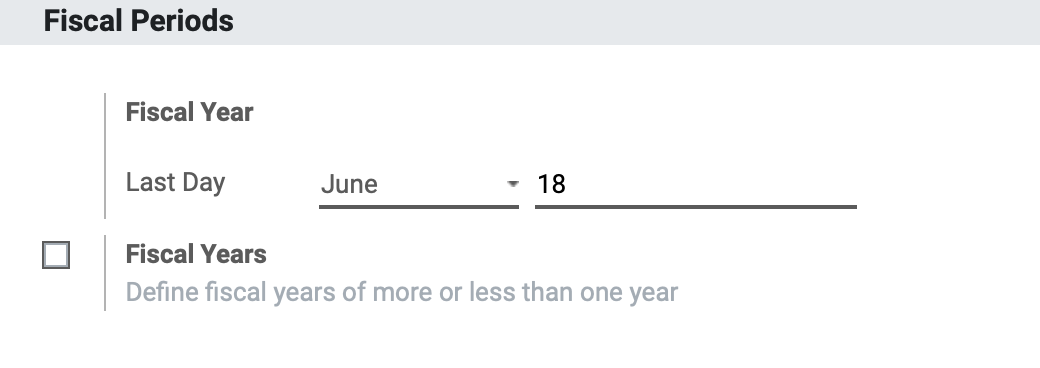
Here, we will define the end of the fiscal year. By default, it is set to December 31st but we will change the date to that of this writing for the purposes of this workflow. Save if you have made any changes.
Good to Know
Custom Fiscal Years
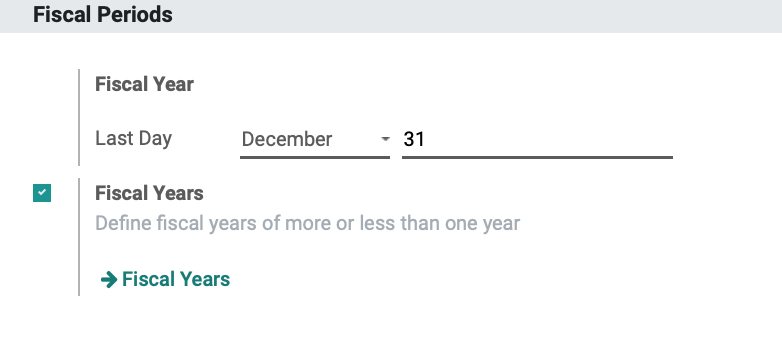
You can define a fiscal year as being shorter than one year by selecting the Fiscal Years box and configuring it to your needs.
User Permissions
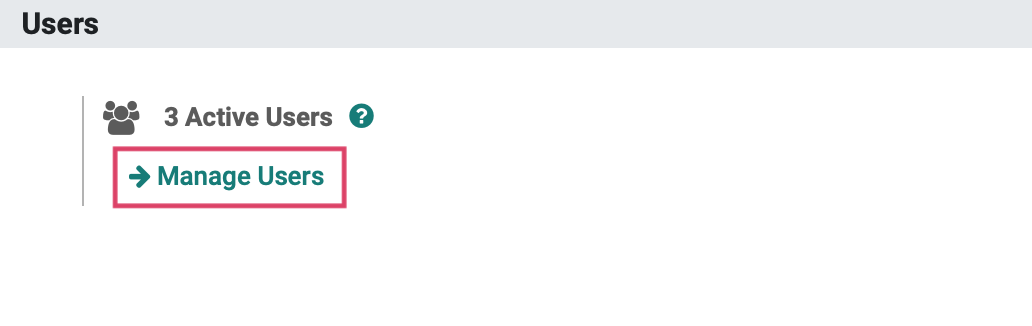
From your dashboard, navigate to the Settings Application.
![]()
Under the Users section, select Manage users and select the user to edit.

Click Edit.
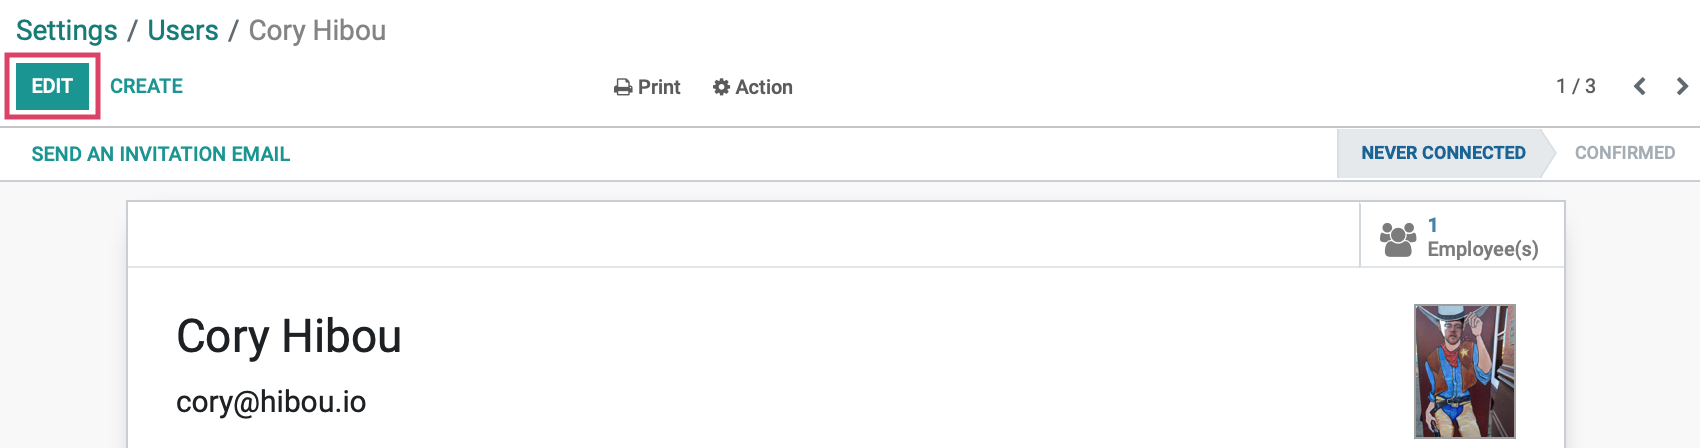
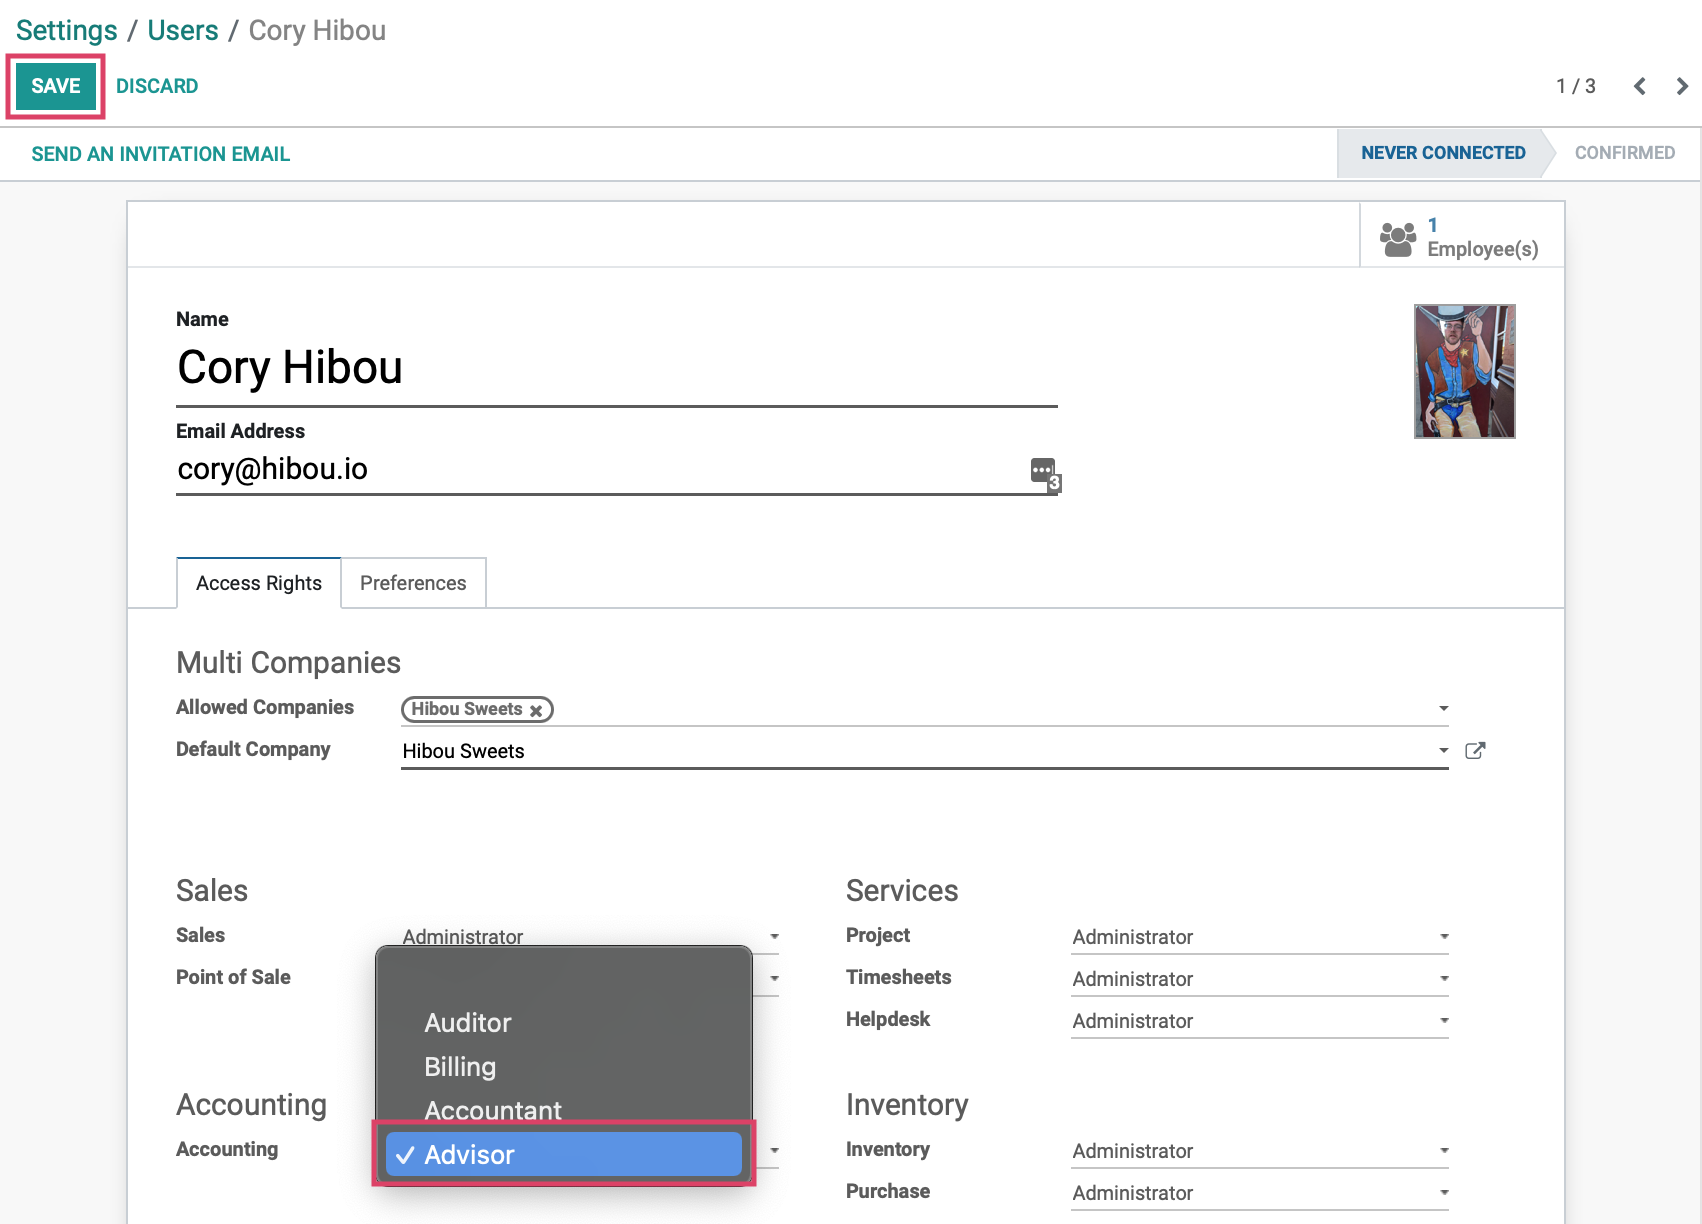
Under the Accounting field, we have the different access levels to choose from. Advisors have the highest access rights within Odoo, and are the only ones who are able to modify the Chart of Accounts, reconciliations, and tax adjustments.
Select 'Advisor', then click save when complete.
Lock Dates
Make your way back to the Accounting app.

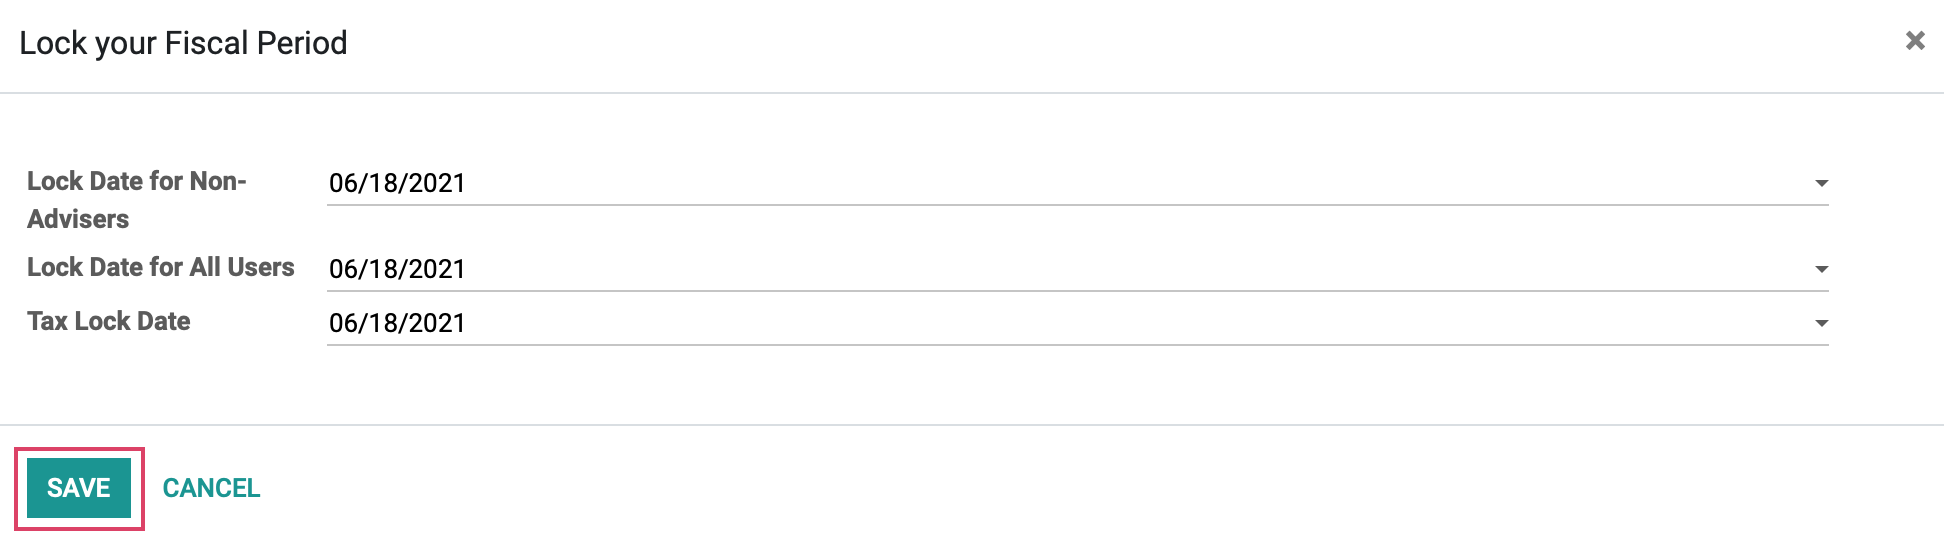
Once there, go to Accounting > Actions > Lock dates. This will open a modal with the following fields:
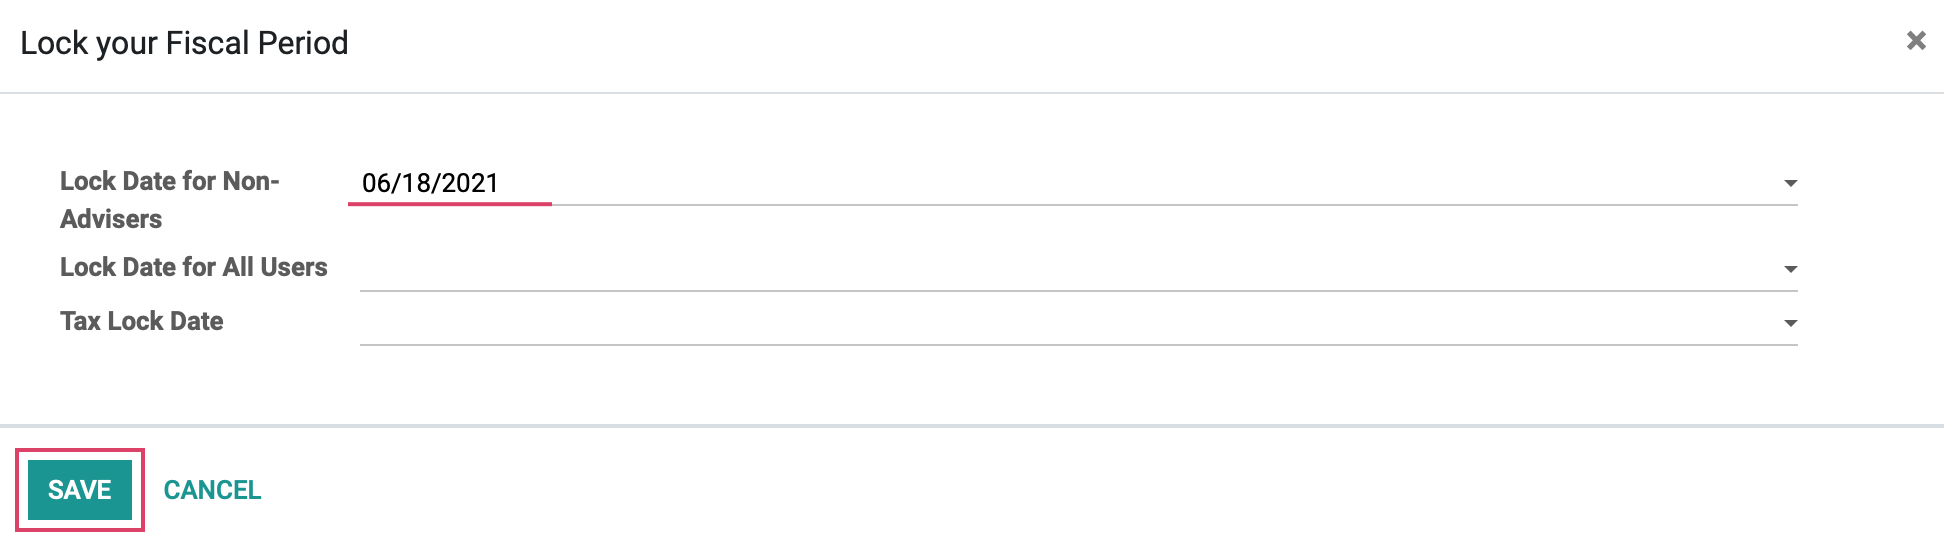
Lock Dates for Non-Advisers: Only Advisors can make edits prior to and including this date.
Lock Dates for All Users: No users, including Advisors, prior to and including this date.
Tax Lock Date: Date after which no users can edit journals related to a tax prior to and including this date.
Click SAVE when you are finished.
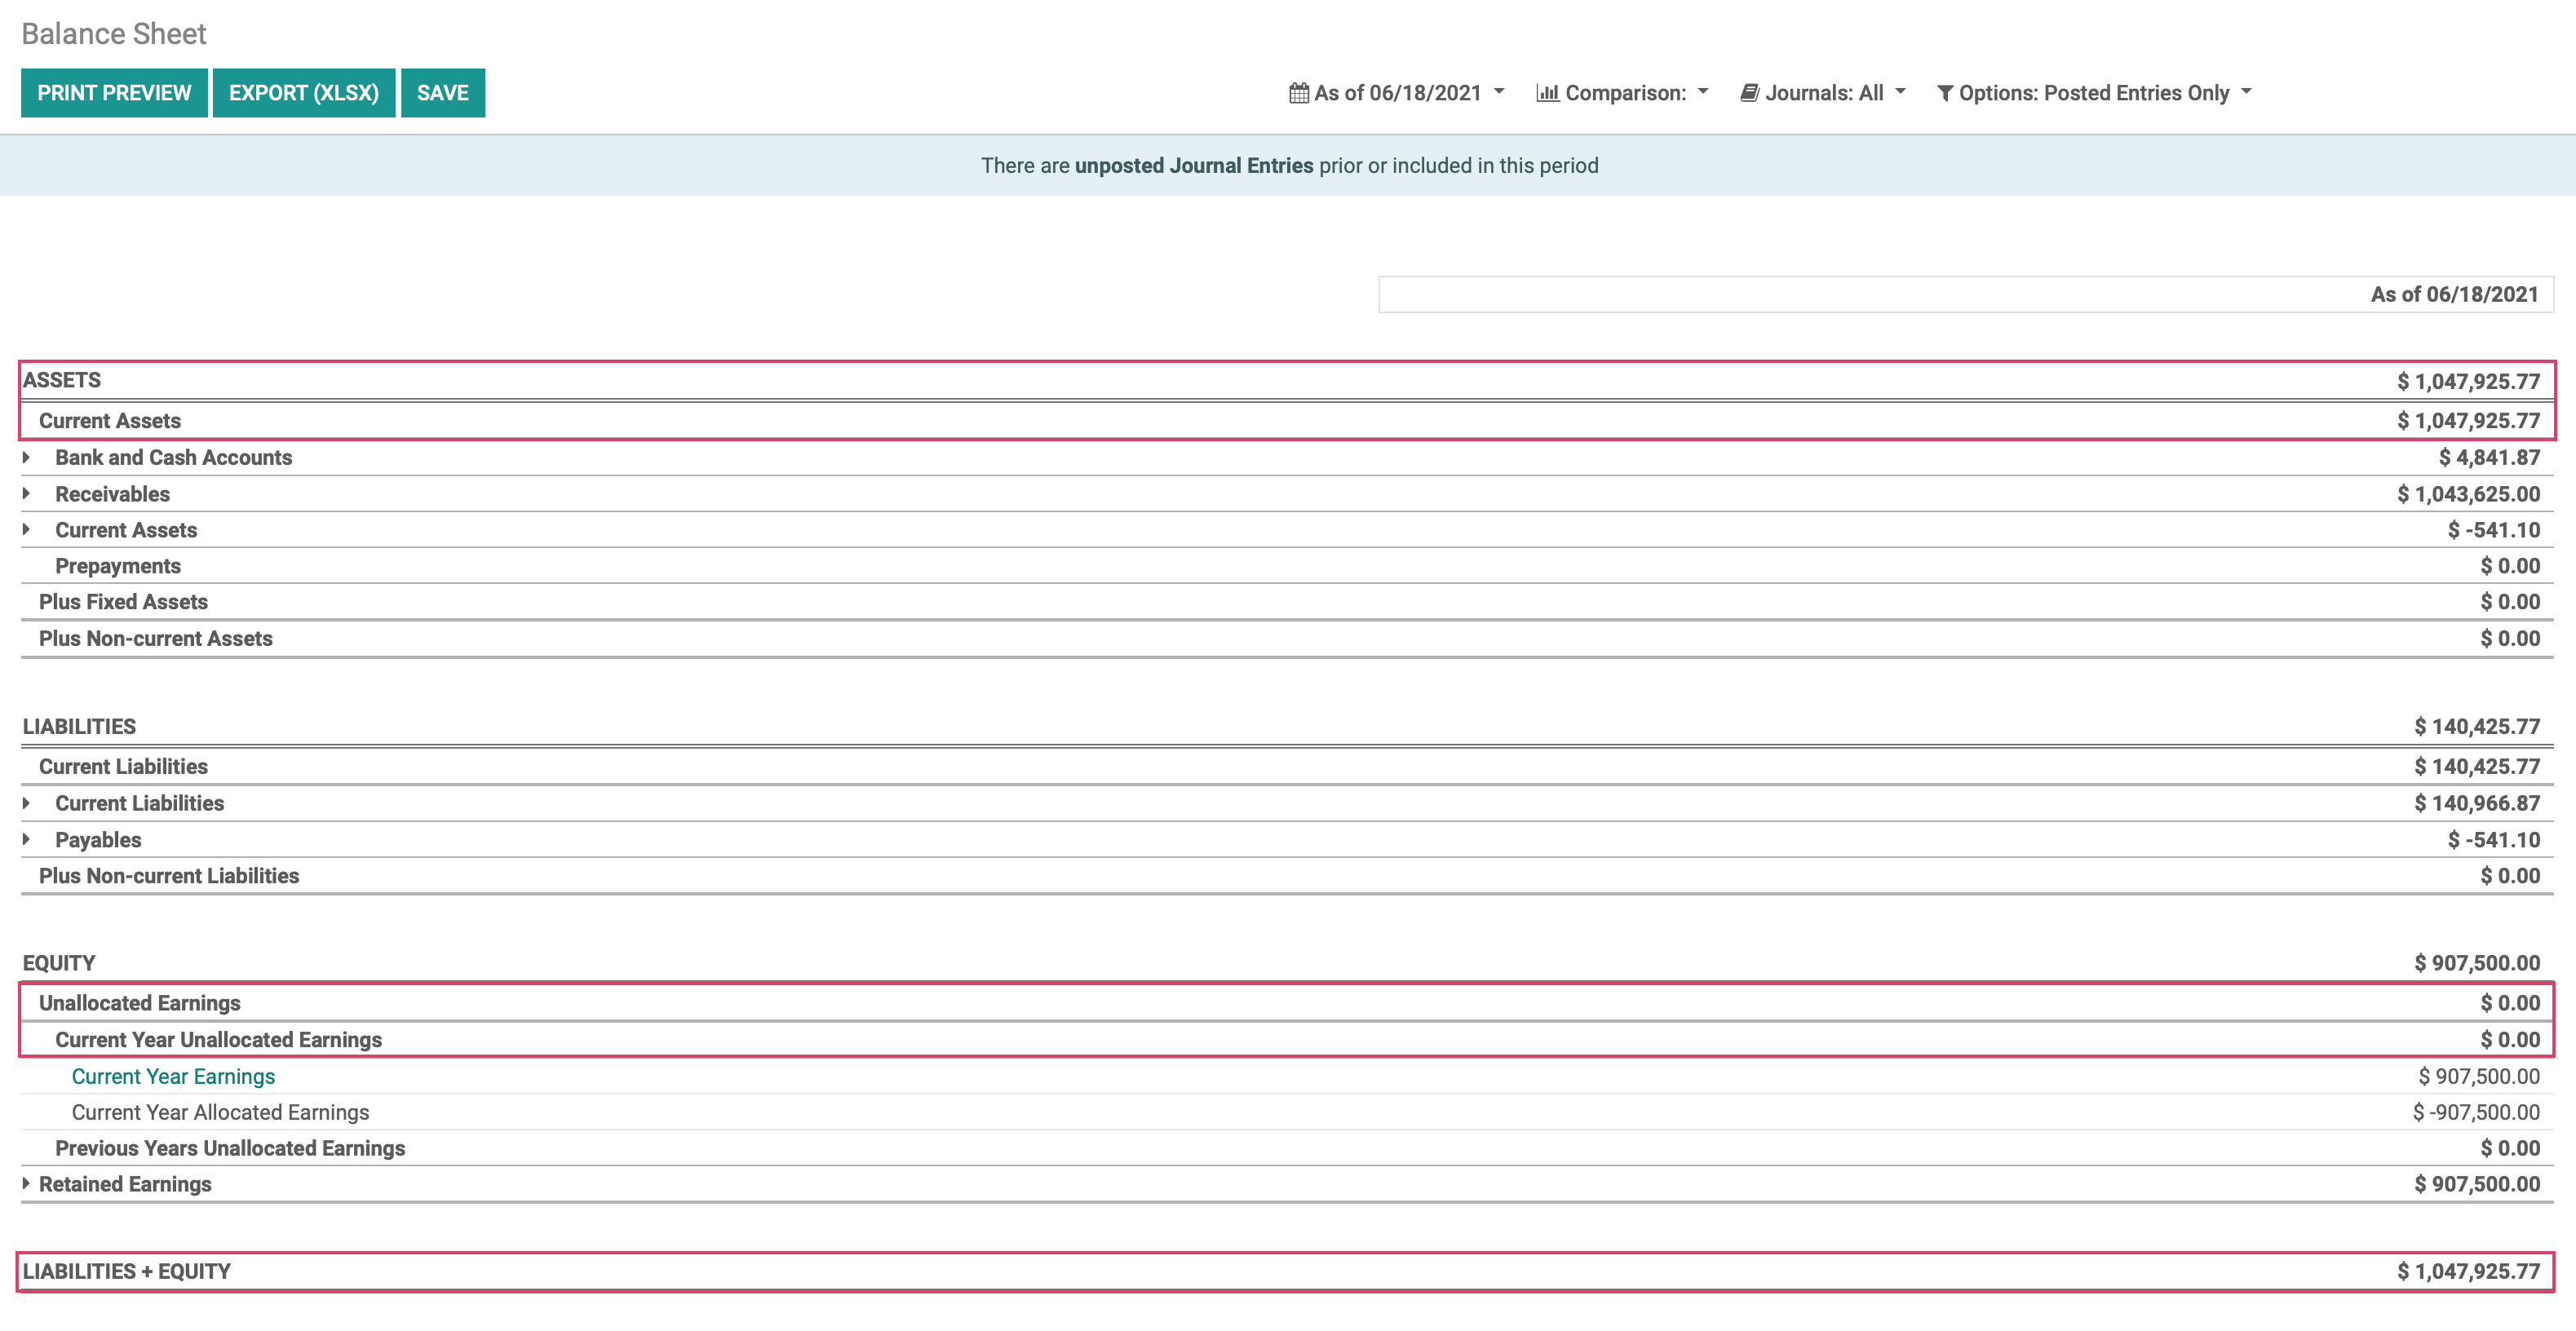
Now, go to Reporting > US GAAP > Balance Sheet. Make sure the calendar dates reflect the end of the financial year.
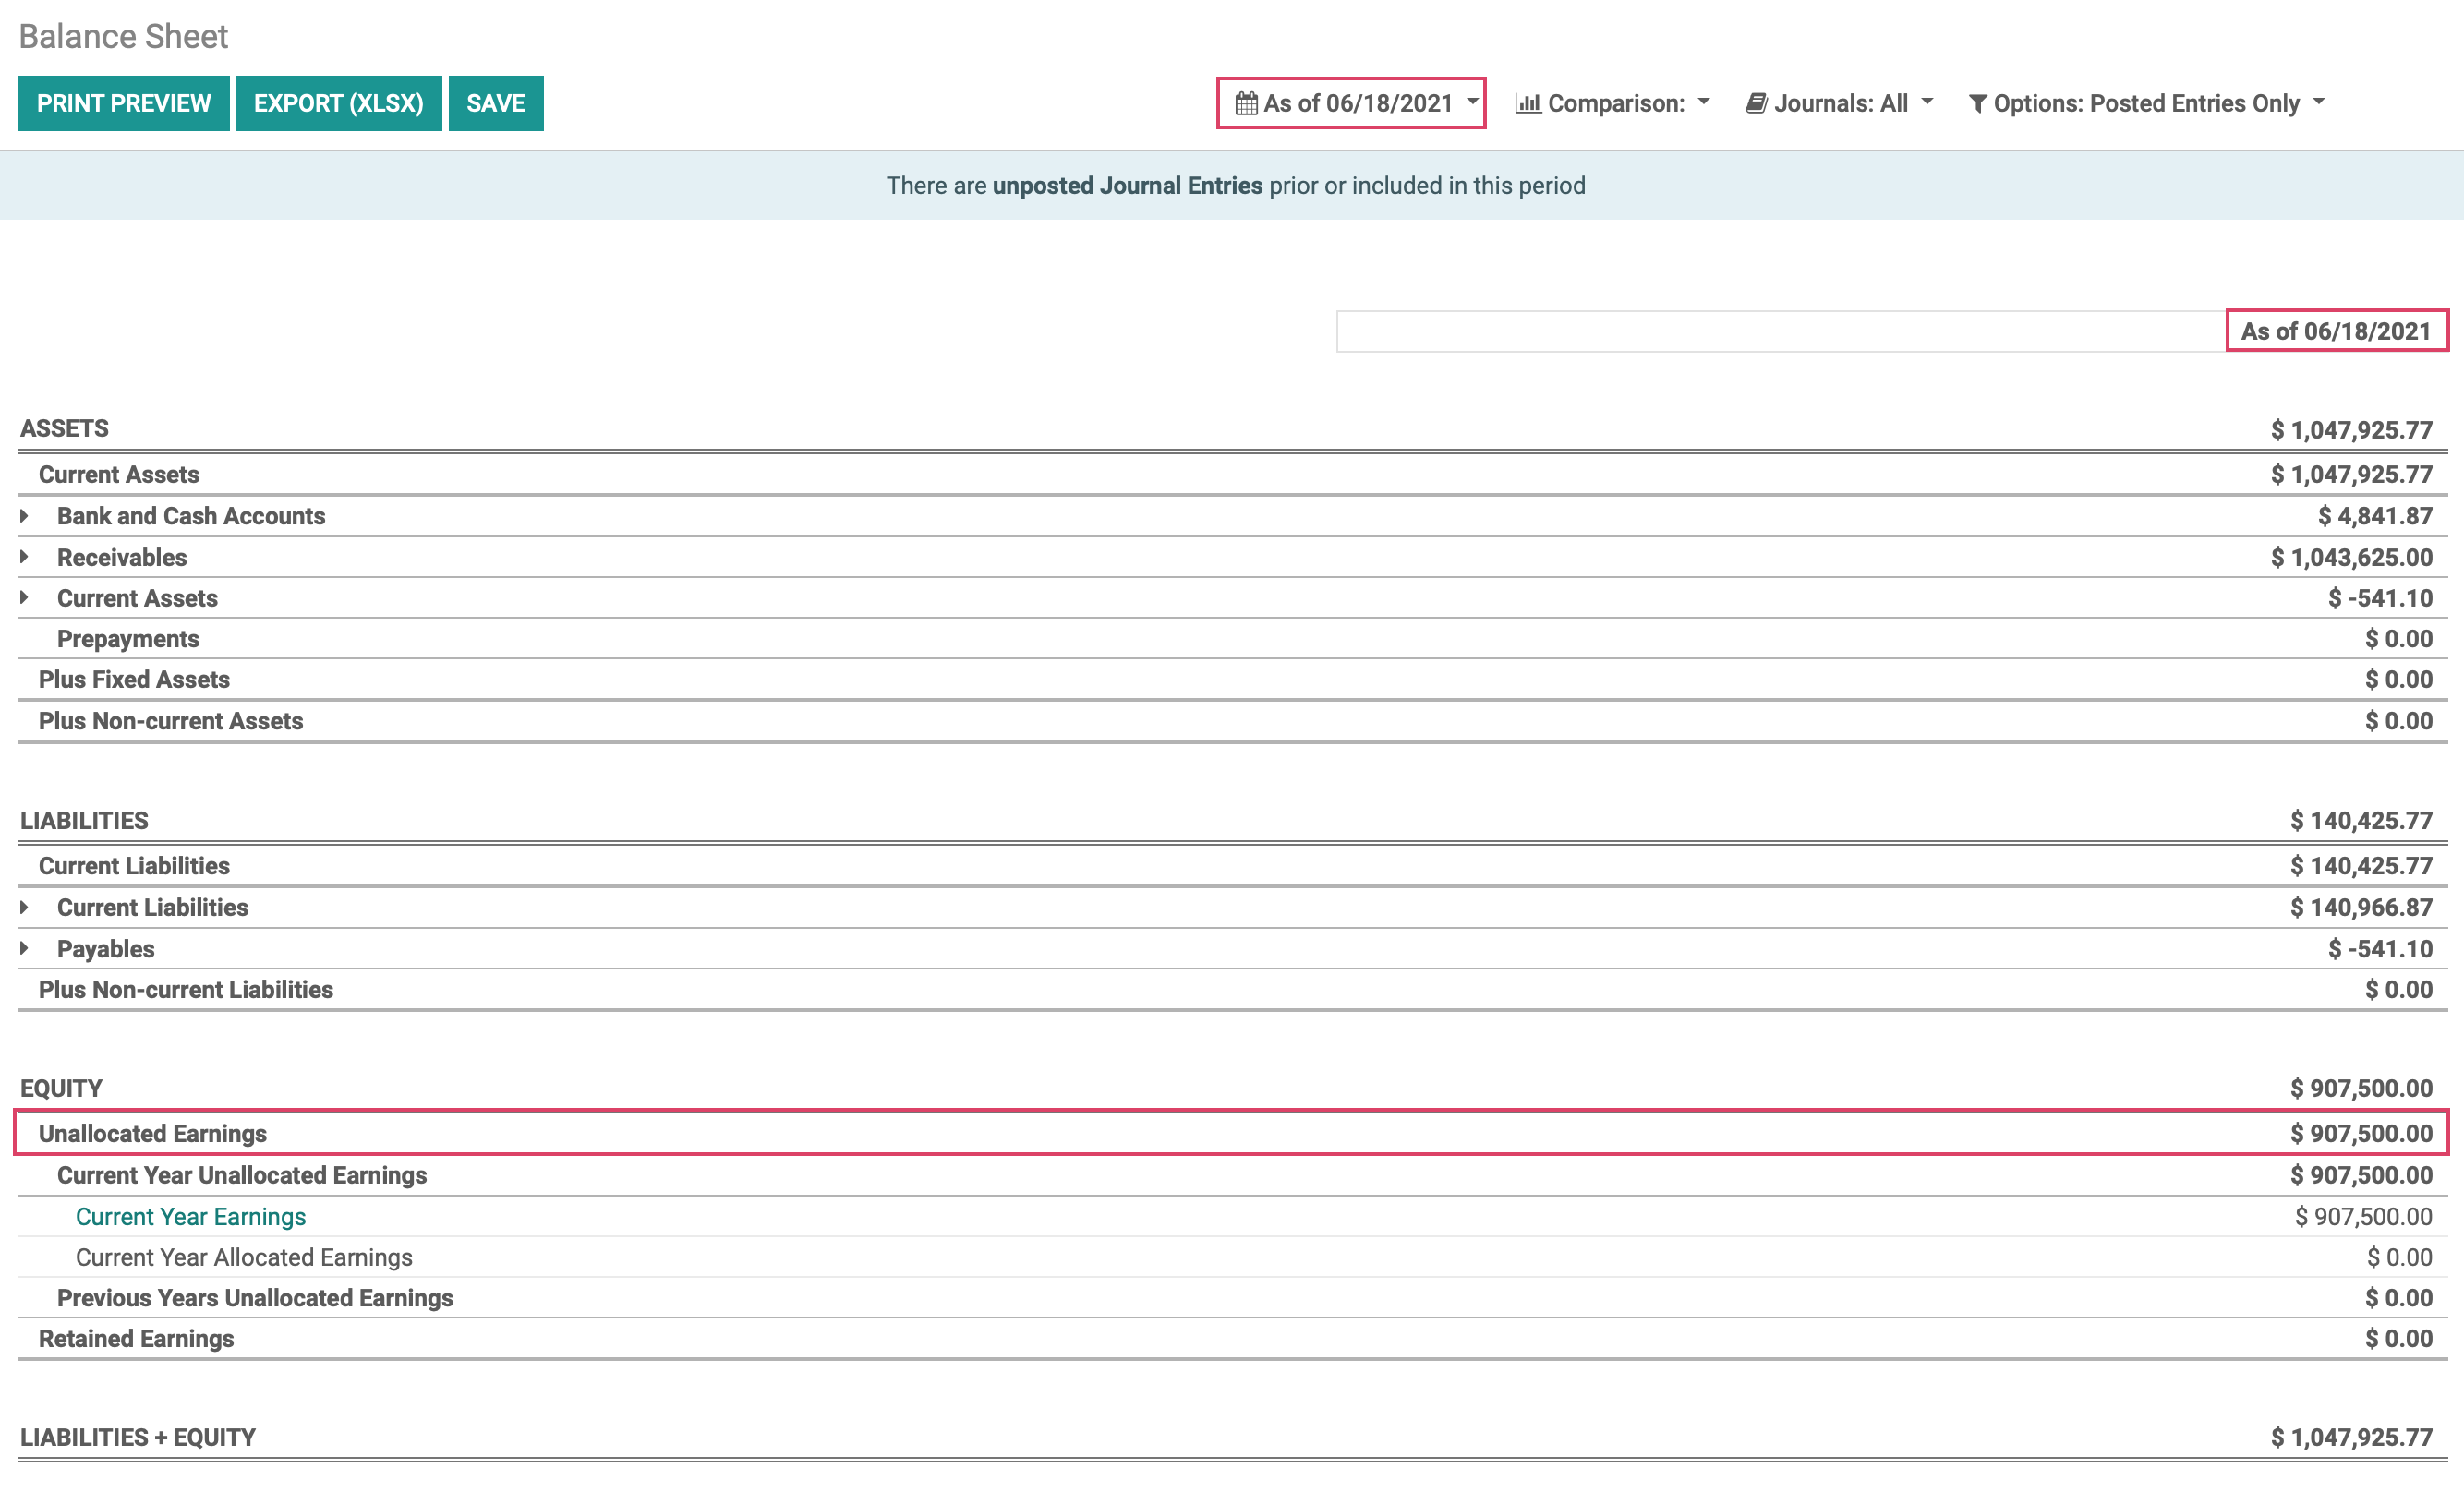
Scroll down to Unallocated Earnings. We want to allocate our current year earnings in order to have the total Current Year Unallocated Earnings report a balance of $0, so we will allocate all current year earnings to Retained Earnings.
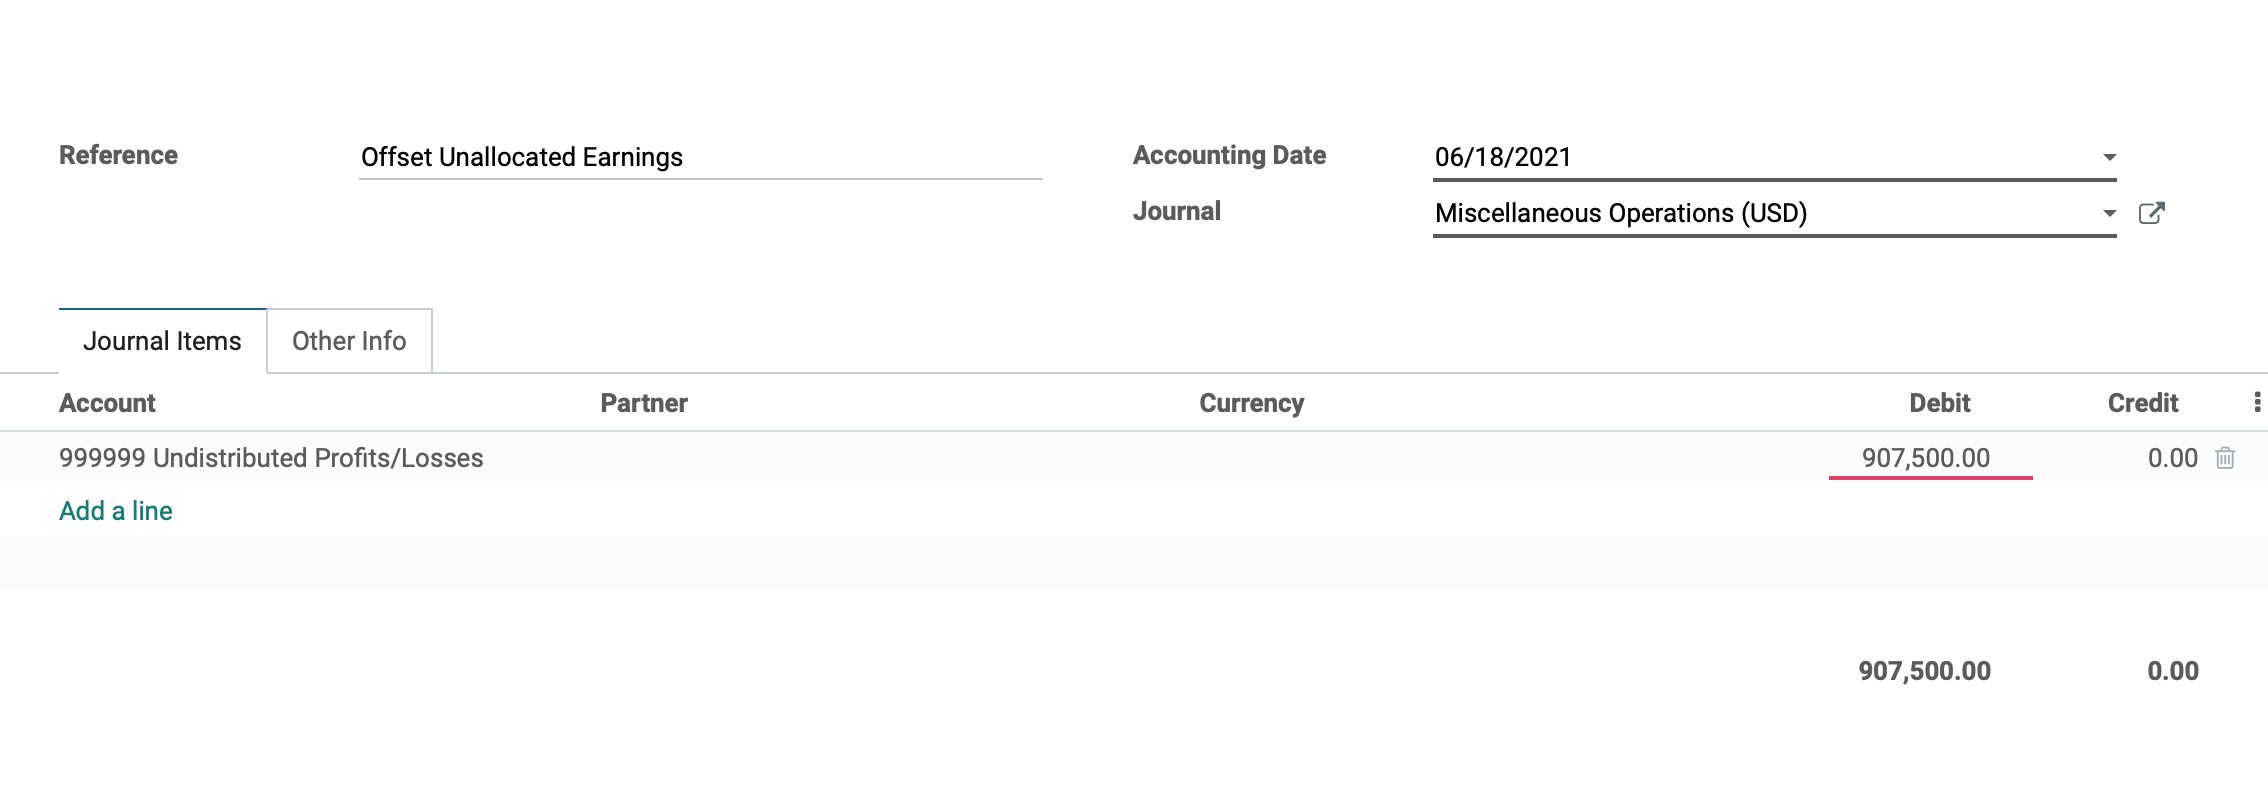
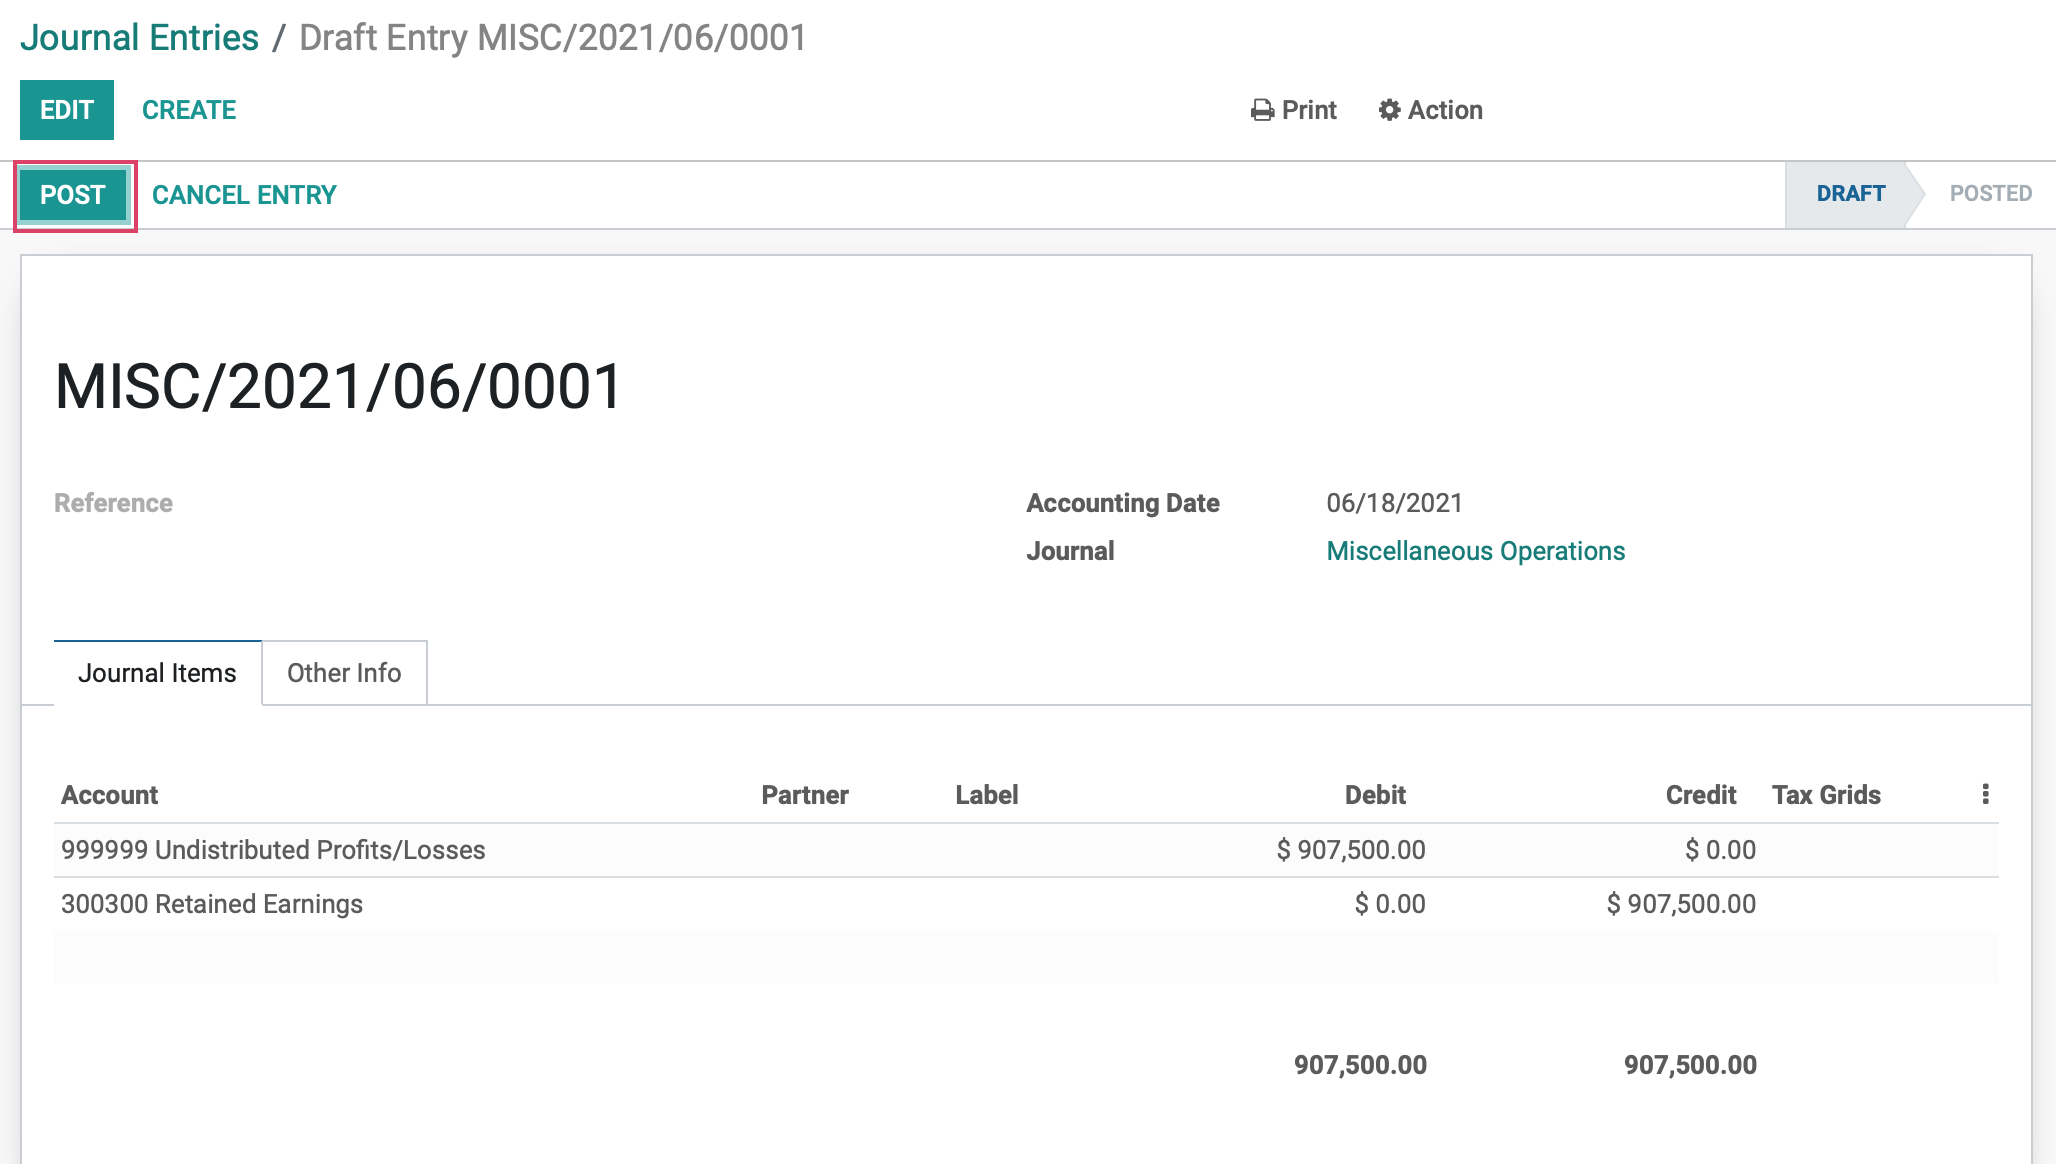
Now, go to Accounting > Miscelleanous > Journal Entries. Click CREATE.

Give the Journal Entry a Reference Name, select a date in the past, for instance, December 31st, and keep the journal set to the default Miscellaneous Operations. Under the Journal Items tab, Add a Line under Accounts, we will use Profits/Losses which is an Odoo created account used to record unallocated yearly earnings, the type must be set to current year earnings. To offset the unallocated earnings, we will Debit $907,500.
Next, we'll need to offset this to the Retained Earnings account. If you need to create that account, click Add a line, then in the Account field type the name of your account (Retained Earnings) and select Create and Edit from the drop-down.
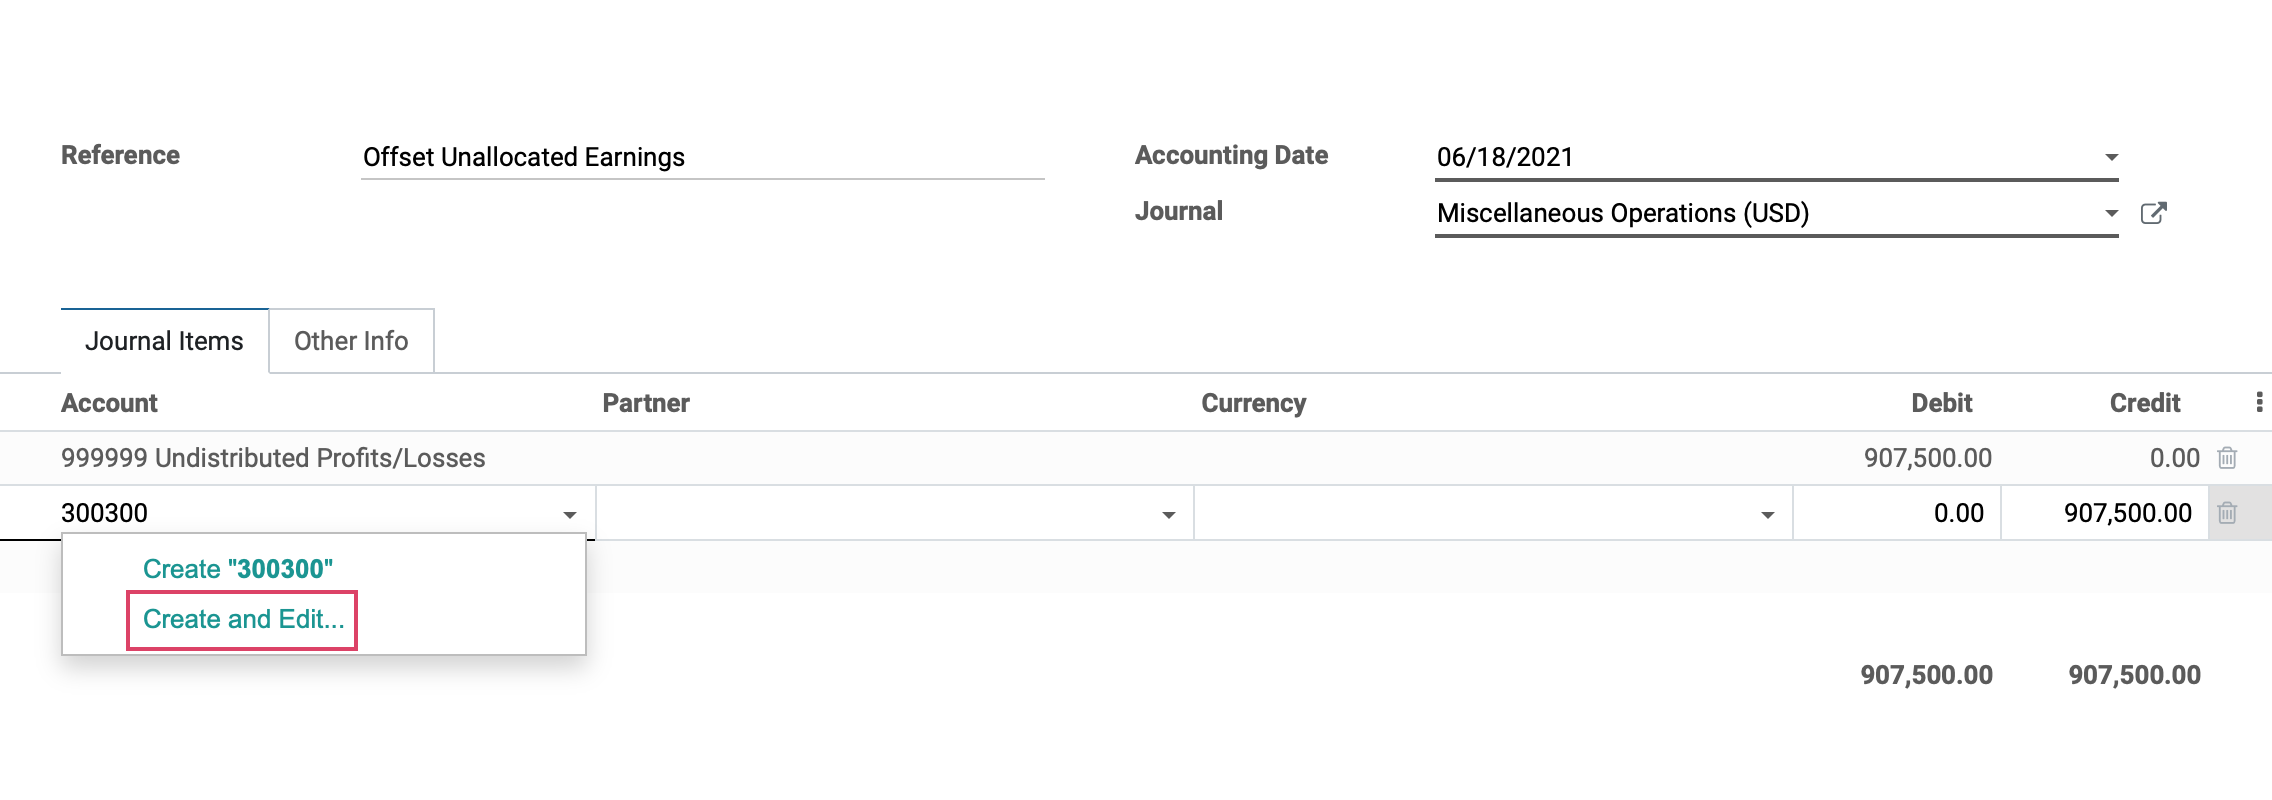
The following modal will open:
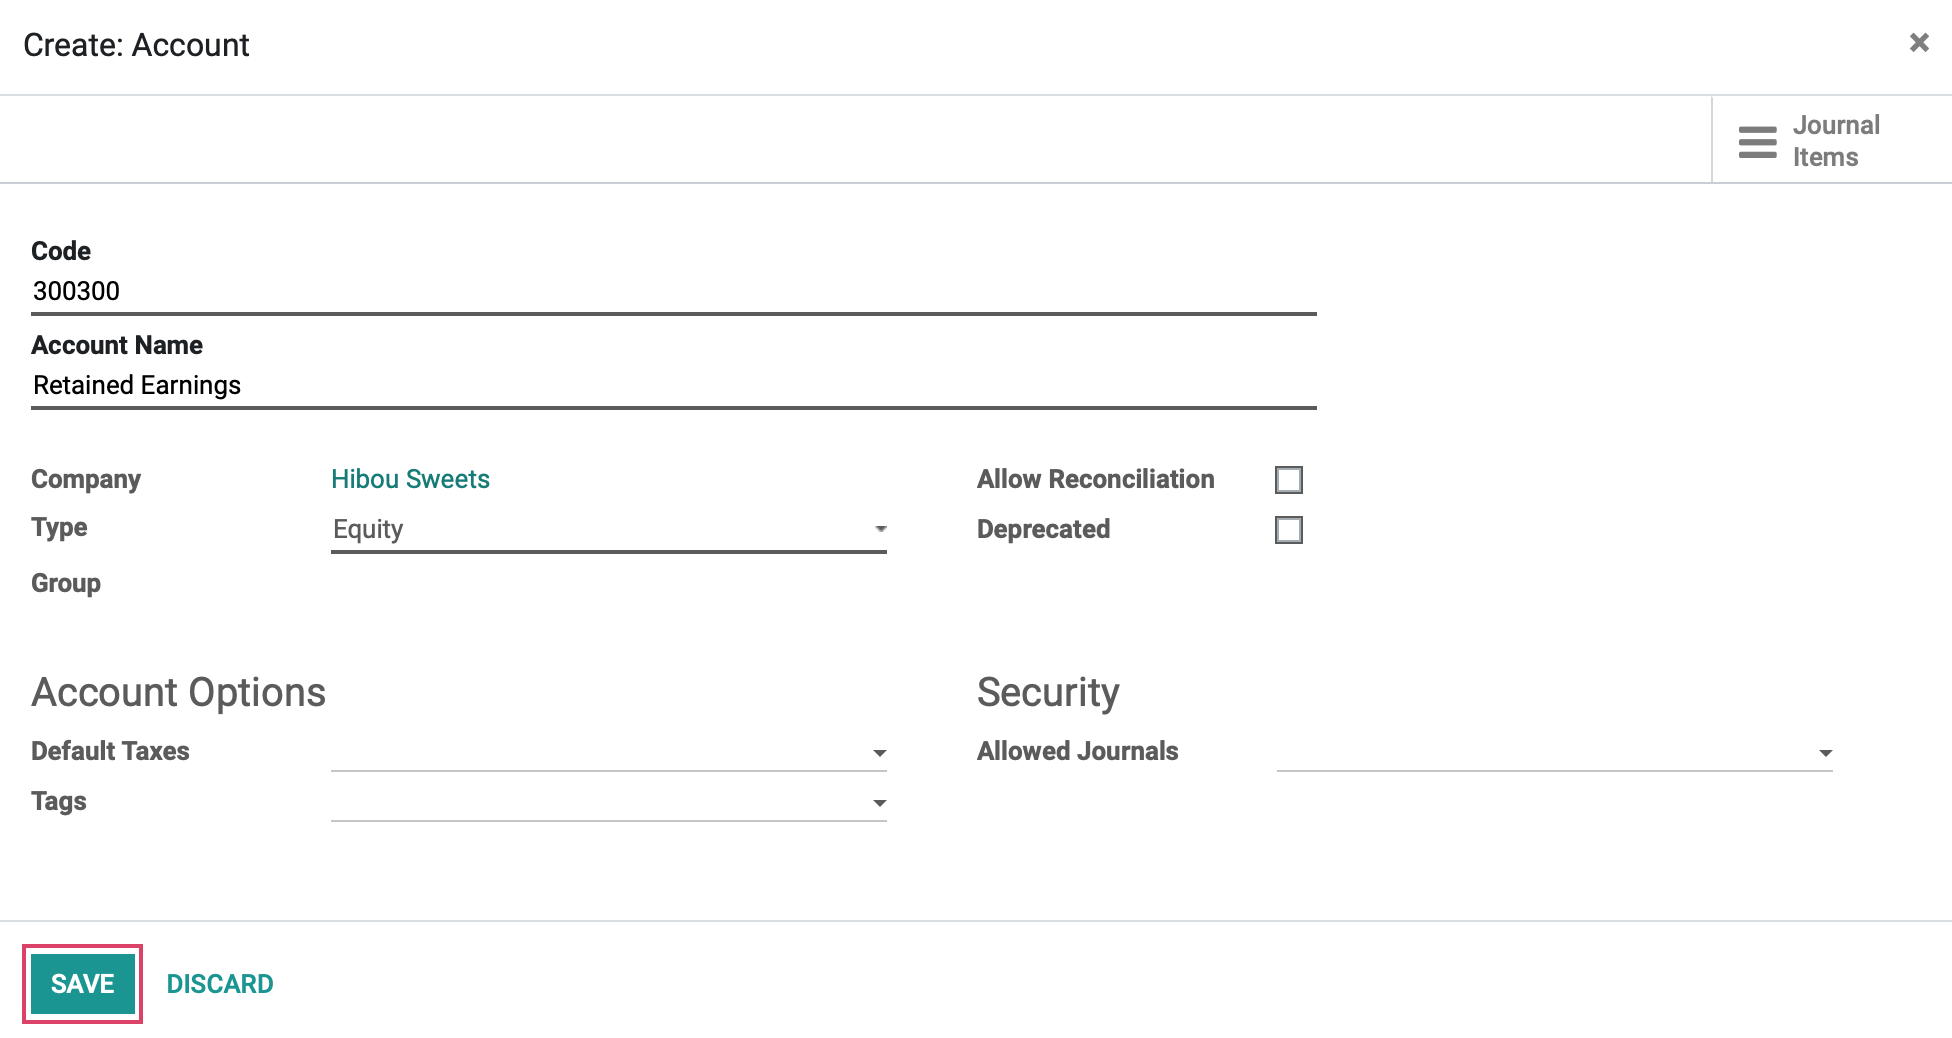
Code: Assign a code to be used for this account.
Account Name: Name of account, i.e. Retained Earnings.
Company: The company in which the journal is to be used. If in a single company database, the company name will be selected by default.
Type: Account type is used for the purpose of information to generate country-specific legal reports, and to set the rules to close a fiscal year as well as generate opening journal entries.
Group: If using Journal Groups, (found at the bottom of the page) set the Group here.
Account Currency: Set currency type for account.
Allow Reconciliation: Check this box if the account allows invoices & payments matching of journal items.
Deprecated: Mark this box to prevent use of the account.
Account Options:
Default Taxes: Tax Rate set on the Account.
Tags: Assigned tags for custom reporting.
Security:
Allowed Journals: Journals in which this account can be used. If left blank, can be used in all journals.
Click Save.
As soon as you have saved, you will see that the new account creates a credit line in the same amount, to offset the debit. Click SAVE once again, then click POST.
Use the drop down menu to go to Reporting > US GAAP > Balance Sheet and we should see that the assets equal the liabilities plus equity.
Now, go back to Accounting > Actions > Lock Dates and enter the lock date for all users as we are done making any changes to the reporting. Click Save.
Odoo will generate all reports automatically so there is no need to run them manually. In addition, you will not need to open a new fiscal year so at the beginning of the new year, the account balances will be $0.
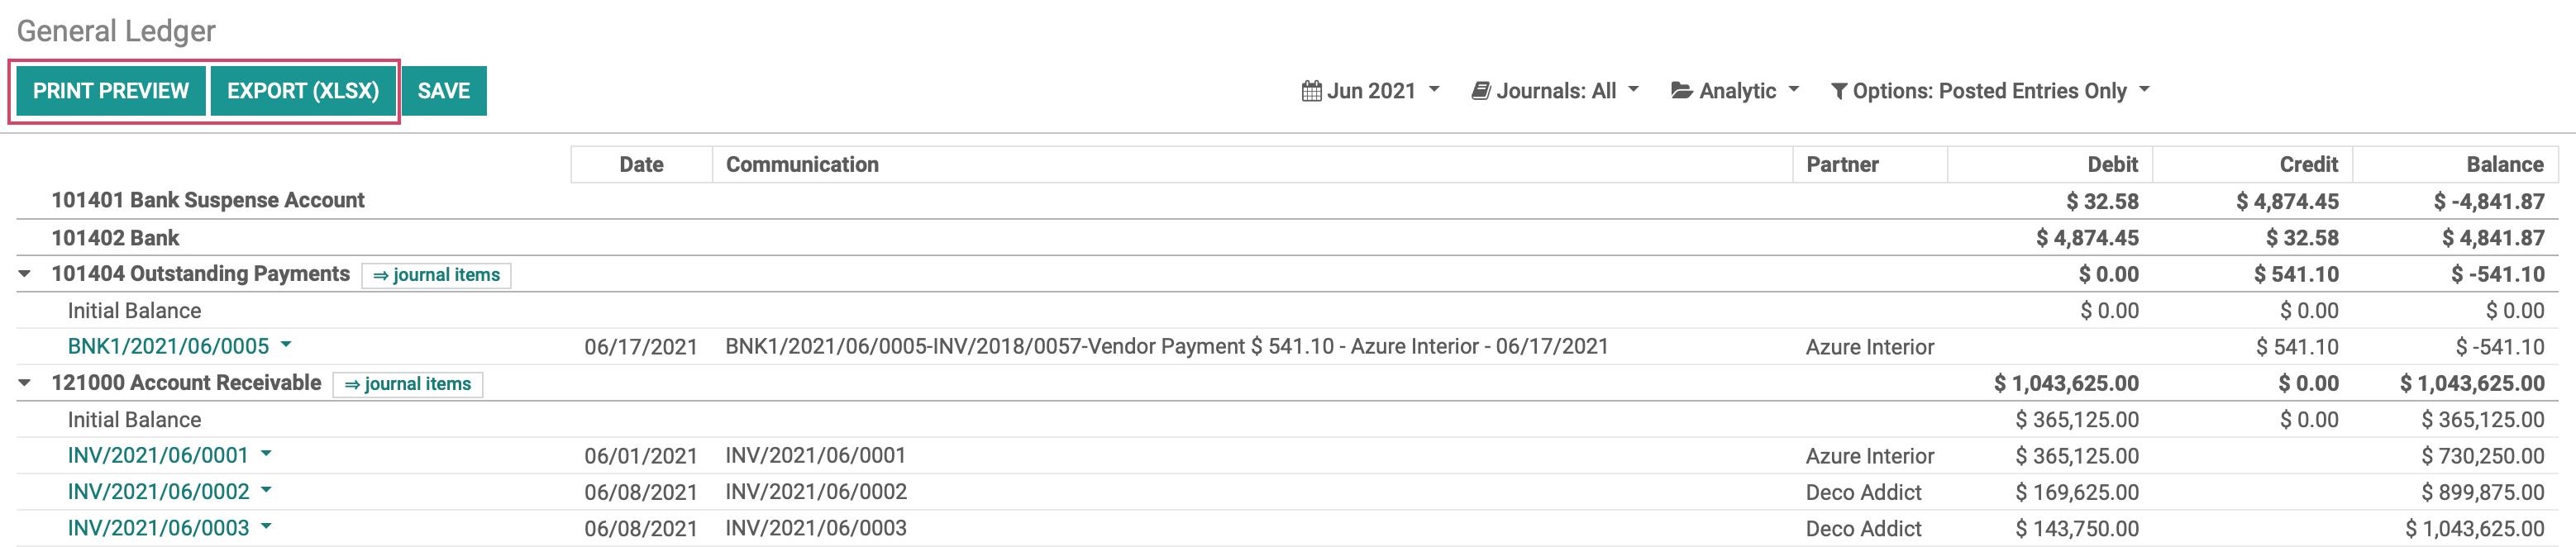
Use the drop down menu to go to Reporting > Audit Reports > General Ledger. Once there, click Options > Unfold All.
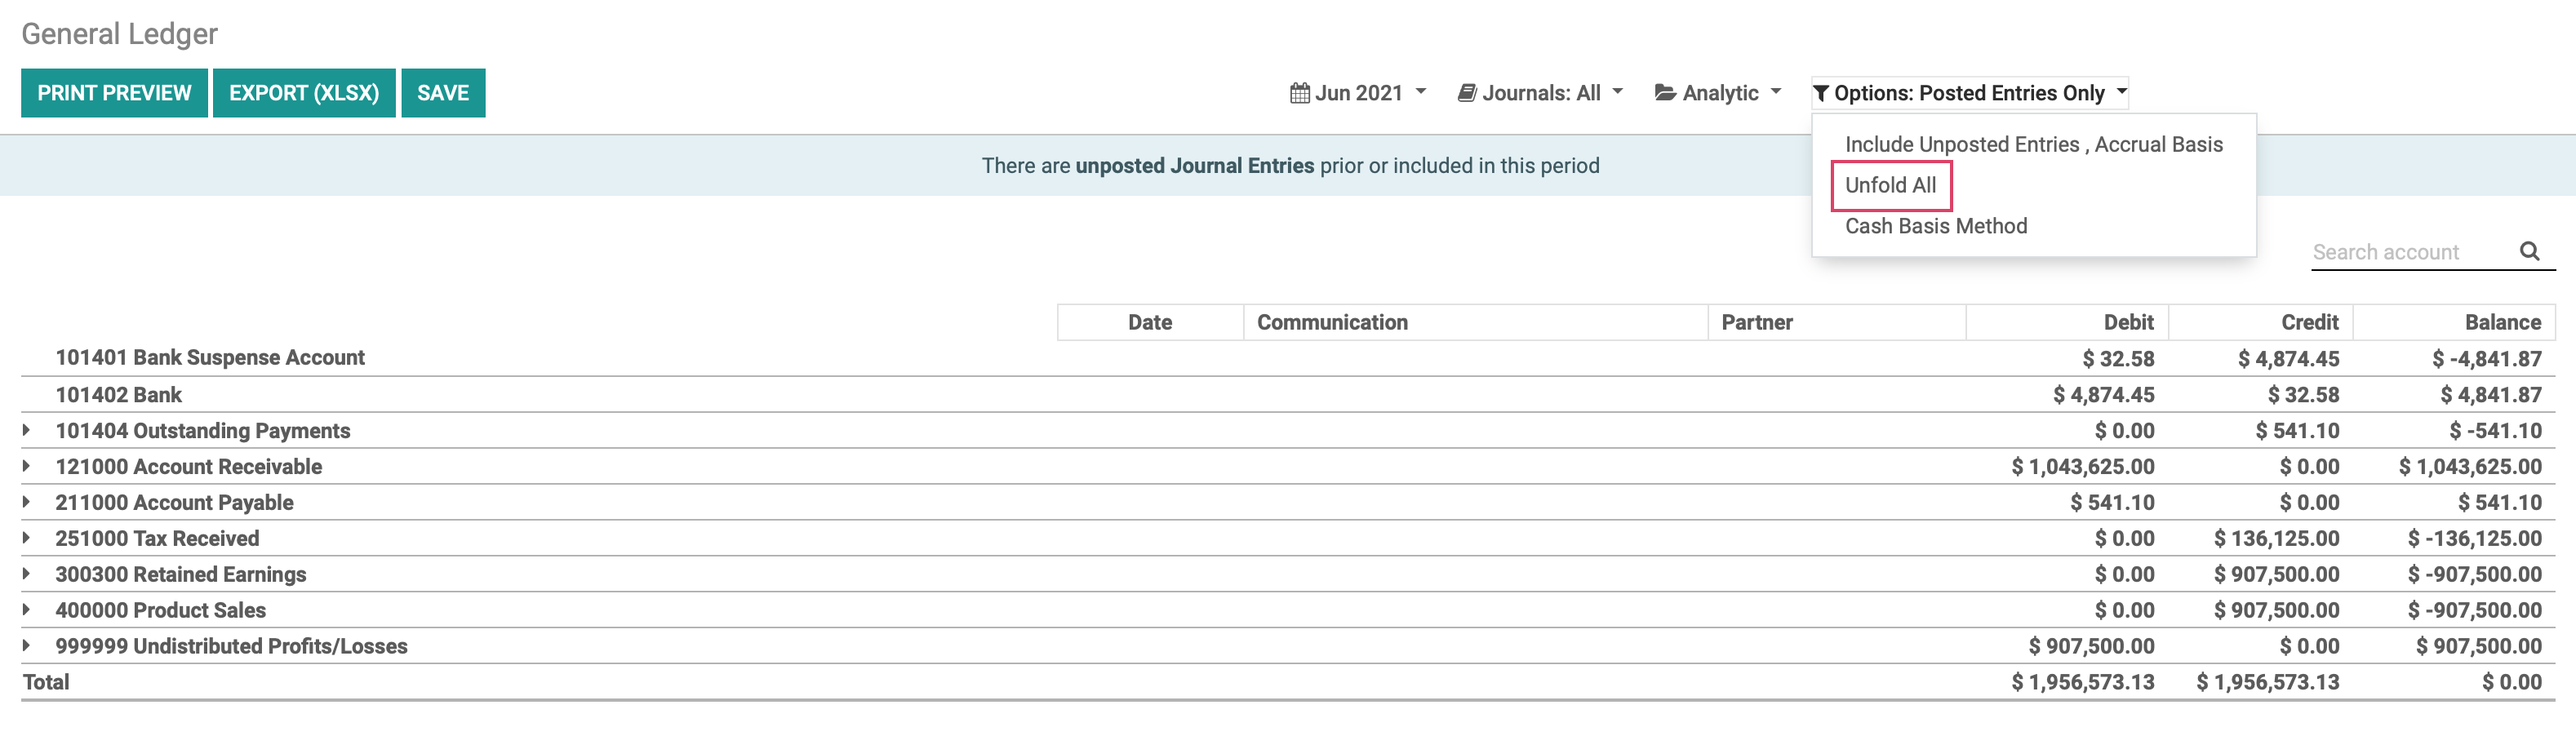
From here you can Export (xlsx) file or print preview for your records.