Accounting: Configuration: Reconciliation Models
Purpose
Reconciliation in accounting refers to the process of ensuring that the items on your business's bank statement are reconciled (linked) to activities in your business.
The purpose of this documentation is to go over the configuration and scope of each reconciliation model in Odoo 13, as well as to provide a working example, respectively.
Process
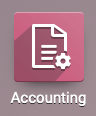
To get started, navigate to the Accounting app.
There are to ways to get to Reconciliation Models.
Option 1: From the Overview, click the menu next to an account that has reconciliation enabled, then select Reconciliation Models. This option brings you to a list of models that impact the Journal you navigated from.
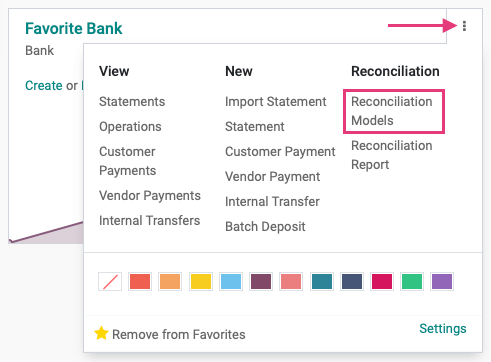
Option 2: Navigate to Configuration > Accounting > Reconciliation Models. This option brings you to a list of all models, regardless of the Journals they impact.
Types of Reconciliation Models
There are three types of Reconciliation Models:
Manually create a write-off on clicked button: This option will create a button to be used as a shortcut during the reconciliation process. You can create more than one button that allows you to allocate funds to different accounts, such as Write-Offs or Bank Fees.
Suggest counterpart values: This option allows you to set conditions that, when met, will trigger specific counterpart suggestions.
Match existing invoices/bills: This option will auto-match invoices and/or bills to customer or vendor payments if they meet the conditions you've set.
We'll go over each type below, and show a working example.
Manually Create a "Write-Off on Clicked" Button
Bad debt is, sadly, part of doing business. Odoo makes it to write-off amounts using a shortcut in during reconciliation. To get started, click Create.

You'll then need to configure the model using the following options:
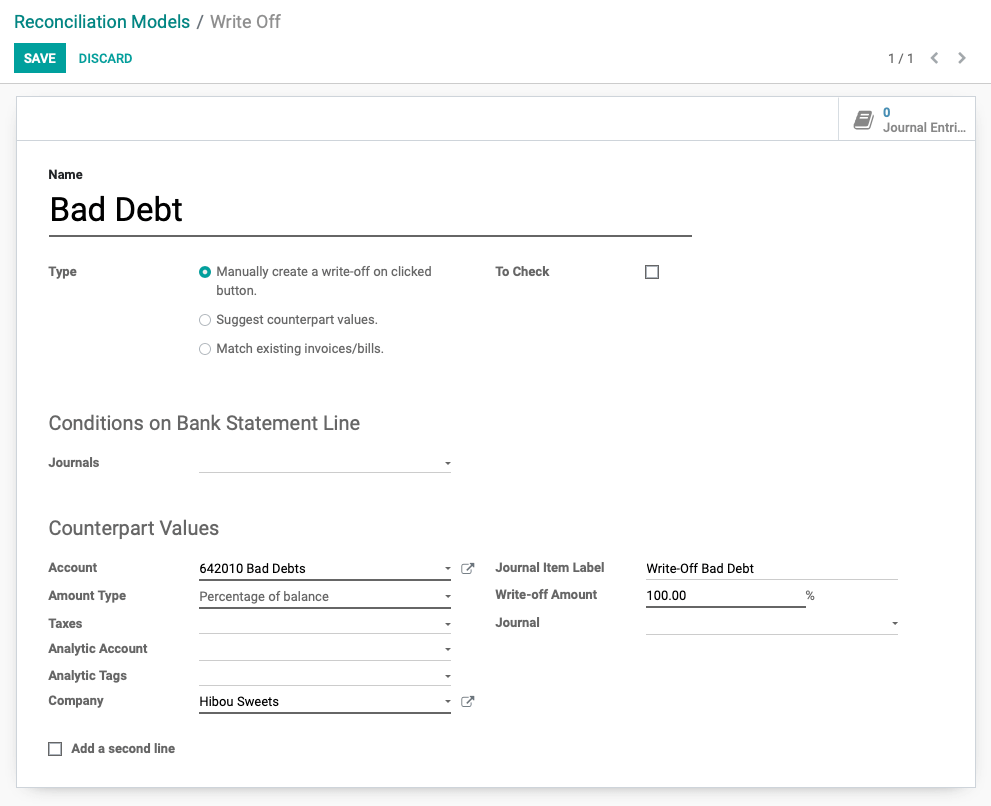
Name: Create a name for this Reconciliation Model. This will also serve as the button text you'll see during reconciliation.
Type: Select Manually create a write off on clicked button.
To Check: By enabling this, matches within this rule will be marked "To Check" and there will be a shortcut on the overview page for manual checks before validation.
Conditions on Bank Statement Line:
Journals: Leave this field empty to have it apply to all Journals with reconciliation enabled. To have this model apply to one Journal only, select it here.
Counterpart Values:
Account: Select the account where this debt will be written-off to. In our example, we've created an account specifically for Bad Debts, so we'll use that one.
Amount Type
Fixed: Select this option to only allocate a flat-rate amount to the selected account. When selected, you'll see an additional field
Write-off Amount: Enter the flat-rate amount to be written off.
Percentage of Balance: Select this option to allocate a percentage to the selected account. When selected, you'll see an additional field:
Write-off Amount %: Enter the percentage rate to be written off.
From label: This option lets you extract an amount from a string. When enabled, you'll see two more fields:
Amount from Label: This field is auto-populated with a Regex expression used to extract dollar amounts from a string.
Decimal Separator: Used with the Regex expression above, this character will not be removed from the string as it's important to determine the correct amount.
Taxes: When the reconciliation model is applied, the tax selected in the drop-down will be applied. When selected you'll see an additional field:
Tax Included in Price: When ticked, the tax indicated will be included in the price.
Analytic Account: Select Analytic Account if tracking specific costs and revenues.
Analytic Tag: Select Analytic Tag(s) if you have set them up to further refine analytic entries.
Journal Item Label: This field auto-populates with the Reconciliation Model Name, but you can change it as needed. In this example, we added a little more detail.
Journal: This field is ignored in a bank statement reconciliation.
Add a second line: This gives you the option to add further conditions using the same fields.
When you're ready, click SAVE.
How it Works
We've created a Reconciliation Model with the following fields set:
Type: Set to Manually create a write-off on clicked button.
Counterpart Values
Accounts: We've set this to a Bad Debts expense account we created in the Chart of Accounts.
Amount Type: We've set this to Percentage of Balance.
Write-off Amount: We've set this to 100%.
Journal Item Label: We wanted this to show a bit more detail, so we set this to "Write-Off Bad Debt".
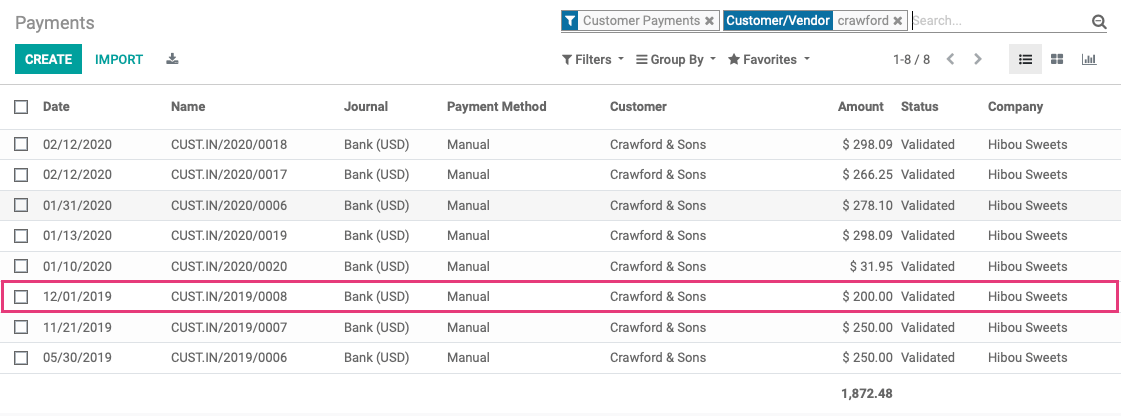
Example: Our customer has a partially paid invoice that was created in Feb 2019, due Jun 2019. They have made multiple partial payments, the most recent being on Dec 1, 2019. To see where this invoice stands, we'll need to do some Payment Matching, but we know we'll have a balance to write-off to bad debt.
First, we'll go to Customers > Payments and open the most recent payment they made.
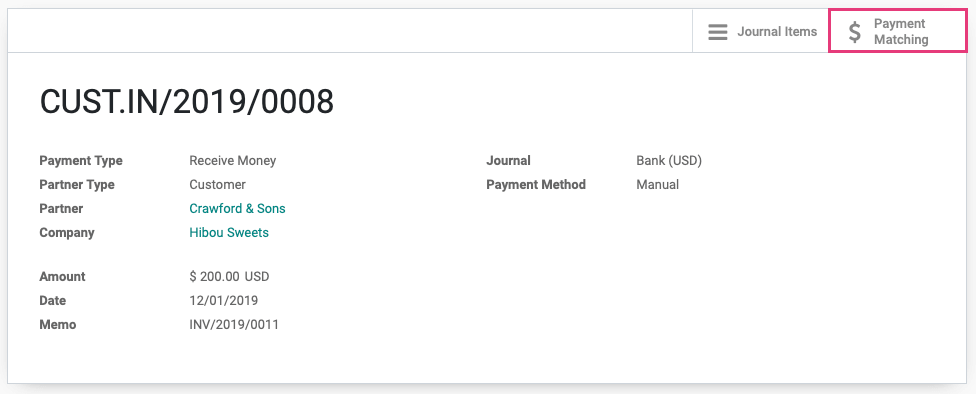
Since this payment hasn't been applied to an invoice, we'll click the Payment Matching smart button.
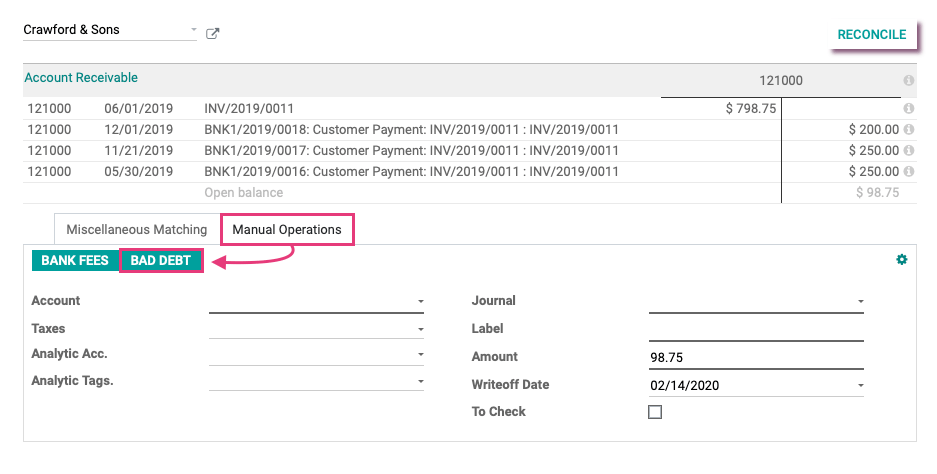
We'll add the overdue invoice as well as all payments to the T Sheet. Next, we'll click the Bad Debt button under the Manual Operations tab to write-off the $98.75 balance.
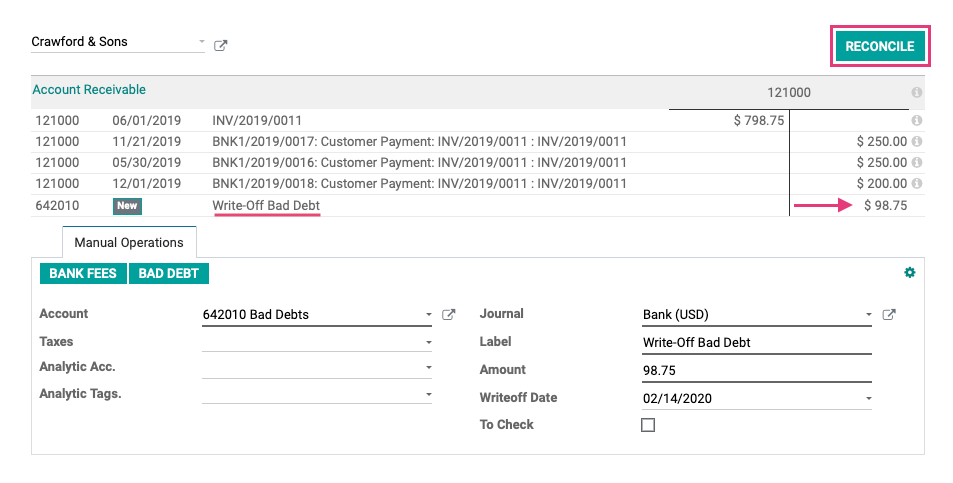
Doing this will auto-populate the fields we configured on the Reconciliation Model and a new line is added to the bank statement, thereby balancing the T Sheet. Now we can click Reconcile.
Suggest Counterpart Values
Scenario: Every month, there's an ACH payment of $79.49 that has a reference note "XFNTY". We know that this is our payment to Xfinity for our internet services. To simplify our reconciliation process, we can also tell Odoo about this relationship via Reconciliation Model.
To get started, click Create.
You'll then need to configure the model using the following options:
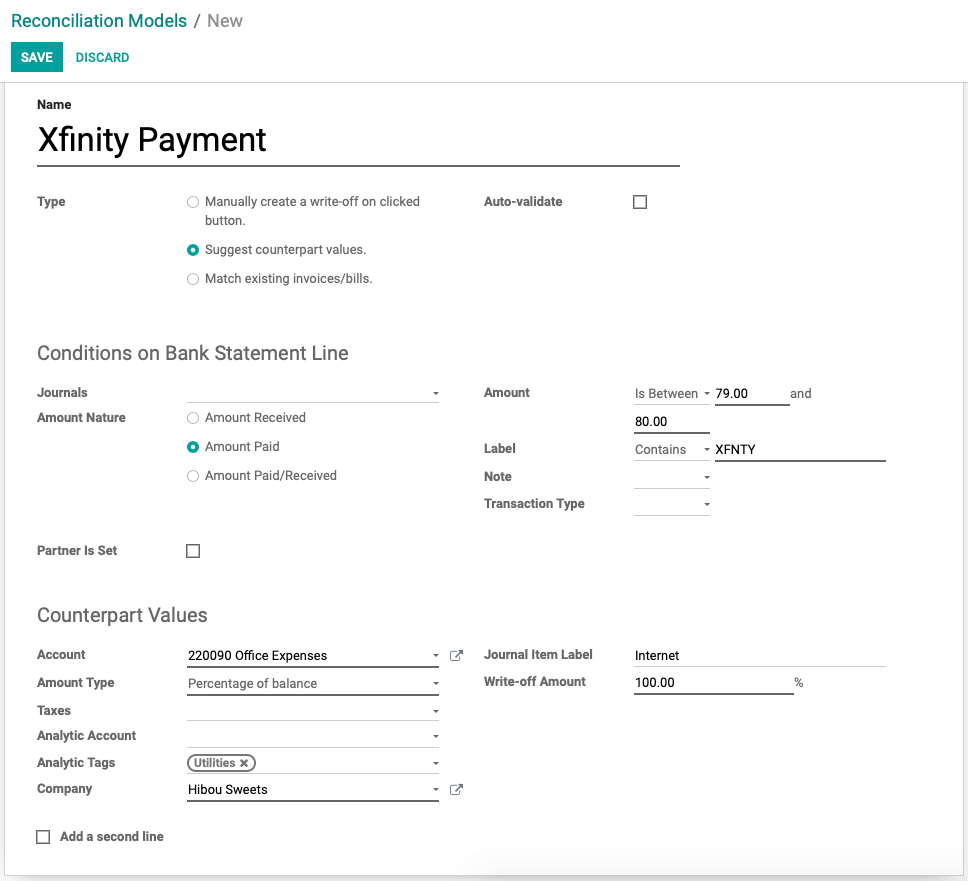
Name: Create a name for this Reconciliation Model.
Type: Select Suggest counterpart values.
Auto-validate: Tick this box if you'd like Odoo to automatically match and validate transactions that match the criteria.
Conditions on Bank Statement Line:
Journals: Leave this field empty to have it apply to all Journals with reconciliation enabled. To have this model apply to one Journal only, select it here.
Amount Nature: You'll have three choices:
Amount Received: Only apply on amounts received.
Amount Paid: Only apply on amounts paid.
Amount Paid/Received: Apply on both amounts paid and received.
Amount: Filter for am amount greater than, less than, or between two values.
Label: Filter for label text that contains, does not contain, or matches the supplied Regex expression.
Note: Filter for note text that contains, does not contain, or matches the supplied Regex expression.
Transaction Type: Filter for text that contains, does not contain, or matches the supplied Regex expression.
Partner is Set: When enabled, you'll be able to select a Partner (customer or vendor) or Partner Category that must be set on the transaction for this model to apply. This gives you two options:
Restrict Partners to: Select partner(s) that must be set on the transaction.
Restrict Partner Categories to: Select the partner category(ies) that must be set on the transaction.
Counterpart Values:
Account: Select the account where this payment will be recorded.
Amount Type: (Example: Percentage of Balance)
Fixed: Select this option to only allocate a flat-rate amount to the selected account. When selected, you'll see an additional field
Write-off Amount: Enter the flat-rate amount to be moved.
Percentage of Balance: Select this option to allocate a percentage to the selected account. When selected, you'll see an additional field:
Write-off Amount %: Enter the percentage rate to be moved.
From label: This option lets you extract an amount from a string. When enabled, you'll see two more fields:
Amount from Label: This field is auto-populated with a Regex expression used to extract dollar amounts from a string.
Decimal Separator: Used with the Regex expression above, this character will not be removed from the string as it's important to determine the correct amount.
Taxes: When the reconciliation model is applied, the tax selected in the drop-down will be applied. When selected you'll see an additional field:
Tax Included in Price: When ticked, the tax indicated will be included in the price.
Analytic Account: Select Analytic Account if tracking specific costs and revenues.
Analytic Tag: Select Analytic Tag(s) if you have set them up to further refine analytic entries.
Journal Item Label: This field auto-populates with the Reconciliation Model Name, but you can change it as needed.
Add a second line: This gives you the option to add further conditions using the same fields.
When you're ready, click SAVE.
How it Works
We've created a Reconciliation Model with the following fields set:
Name: We've named this Xfinity Payment because it's specific to this partner.
Type: We've set this to Suggest counterpart values.
Conditions on Bank Statement Line
Amount Nature: We've set this to Amount Paid because this is always a vendor, never a customer.
Amount: We've set this to apply to amounts between 79.00 and 80.00, because we know it's always in this range.
Label: We've set this to contain "XFNTY" because our bank statements always show this code for payments to this vendor.
Countepart Values
Account: We've set this to the account that reports our Office Expenses.
Journal Item Label: We've set this to add "Internet" to the Journal entry so we know what type of office expense it is.
Amount Type: We've set this to Percentage of Balance.
Write-off Amount: We've set this to 100%.
Analytic Tags: We added a "Utilities" tag to help us in our reporting.
Example: We have an existing unpaid Vendor Bill for Xfinity, and our Bank Statement shows the ACH transfer. With our new Reconciliation Model set, we'll leave the matching to Odoo.
From the Overview, click Reconcile on the Journal that you use to manage your Internet payment.
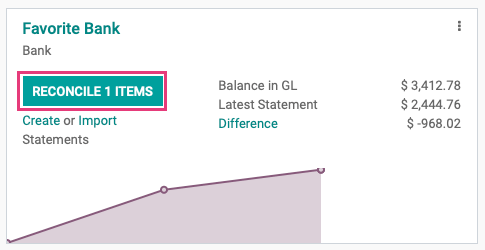
On the next screen, you can see how Odoo matched the debit to the credit based on the Reconciliation Model. All that we need to do now is click Validate.

Good to Know!
To Auto-Validate or Not Auto-Validate?
If Auto-Validate has been enabled for this Reconciliation Model, we wouldn't have needed to click Validate. Instead, the payments would be matched and reconciled automatically. While this sounds convenient, it's not dependable.
We do not suggest enabling this feature. It's best to always manually check your transactions before reconciliation.
Match Existing Invoices/Bills.
Scenario: Our associates are often in such a rush they register payment under the customer account, but don't match it to the invoice. We need a way to make reconciling a little faster at the end of the day.
This reconciliation model is very simple and can be useful for most businesses, as it simply suggests that two transactions should be linked. While you can request it auto-validate, we don't recommend it. To get started, click Create.

You'll then need to configure the following options:
Name: Create a name for this Reconciliation Model.
Type: Select Match existing invoices/bills.
Auto-validate: Enabling this will validate the matches automatically based on your conditions.
Conditions on Bank Statement Line
Journals: Leave this field empty to have it apply to all Journals with reconciliation enabled. To have this model apply to one Journal only, select it here.
Amount Nature: You'll have three choices:
Amount Received: Only apply on amounts received.
Amount Paid: Only apply on amounts paid.
Amount Paid/Received: Apply on both amounts paid and received.
Amount: Filter for an amount greater than, less than, or between two values.
Label: Filter for label text that contains, does not contain, or matches the supplied Regex expression.
Note: Filter for note text that contains, does not contain, or matches the supplied Regex expression.
Transaction Type: Filter for text that contains, does not contain, or matches the supplied Regex expression.
Same Currency Matching: Select this to require the transactions you're matching share a currency. When enabled, you'll see an additional field:Amount Matching: Enable this and set a requirement (as a percentage) indicating the proximity that transactions should match each other before suggesting they link. 100% would be an exact match.
Partner is Set: Enable this if the partner (vendor/customer) must be set and matching in order to make the suggestion. You'll see tow additional fields when enabled, and you can leave them blank to simply indicate that a partner must be set. You can also use those two fields to select a Partner (customer or vendor) or Partner Category that must be set on the transaction for this model to apply.
Restrict Partners to: Select partner(s) that must be set on the transaction.
Restrict Partner Categories to: Select the partner category(ies) that must be set on the transaction.
How it Works
We've created a Reconciliation Model with the following fields set:
Amount Nature: Amount Paid/Received
Same Currency Matching: Enabled
Amount Matching: 100%
Parter Is Set & Matching: Enabled
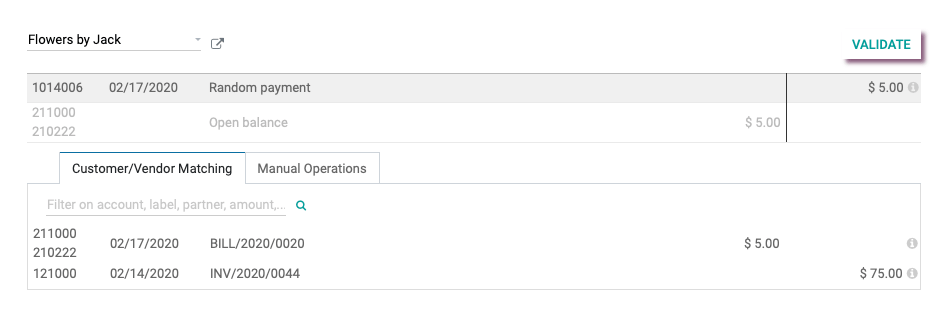
Example: There's currently an unpaid vendor bill for Flowers by Jack for $5.00. One of our associates sent a payment to Flowers by Jack for $5.00, but didn't link the payment to the invoice. Let's see how Odoo suggests a link between these transactions based on the Reconciliation Model we've created.
From Accounting Overview, we'll click RECONCILE on the Journal that we sent the payment from.

On the next screen, you can see how Odoo matched the debit to the credit based on the Reconciliation Model. All that we need to do now is click VALIDATE.

Good to Know!
If the suggested match doesn't look right, simply click into the T Sheet and you'll see other options to select from. In this example, we can see Odoo got it right as there are no other $5.00 transactions that would work.