Accounting: Configuration: Taxes
Purpose
The purpose of this documentation is to outline the configuration and processes associated with taxes in the Odoo 13 Accounting application.
Getting Started
Odoo has localization modules for certain countries that will pre-load your default taxes into the database. It's important to add these pre-configured Charts of Accounts before creating your own. To check and see if your country has a module, go to the Apps application.
Once there, search for your country name to see if there's an available localization module. If there is, it will include a basic chart of accounts and a local tax list.
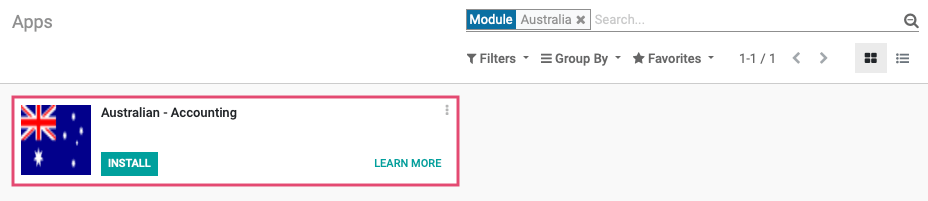
Click Install on the module.
Process
To get started, navigate to the Accounting app.
Configuring Taxes
To review your taxes, navigate to Configuration > Invoicing > Taxes. Once there, you'll see a list view of all active configured taxes for Sales or Purchase.

Important!
How to Handle Default Taxes
Many are tempted to remove the default sales tax or otherwise modify it to meet a specific use case. We recommend a more flexible approach, which involves using Fiscal Positions to apply the appropriate tax (or no tax, if taxes would not apply to the order).
To use this approach, you'll make some simple changes to the default sales tax. Click into the records with the Tax Scope "Sales" and:
Change the Tax Name to 'Product Sales Tax'
Change the Amount to 0.0000%
Change the Label on Invoices to 'Sales Tax'
When done, click Save.

Repeat this process for the tax with the "Purchase" Tax Scope.

The Product Sales Tax will act as a generic tax that will be applied to all sale orders without impacting the amount of tax that gets applied with it. The Product Purchase Tax will be added, respectively, to purchase orders.
You will then create specific taxes, for each state for example, and map the taxes using Fiscal Positions. For detailed instructions on how this process works, read our Fiscal Positions document.
Click on a tax to view its configuration. We will review the Product Sales Tax as an example. Once there, click Edit to see all of the available options.

Tax Name: The name of the tax.
Tax Computation
Group of Taxes: The tax is a set of sub taxes.
Fixed: The tax amount stays the same whatever the price.
Percentage of the Price: The tax amount is a% of the price:
Percentage of Price Tax Included: The tax amount is a division of the price.
Tax Scope
Sales: This tax is to be applied to sales only.
Purchase: This tax is to be applied to purchases only.
None: This tax cannot be used on its own, but can be used in a group.
Active: This open toggles between Active and Archived.
Amount: The amount of tax computation. (Example: If you want a 15% tax, you would select 'Percentage of Price' as the Tax Computation and enter 15 for the Amount)
Under the Definition tab, you'll see the following fields.
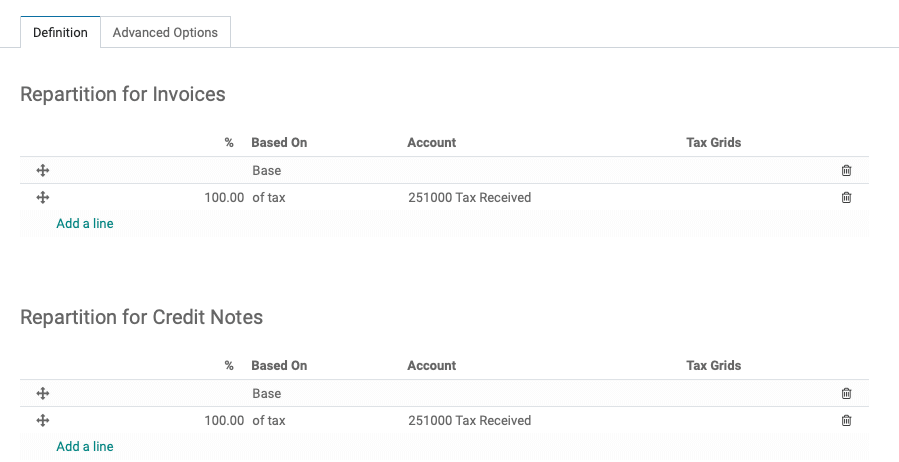
Repartition for Invoices: This table allows you to outline how the tax on each invoice is distributed among accounts. You can click into an existing line to make changes, or click ADD A LINE to add a new entry.
%: Enter the amount of the tax collected should be distributed to the account indicated on the same line.
Based On: Each entry requires a Based On entry. It defaults to the first line, but you can adjust it based on your tax requirements.
Account: The account that will be used on taxes for invoices. Leave this field empty to use the product's income account.
Tax Grids: Select a tax grid, if applicable.
Repartition for Credit Notes: This table allows you to outline how the tax on each credit note is distributed among accounts. You can click into an existing line to make changes, or click ADD A LINE to add a new entry. All entries must add up to 100%.
%: Enter the amount of the tax collected should be distributed to the account indicated on the same line.
Based On: Each entry requires a Based On entry. It defaults to the first line, but you can adjust it based on your tax requirements.
Account: The account that will be used on taxes for credit notes. Leave this field empty to use the product's income account.
Tax Grids: Select a tax grid, if applicable.
Good to Know!
The totals under Repartition for Invoices and Repartition for Credit Notes must balance each other out, and the tax accounts should be the same unless you have very rare circumstances. Additionally, the order of entries and the number of lines must also match.
Under the Advanced Options tab, you'll see the following fields.
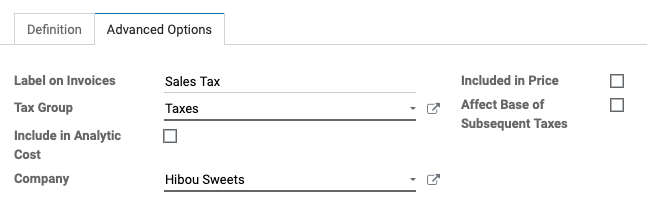
Label on Invoices: This label will appear on invoices with this tax selected.
Tax Group: Allows you to group taxes on invoices and sale orders. In general, we recommend a simple 'Taxes' group that can be applied to most or all taxes.
Include in Analytic Cost: If enabled, the amount computed by this tax will be assigned to the same analytic account as the invoice line, if any.
Included in Price: Select this if you want to include this tax in the price.
Affect Base of Subsequent Taxes: If set, subsequent taxes will be based on the tax-included price.
When you're done, click Save.
Good to Know!
If you want to clear all taxes from appearing automatically on Invoices or Vendor Bills, navigate to Configuration > Settings. Under the Taxes section, you will see default taxes for both sales and purchases. If you remove both of those entries, no tax amount will be applied to product sales or purchases automatically. 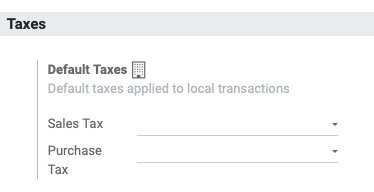
When you're done, click save.
Good to Know!
Understanding Tax Groups
Tax Groups can greatly improve the readability of taxes on invoice and sale order PDFs!
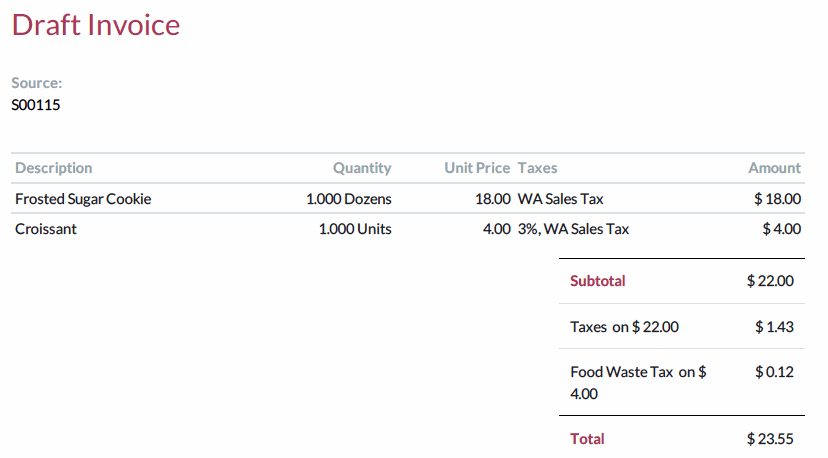
Take, for example, a customer purchasing a croissant and a dozen cookies. There are two associated taxes:
Sales Tax 6.3%
Food Waste Tax 3%
The first is in the Taxes tax group and the latter is in its own tax group dedicated to displaying Food Waste taxes as a separate tax item to customers on the invoice.

When taxes are in a tax group, the total for the tax group and its name will be totaled and listed below the subtotal on the invoice's PDF.
If you only have general sales and purchasing taxes, we recommend using the generic 'Taxes' group, to keep things simple.
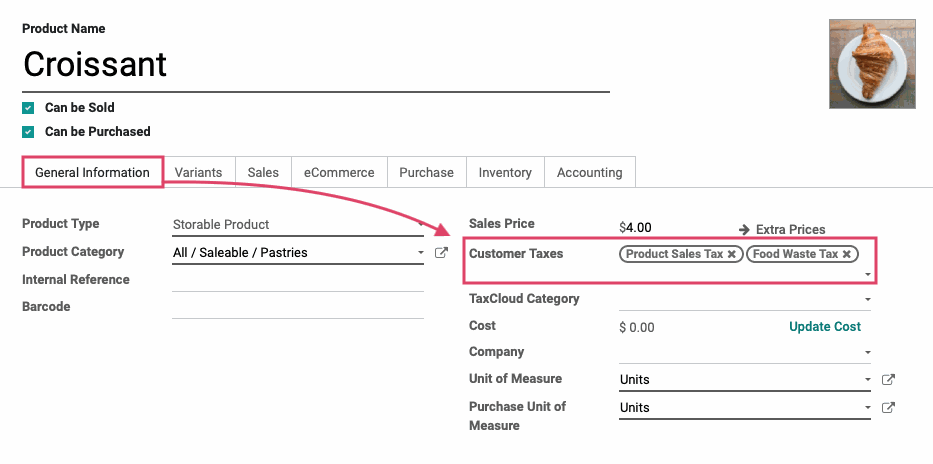
Select the product that you would like to set a default tax on. Click Edit on the product details page.
Under the General Information tab, you will see Customer Taxes. This is where you can select the taxes that apply to this product when it is sold to your customers.
Select all of the taxes that apply.
Under the Purchase tab, click on the Vendor Taxes drop down and select the default tax for this product. This is the tax that will be applied when this product is purchased from the vendor.
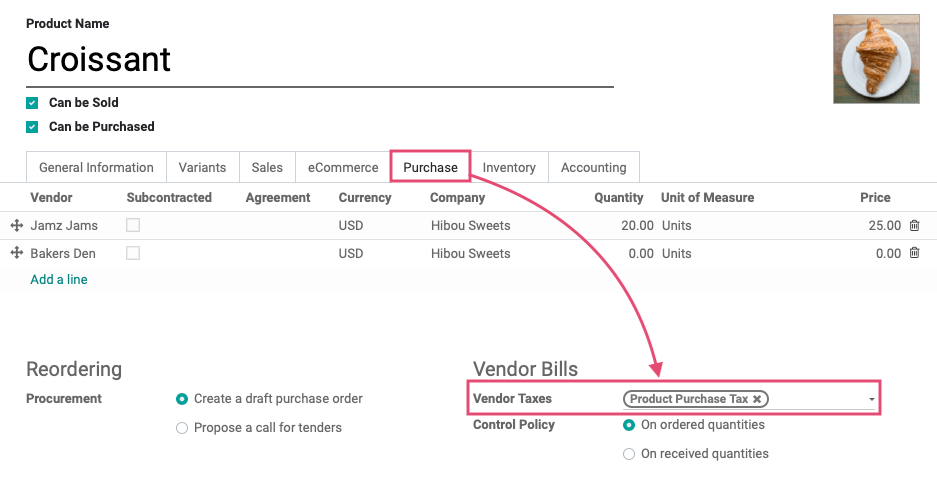
When ready, click Save.
Important!
Remember Fiscal Positions
We recommend assigning the default Sales Tax we setup earlier as the Customer Tax across all products. You'll then use Fiscal Positions to map each customer to the correct tax at the time of sale. For instructions on using fiscal positions, read our Fiscal Positions document.
Setting Default Taxes on an Account
When default taxes are set on an account, this default tax will be applied each time the account is selected. With this setting, regardless of whether or not a product is selected, the default tax will always be present in the taxes column on a sale order or invoice.
In the Accounting app, click configuration > Accounting > Chart of Accounts. Select the account you would like to set a default tax on and click the edit button.
Click the drop-down menu next to the Default Taxes field and select the default tax you'd like to apply to this account. Note that you can apply both tax scopes: sales and purchases.
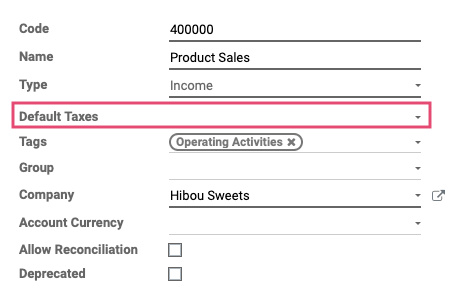
When ready, click save.
Taxes in Action
To see how taxes are used, let's create an Invoice.
Navigate to customers > invoices, then click the Create button.
Select a Customer from the drop-down menu and then, under the Invoice Lines tab, click Add an item and select a product. Give the product a unit price and in the Taxes column, click the drop-down and select applicable taxes.
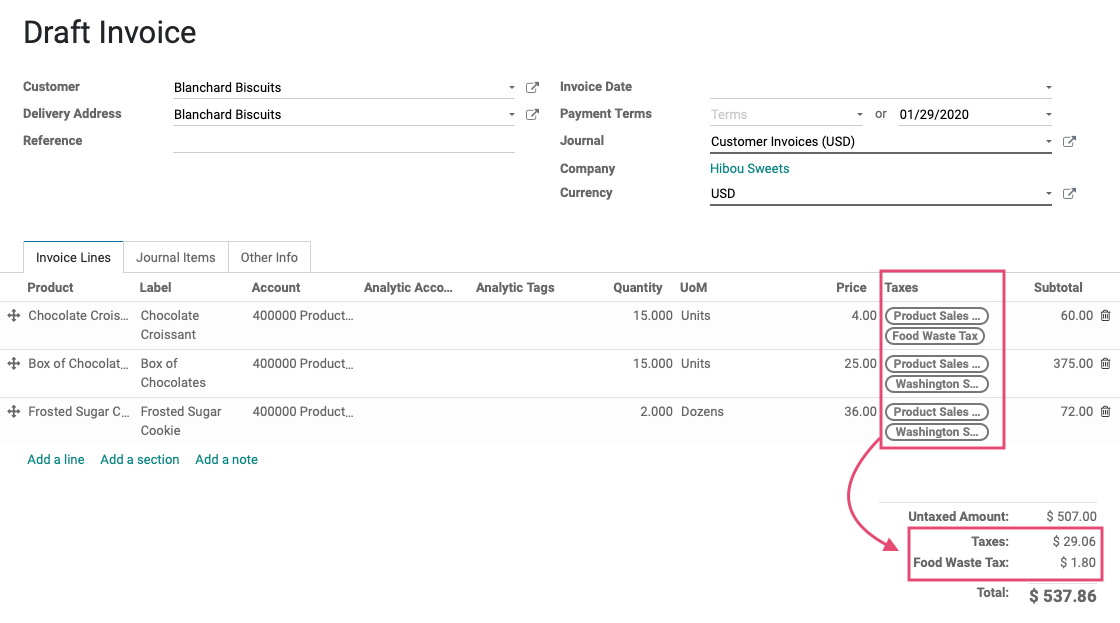
Once a tax has been selected, the individual tax groups will be listed under the subtotal on the bottom right.
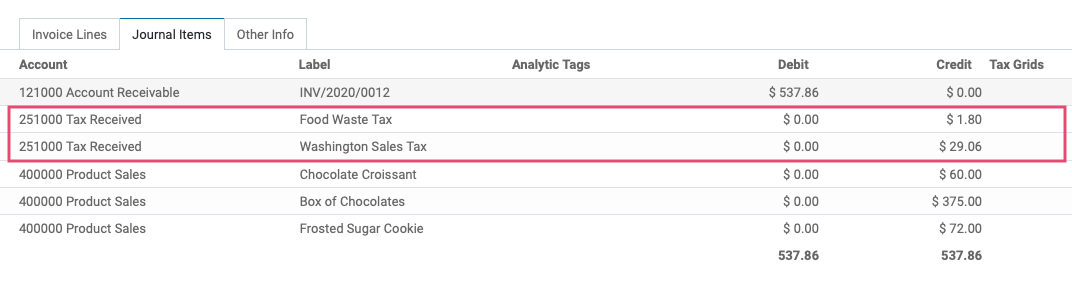
Under the joURNAL ITEMS tab, you can see the breakdown of taxes. You will see we have specific lines for the taxes. The account column reflects the accounts defined for the respective tax.
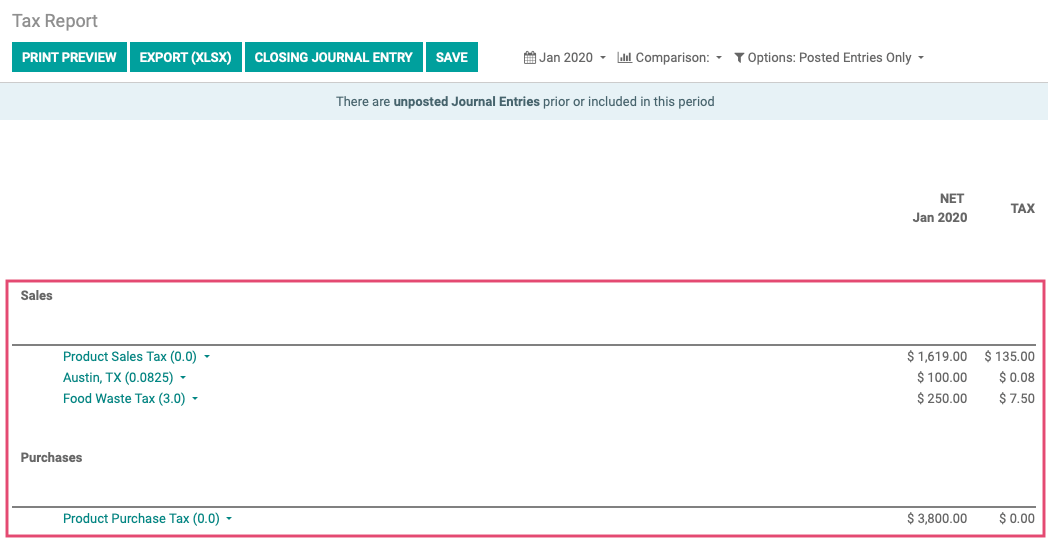
Tax Reporting
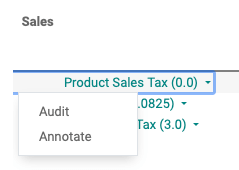
To view your Tax Report, navigate to Reporting > Audit Reports > Tax Report. Here you will see your Sale and Purchase taxes, with columns on the right for the NET amount and the TAX amount.
You'll also have several button options at the top of the page.
Print Preview will download a printer-friendly PDF.
Export (XLSX) will download the data in spreadsheet form.
Closing Journal Entry initiates your closing journal entry for the accounting period.
Save will save either the XLSX file or PDF file to the associated folder in the Documents application.
To Audit or Annotate a tax, click the tax to bring up a drop-down menu.