Accounting: Accounting: Journals: Customer Payments
Purpose
This document will walk you through how payment journal entries are created in the Accounting application of Odoo 14, and how to set the accounts that those payment journal entries will impact. We will show examples of both sending payment to a vendor and receiving payment from a customer as well as how to create payments manually.
Process
To get started, navigate to the Accounting app.
Journals and Accounts
The accounts that will be impacted by registering payments will always be taken from the journal's default debit/default credit accounts and the partner's Accounts Receivable/Accounts Payable (AR/AP) accounts listed on their contact.
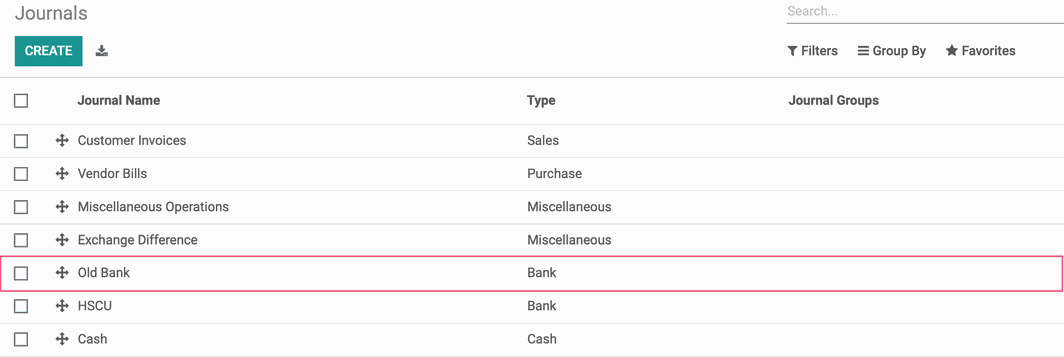
We will look at the journal's accounts first. Navigate to the journal that you want to post your payment to by clicking Configuration > Accounting > Journals.
In this example, we will post a payment to our 'Old Bank' journal.
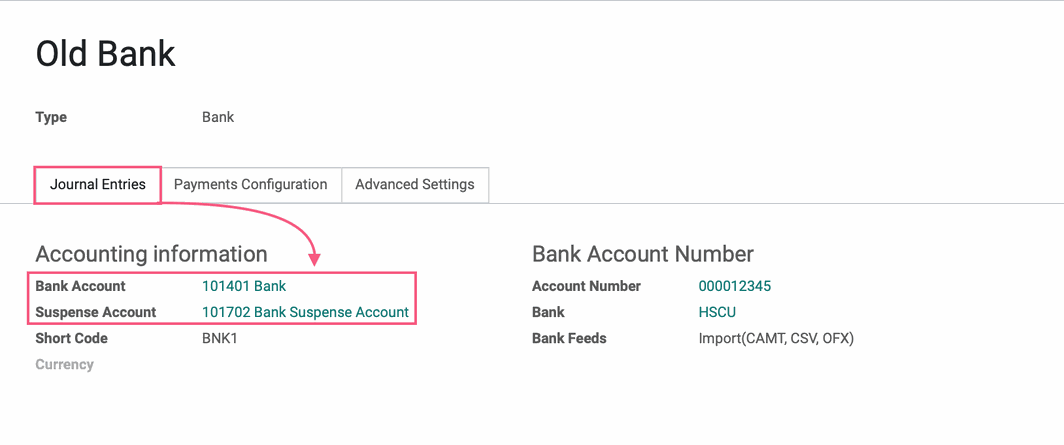
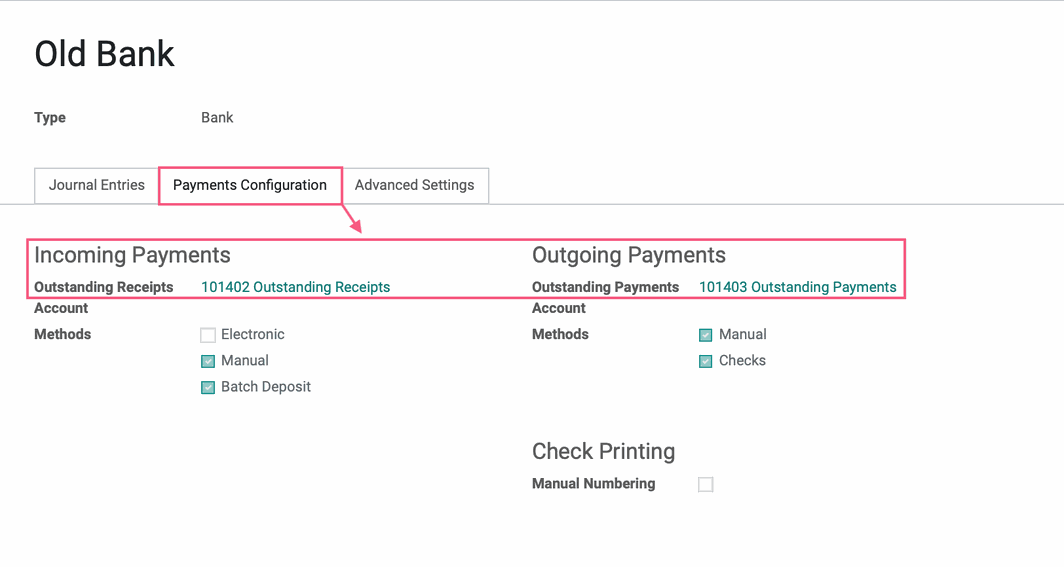
Let's look at the Journal Entries tab. For this journal, the Bank Account is set to "Bank" and the Suspense Account is set to "Bank Suspense Account".
Suspense Account: Bank statement transactions are posted to the suspense account until reconciled with a corresponding payment on a vendor bill or customer invoice. This allows the accountant to easily track discrepancies and further separate remaining reconciliation tasks by journal.
Next, let's move to the Payments Configuration tab. Like all journal entries, the account used on a transaction will depend on whether a payment is being sent or received. When sending payments, the Outstanding Payments account on the journal will be used. For receiving payments, the Outstanding Receipts account on the journal will be used.
Outstanding Receipts: Incoming entries triggered by invoices/refunds will be posted on the Outstanding Receipts account and displayed as blue lines in the bank reconciliation widget. During the reconciliation process, concerned transactions will be reconciled with entries on the Outstanding Receipts account instead of the receivable account.
Outstanding Payments: Outgoing payments triggered by bills/credits will be posted on the Outstanding Payments account and displayed as blue lines in the bank reconciliation widget. During the reconciliation process, concerned transactions will be reconciled with entries on the Outstanding Payments account instead of the payable account.
The other half of the journal entry will be determined by the accounts listed on the partner's AR/AP found on their contact record.
To access your vendors, navigate to Vendors > Vendors. To access your customers, navigate to Customers > customers.
In this view you will see that when selecting a Vendor, Odoo filters to Vendor Bills. Choose the partner that you want to associate with your payment.
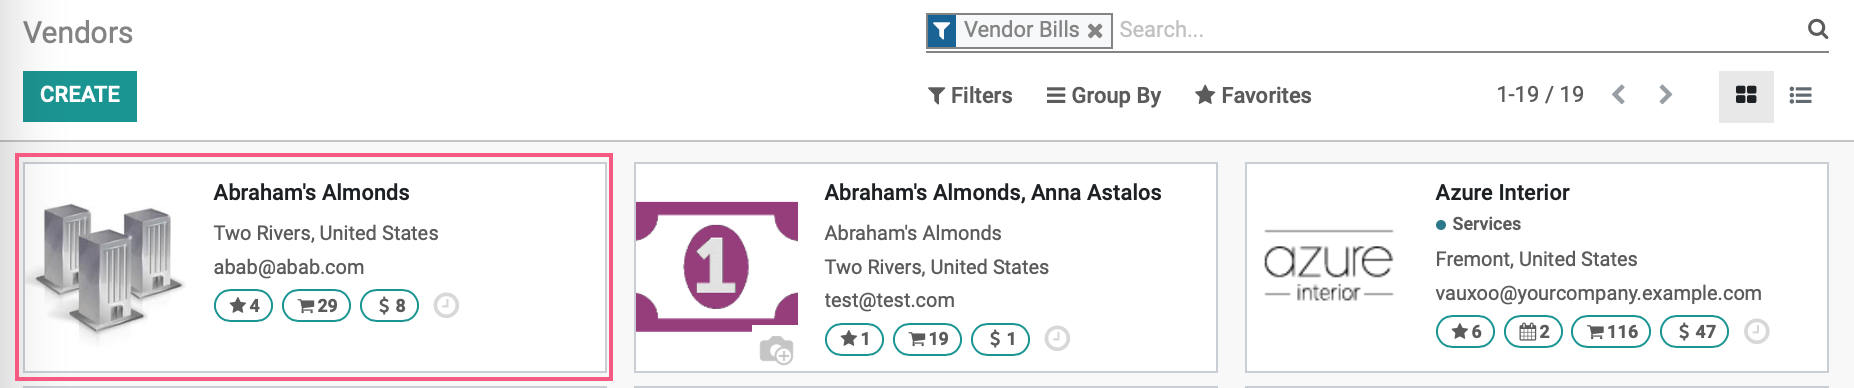
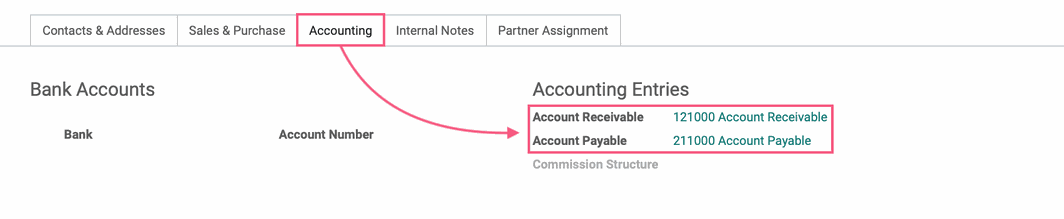
Navigate to the accounting tab for the partner and click the Accounting tab. The accounts listed as their Account Receivable and Account Payable will be used for payments associated with this partner.
If you see the message "Accounting-related settings are managed on the parent company", click the parent company link displayed. These fields can only be viewed/changed on a parent contact.

Incoming customer-type payments use the partner's Account Receivable. Outgoing vendor-type payments use the partner's Account Payable.
Manually Create a Vendor Payment (Outgoing)
It's best practice to create a payment directly from the vendor bill; however, Odoo does allow you to create standalone vendor payments. To do so, click Vendors > Payments, then click create.
This will bring you to the following form. This example is a payment we're sending to a vendor, Abraham's Almonds.
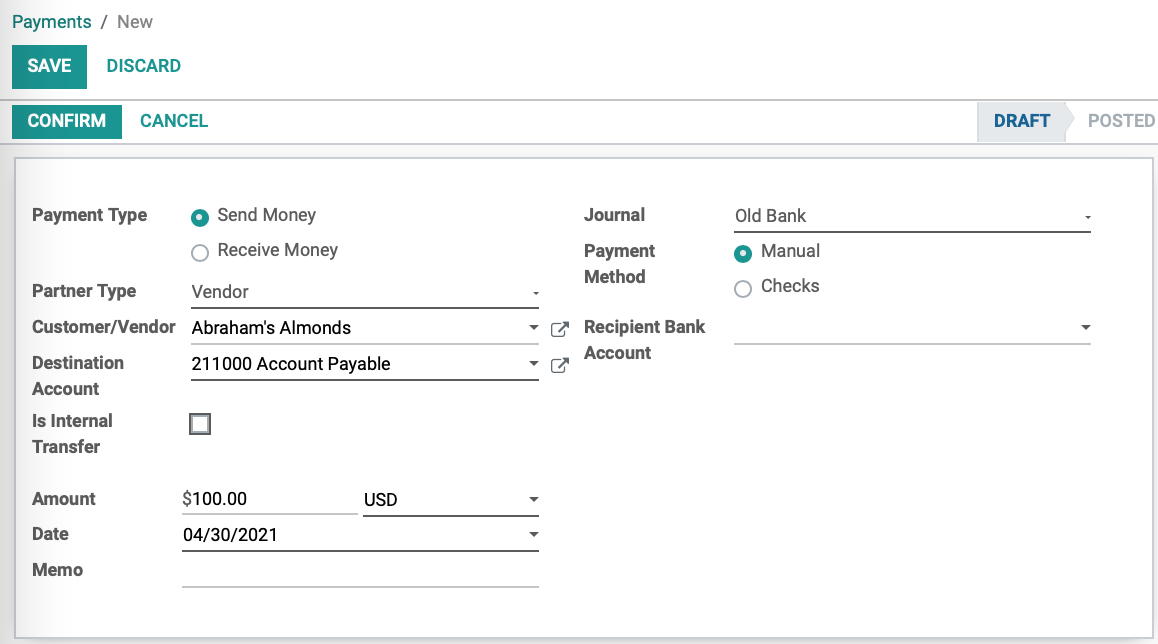
Payment Type: Send Money will already be selected because you accessed this form through the Vendors menu.
Partner Type: "Vendor" will already be selected because you accessed this form through the Vendors menu.
Customer/Vendor: Select the vendor you'll be sending payment to.
Destination Account: If you've selected a vendor and they have an Accounts Payable account configured, it will populate here. Otherwise, select the account where this payment should be recorded.
Is Internal Transfer: This field is to be used for moving funds from one internal account to another. It is not applicable when paying a vendor bill.
Amount: Input the payment amount and currency.
Date: Select the date that the payment should be recorded on.
Journal: Select the journal that the payment will be posted to.
Payment Method
Manual: This means that the payment was sent or received by a method outside of Odoo like a credit card payment or PayPal receipt.
Check: This means that a check was used to make or receive this payment and can be recorded within Odoo. If you use check printing within Odoo, you can have Odoo print the check for this payment. When selected, the following fields display in the previous section.
Memo: Input a reference for the payment, we recommend using the vendor bill number associated with this payment.
Check Number: The check number will be added by Odoo.
Recipient Bank Account: This field will only appear when the Payment Method is set to "Manual". If the vendor you've selected has one or more bank accounts on file, you'll have the option to select their account here.
When you're done, click SAVE to keep this record as a draft, or click CONFIRM. Once confirmed, you can then click print check, or Mark as Sent to record that the manual payment has been sent.
Journal Entry Sent Payment
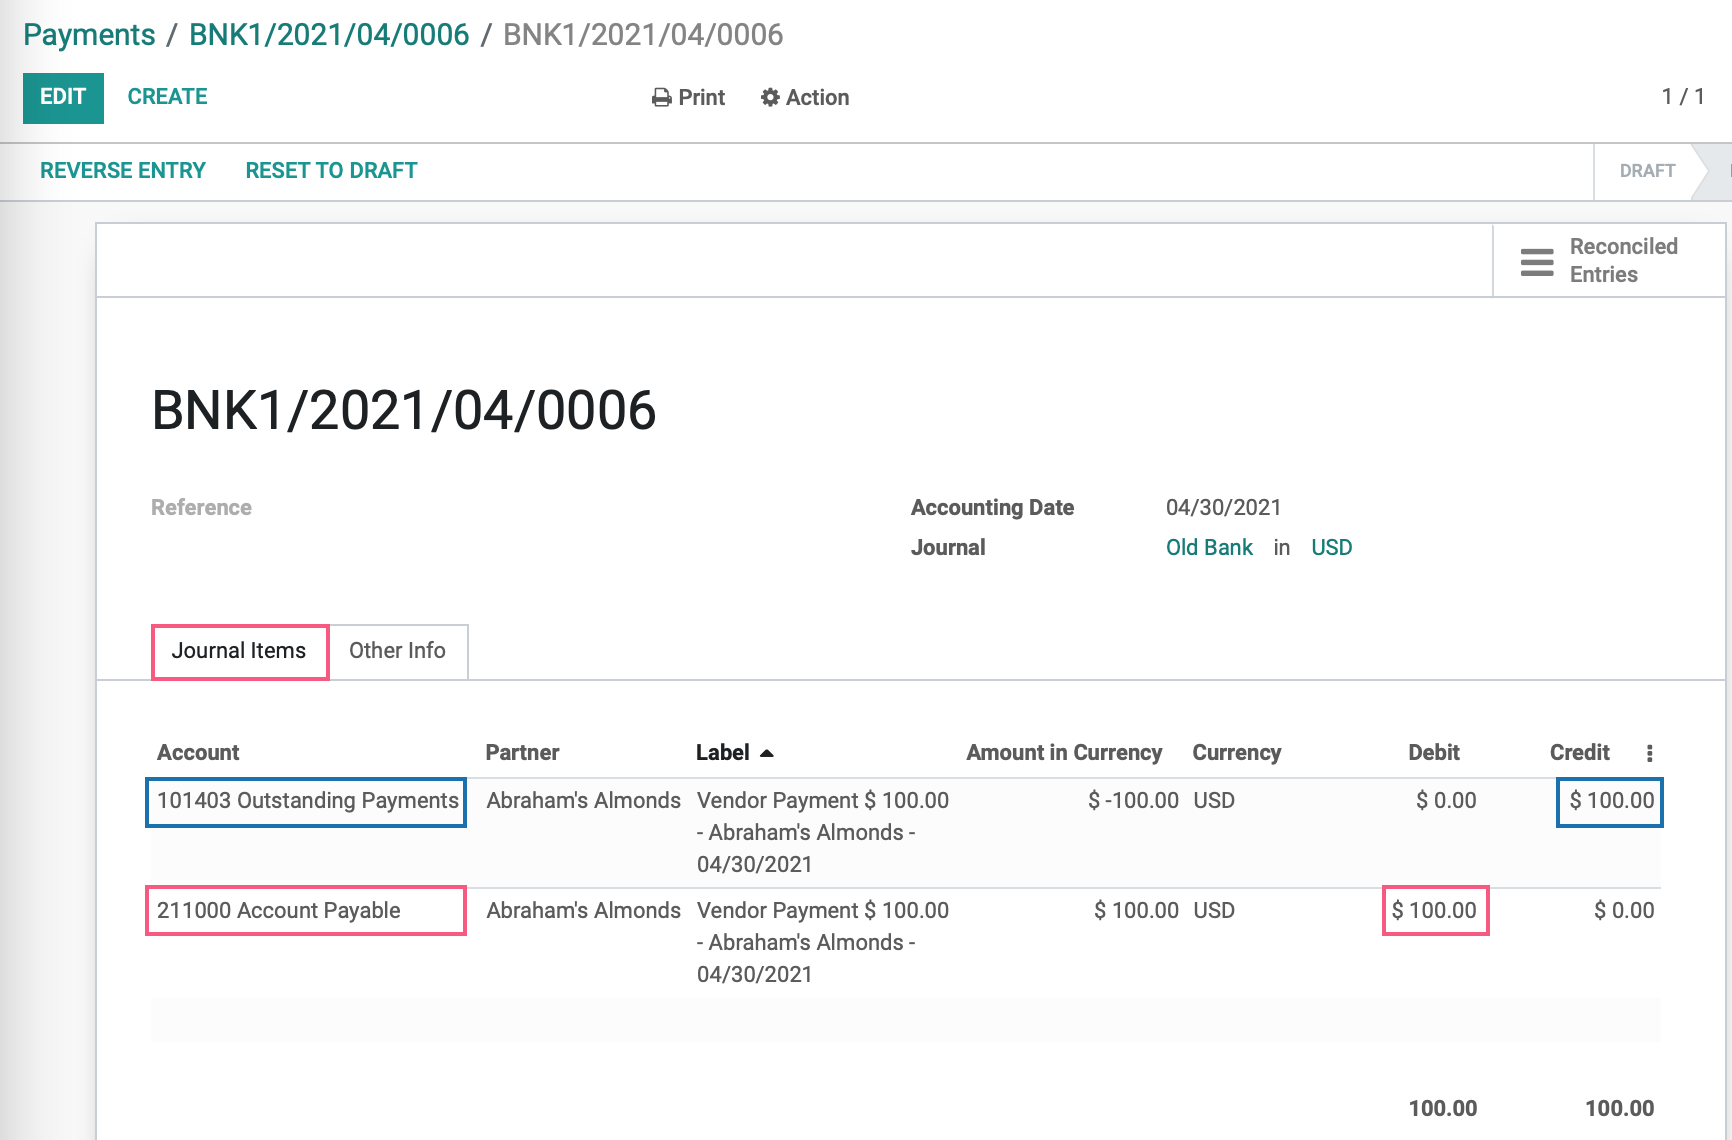
Once your payment is confirmed, we can review the journal entry that was created by clicking on the Journal Entry Link of the confirmed payment.
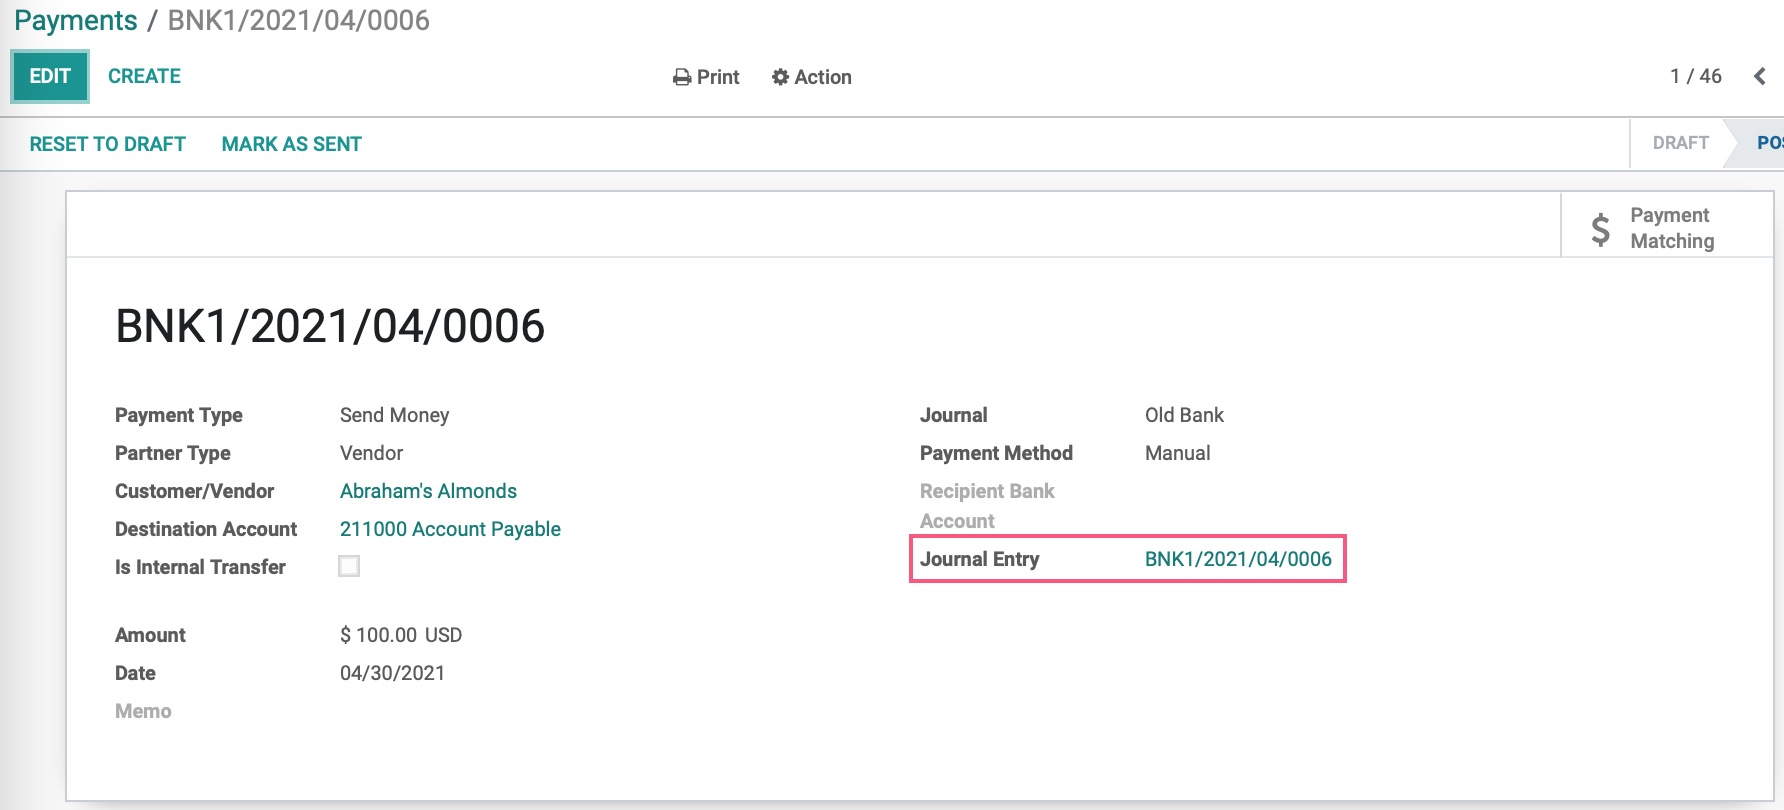
Here you can see that we credited $100.00 from the account that was listed as the Outstanding Payments account on our "Old Bank" journal and we debited the account that was listed as the default Accounts Payable account on the vendor's accounting tab.
Manually Create a Customer Payment (Incoming)
Click CUSTOMERS > Payments, then click create.
This will bring you to the following form. This example is a payment we're receiving from a customer, Alex Alvarez.
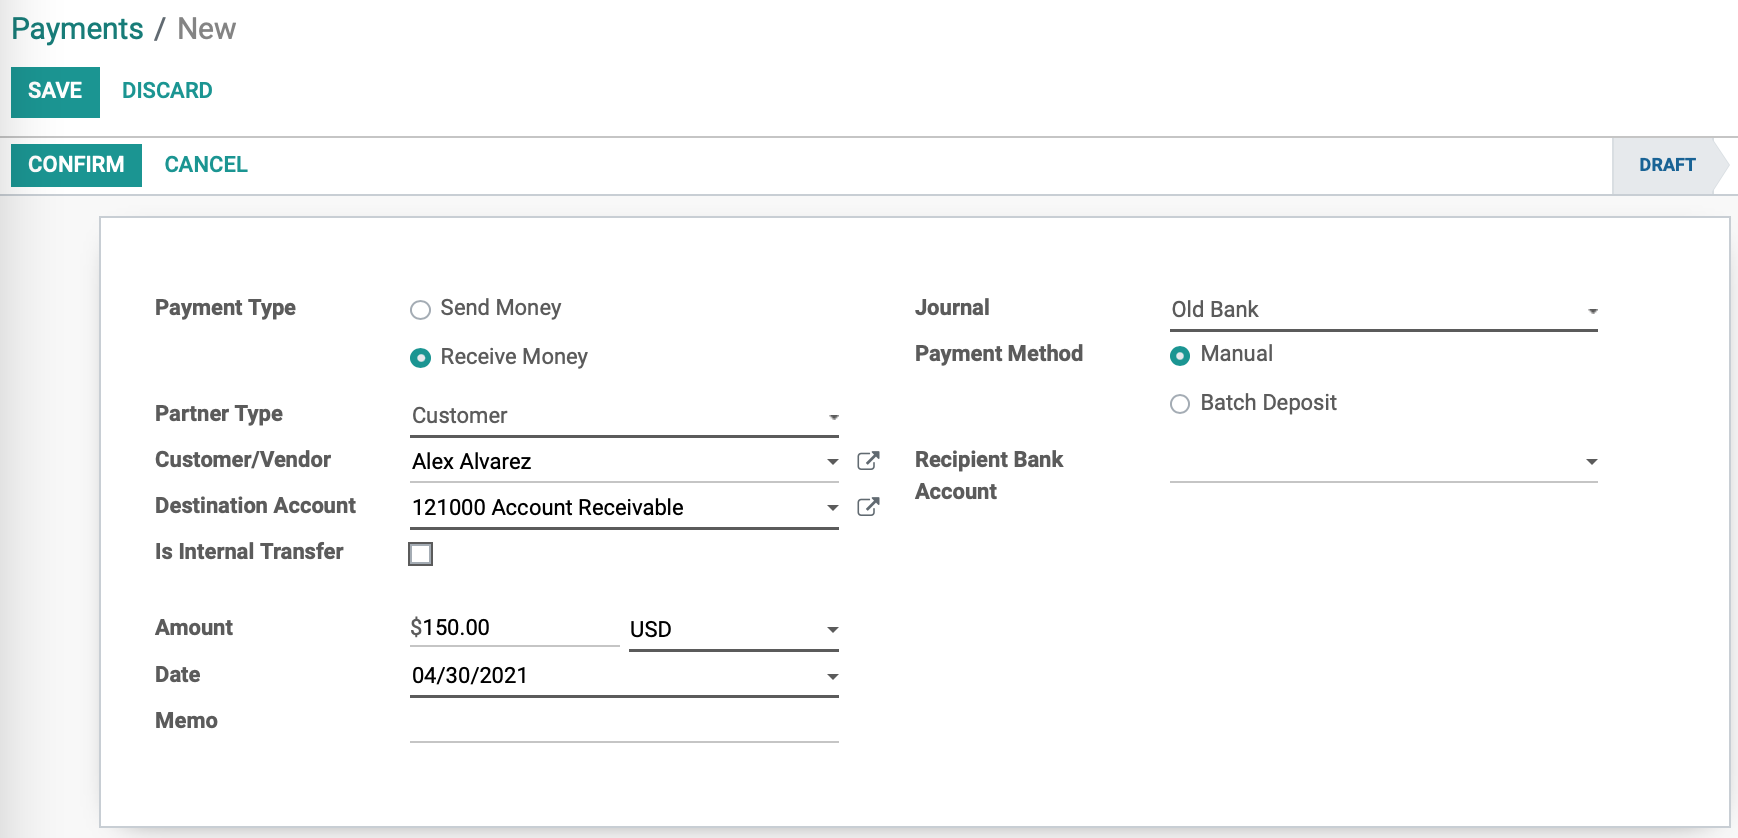
Payment Type: "Receive Money" will already be selected because you accessed this form through the Customers menu.
Partner Type: "Customer" will already be selected because you accessed this form through the Customers menu.
Customer/Vendor: Select the customer the payment is coming from
Destination Account: If you've selected a vendor and they have an Accounts Payable account configured, it will populate here. Otherwise, select the account where this payment should be recorded.
Is Internal Transfer: This field is to be used for moving funds from one internal account to another. It is not applicable when paying an invoice.
Amount: Input the payment amount and currency.
Date: Select the date that the payment should be recorded on.
Journal: Select the Journal that the payment will be posted to.
Payment Method
Manual: This means that the payment was sent or received by a method outside of Odoo like a credit card payment or PayPal receipt.
Check: This means that a check was used to make or receive this payment and can be recorded within Odoo. If you use check printing within Odoo, you can have Odoo print the check for this payment. When selected, the following fields display in the previous section.
Memo: Input a reference for the payment, we recommend using the vendor bill number associated with this payment.
Check Number: The check number will be added by Odoo
Recipient Bank Account: This field will only appear when the Payment Method is set to Manual. This field will only appear when the Payment Method is set to "Manual". If the customer you've selected has one or more bank accounts on file, you'll have the option to select their account here.
When you're done, you have the option to click Save to save this record as a draft; however, for this example, click Confirm to indicate the payment was received.
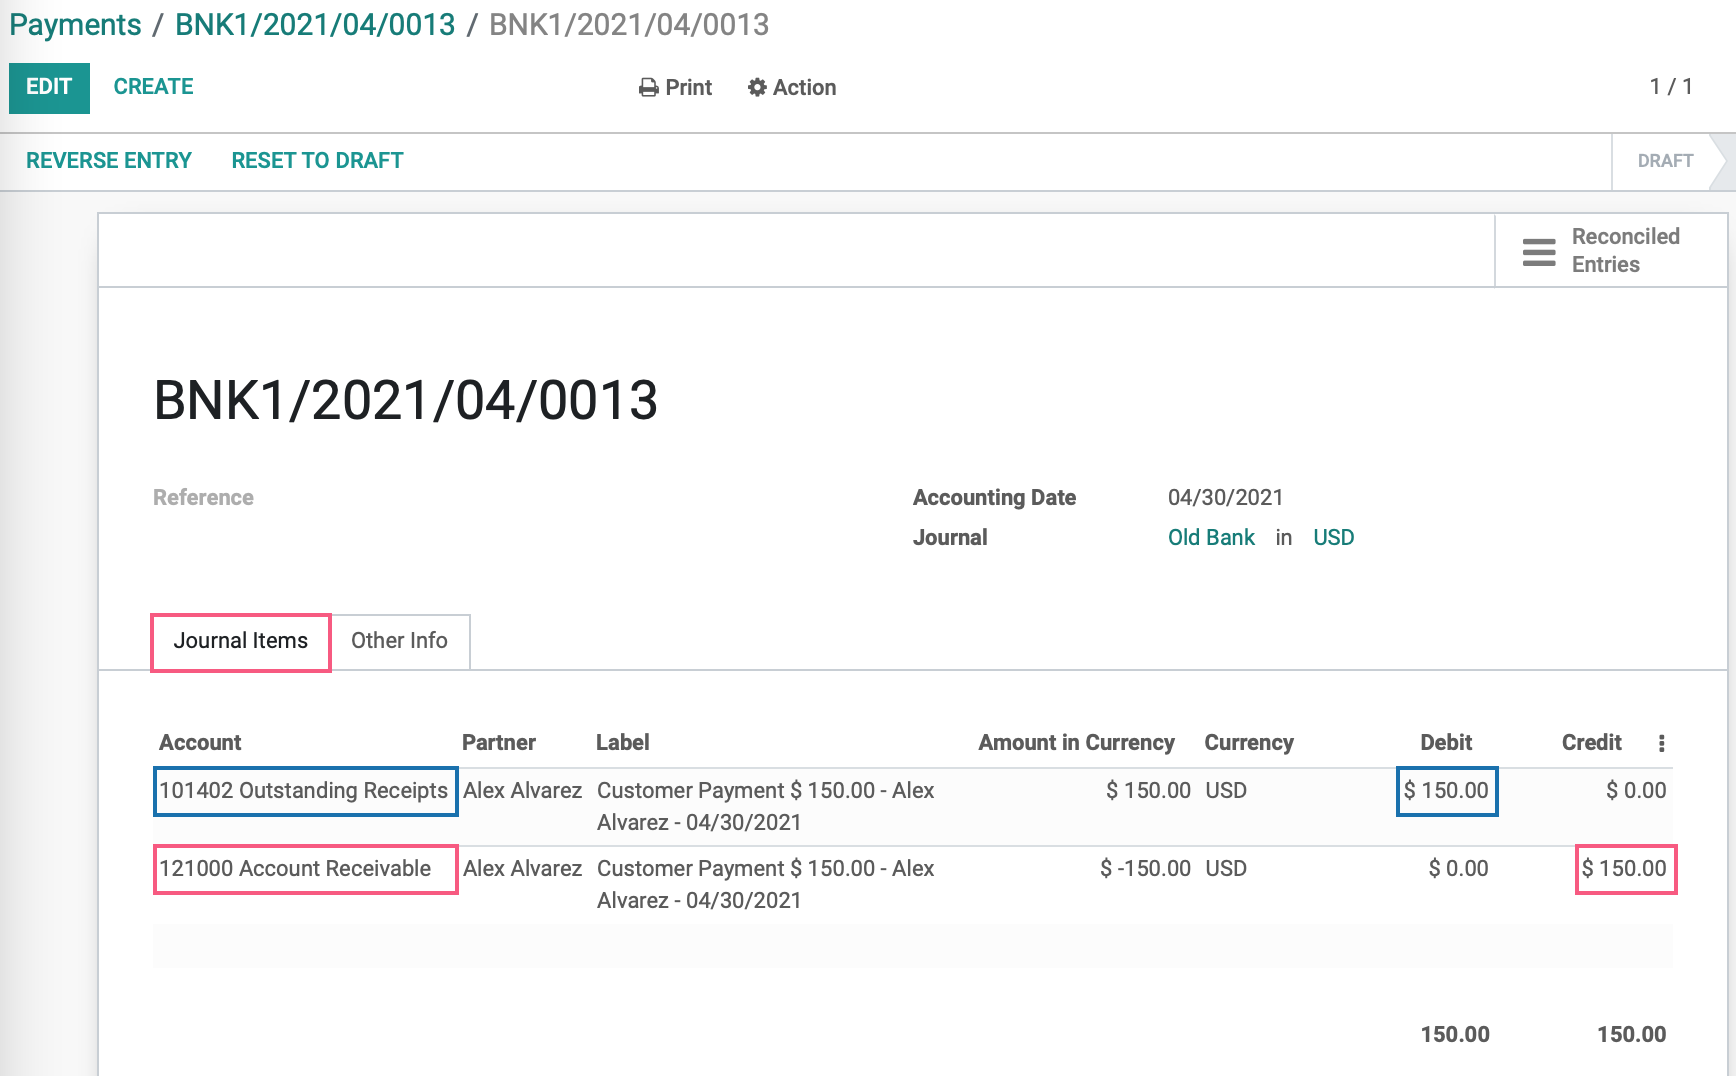
Journal Entry Received Payment
Once your payment is confirmed, we can review the journal entry that was created by clicking on the Journal Entry Link of the confirmed payment.
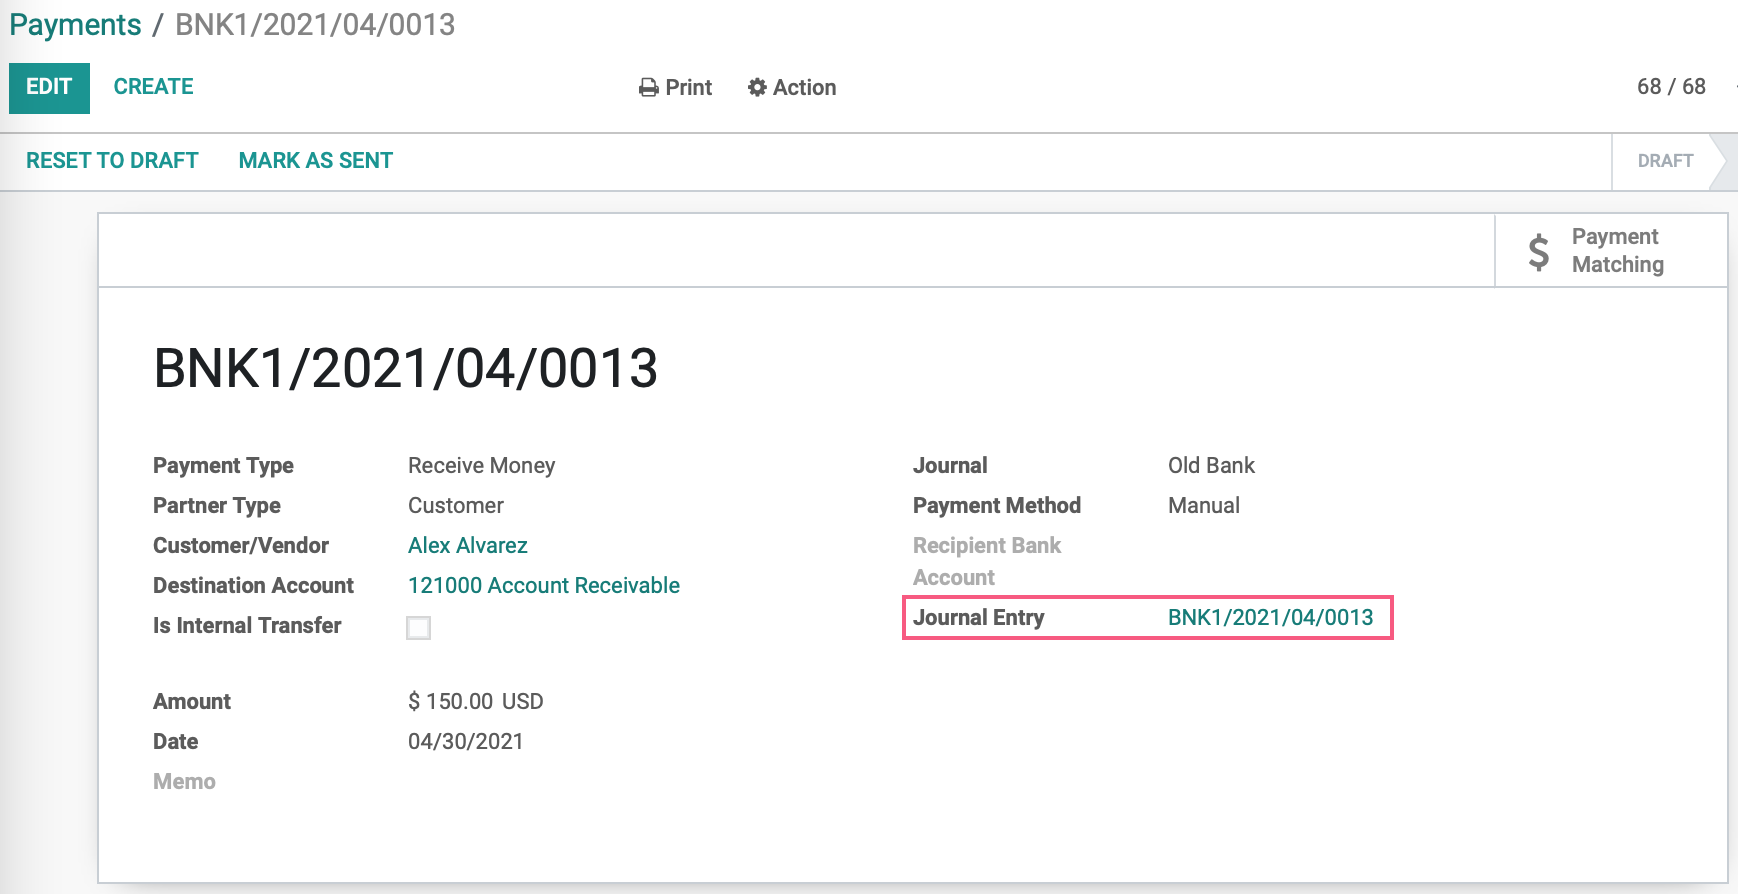
Here you can see that we credited $150 from the account that was listed as the Account Receivable on the customer's accounting tab and we debited the account that was listed as the Outstanding Receipts Account on the 'Old Bank' journal.