Hibou Odoo Suite: Return Merchandise Authorization (RMA): Return Merchandise Authorization (RMA): Templates
Repository Versions:
Purpose
The purpose of this documentation is to outline the use cases and processes associated with creating Return Merchandise Authorization (RMA) templates within Hibou's RMAs application. Additional configuration options are available when Hibou's RMAs for Sale Orders module is also installed.
Due to the template-driven nature of Hibou RMAs, there are a high number of configuration options available which results in a highly flexible system. If you do not use the Sales application, RMAs can still be used in conjunction with the Inventory application to manage the appropriate inventory moves.
Processes
To get started, navigate to the RMA application.
Creating RMA Templates
Once there, click on Configuration and then Templates.
Here you will see a list of all of your RMA templates. Click the CREATE button.
Good to Know!
You can mix and match when setting up an RMA template: Use only inbound, only outbound, or a combination of both! This provides an immense amount of flexibility that can meet most RMA use cases.
First give your RMA template a name that is descriptive and tells users from a glance what operations are associated with the template or the template's use case.
Then select an option from the drop-down menu for Applies To. Stock Picking will be the only option unless the module Hibou RMAs for Sale Orders is also installed.
If you'd like the template to expire, enter a number in the Expire in Days field.

Creating Inbound Pickings
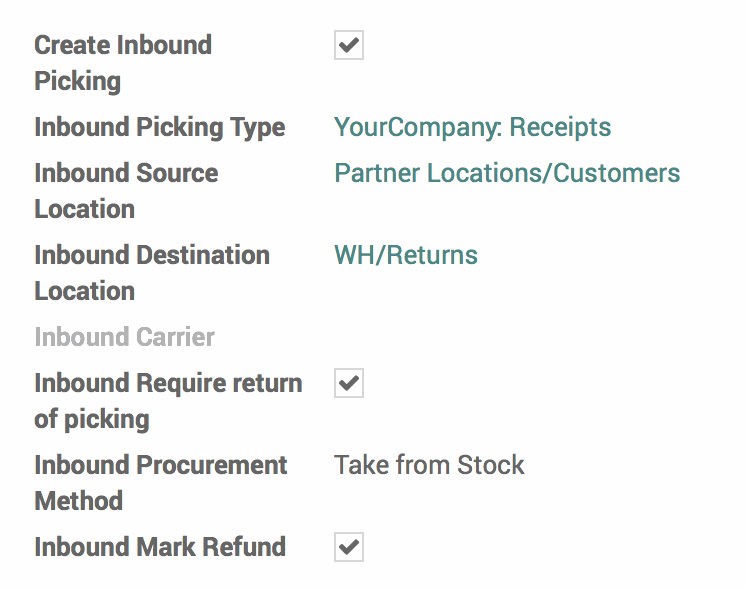
To create an inbound picking for merchandise, select the "Create Inbound Picking" checkbox and use the following configuration options:
Inbound Picking Type: This will typically be the Receipts operation type for a given warehouse.
Inbound Source Location: The location the product is coming from.
For sale order RMAs, this will typically be the 'Partner Locations/Customer' location.
For stock picking RMAs:
If used to return a picking that went to a customer, this will typically be the 'Partner Locations/Customer' location.
If used to receive replacement goods on a picking from a vendor, this will typically be the 'Partner Locations/Vendors' location.
Inbound Destination Location: The location the product is going to.
For sale order RMAs, this will typically be a given warehouse's Returns location, so the merchandise can be evaluated before being scrapped or made available again as sellable stock.
For stock picking RMAs:
If used to return a picking that went to a customer, this will typically be a given warehouse's Returns location.
If used to receive replacement goods on a picking from a vendor, this will typically be a given warehouse's main Stock location.
Inbound Carrier: You can set a default carrier that, with configuration, allows for sending printable, PDF labels to customers for returns in which the company covers return postage. Carrier and integration dependent.
Inbound Require Return Picking: When checked, this will find a picking that's eligible to return. In a stock picking RMA, the eligible picking will be the picking that was selected from the drop-down menu. When unchecked, it will make a new picking. In most cases this should be checked as it is the mechanism that links the picking line back to the line on the related Sales Order, which is responsible for decrementing the delivered quantity.
Inbound Procurement Method: Select the procurement method for the inbound picking. Take from Stock will take from stock, while Apply Procurements will be based on your company's particular procurement configuration.
Inbound Mark Refund: This will increment or decrement quantities on the documents associated with the return. Note that this is highly dependent on use case and it will not have an effect on the stock pickings themselves.
Creating Outbound Pickings
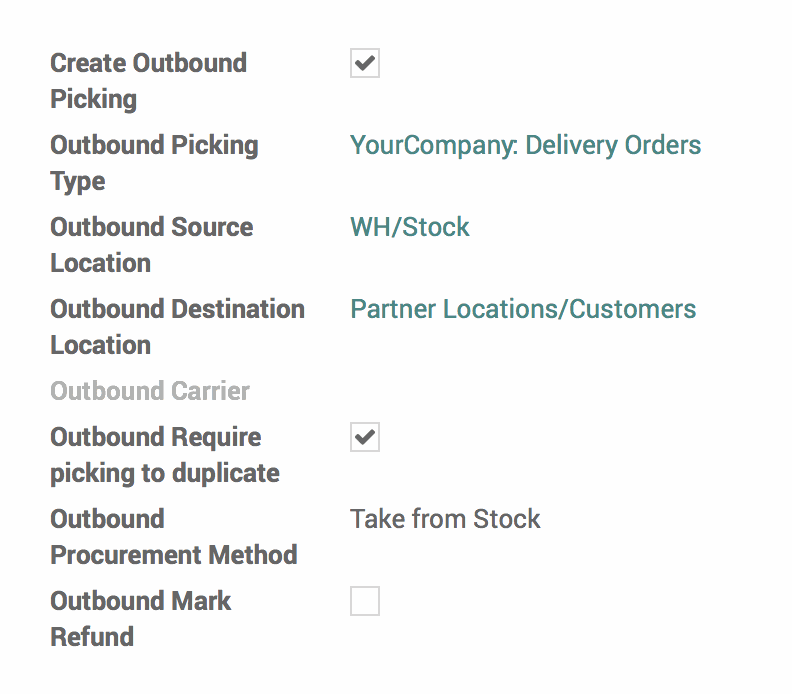
Create an outbound picking for shipping out replacement merchandise with the following configuration options:
Outbound Picking Type: This will typically be the Delivery Orders operation type for a given warehouse.
Outbound Source Location: The location the product is shipping from.
For sale order RMAs, this will typically be a given warehouse's main Stock location.
For stock picking RMAs:
If used to replace a picking that went to a customer, this will typically be a given warehouse's main Stock location.
If used to send back damaged or otherwise unacceptable goods on a picking from a vendor, this will typically be a given warehouse's main Stock location or a Return to Vendor location..
Outbound Destination Location: The location the merchandise is shipping to.
For sale order RMAs, this will typically be the 'Partner Locations/Customer' location.
For stock picking RMAs:
If used to send replacement product to a customer, this will typically be the 'Partner Locations/Customer' location.
If used to send back damaged or otherwise unacceptable goods on a picking from a vendor, this will typically be the 'Partner Locations/Vendors' location.
Outbound Carrier: You can set a default carrier for outbound pickings.
Outbound Require Picking to Duplicate: When checked, this will find an eligible picking that can be duplicated. In a stock picking RMA, the eligible picking will be the picking that was selected from the drop-down menu. When unchecked, it will make a new picking.
Outbound Procurement Method: Select the procurement method for the outbound picking. Take from Stock will take from stock, while Apply Procurements will be based on your company's particular procurement configuration.
Outbound Mark Refund: This will increment or decrement quantities on the documents associated with the return. Note that this is highly dependent on use case and it will not have an effect on the stock pickings themselves.
Instructions
Internal Instructions: These instructions provide guidance to internal customer service agents on any steps they need to follow for the selected type of return.

Customer Instructions: These instructions can be used to inform customers how to proceed with their return. Additionally, these can be included in email templates.
