Manufacturing: Operations: Manufacturing Orders
Purpose
This documentation will explain the components of a Manufacturing Order in the Manufacturing application of Odoo 14, and show you how to create a new order. A manufacturing order is a process of creating a deliverable via in-house operations. Odoo Manufacturing makes it possible to manage simple and complex procedures.
Process
To get started, navigate to the Manufacturing app.
Once there, go to OPERATIONS > MANUFACTURING ORDERS. If you don't have Work Orders enabled, you'll land on this page by default.
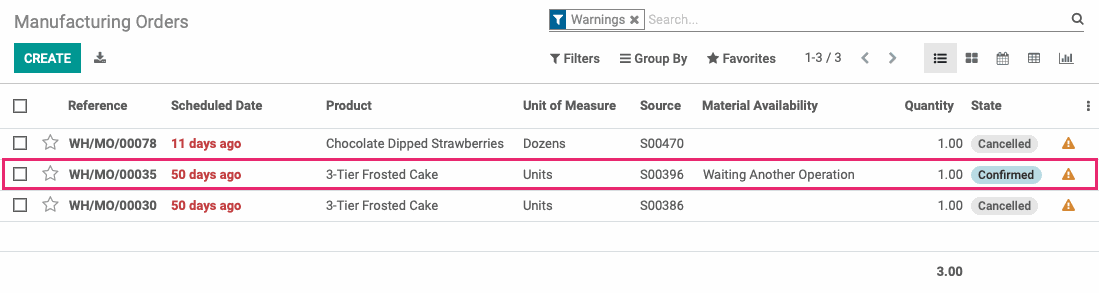
This view shows you the dates, products, material availability, and state of each manufacturing order at a glance. To see the different statuses, remove the To Do filter, then click Group By > Status.

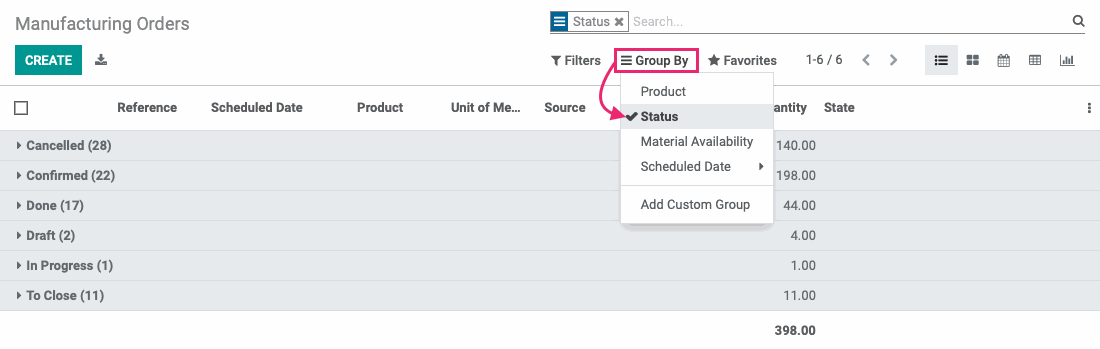
In this view, you'll encounter each of these statuses at some point:
Draft: Indicates the manufacturing order has been started and saved as a draft, but not yet confirmed.
Confirmed: Indicates the manufacturing order has been created and confirmed, and is awaiting production.
To Close: Indicates production is complete and you can manually close the manufacturing order to mark it as Done.
In Progress: Indicates that manufacturing has begun on this manufacturing order.
Done: Indicates the production is complete and the manufacturing order has been closed.
Cancelled: Indicates the manufacturing order was canceled for any reason.
Items that show the Scheduled Date in red are overdue.

Warnings
Items that display a warning icon should be opened and investigated. You can quickly see all of these by using the Filters > Warnings menu.
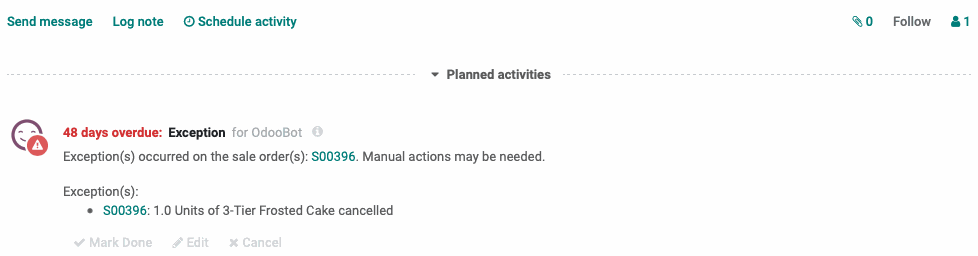
Once opened, the exception will be showin in the chatter. For this manufacturing order, we can see that the original order that triggered it was canceled, so we'd likely want to cancel it, as well. Note that clicking Mark Done will clear the exception warning, but will not solve the issue.
Important!
To create a Manufacturing Order, the product to manufacture must first have a Bill of Materials (BoM). You can find more information in the Master Data > Bills of Materials documentation.
Creating a Manufacturing Order (MO)
Depending on the configuration of your product and system, Odoo may create a MO automatically based on demand. If you need to create one manually, click Create from the Operations > Manufacturing Orders page.
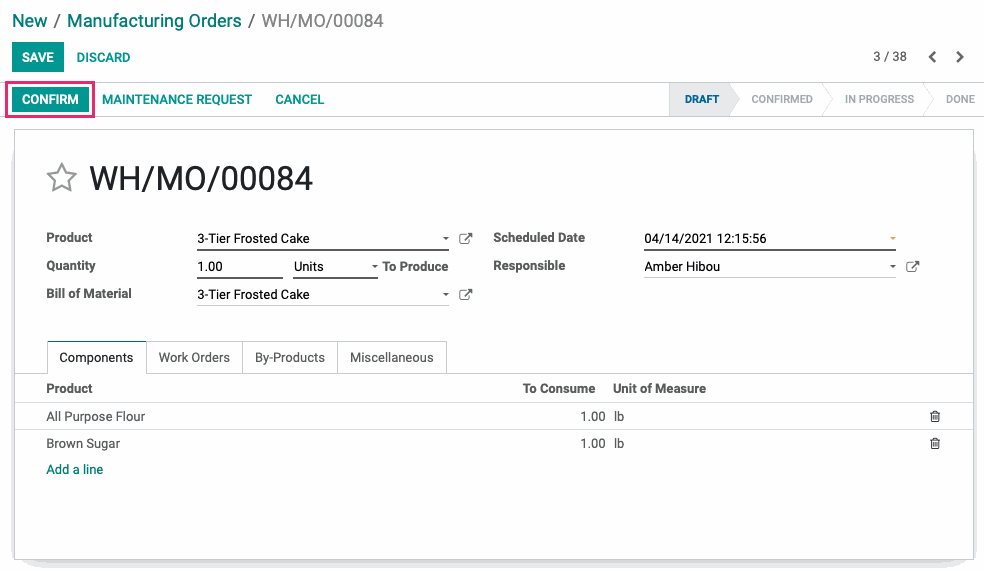
You'll be presented with the following form. We've prepopulated the form with the product "Penuche" to show the process.

Product: This is the item to be produced. Once this field is populated, the remaining fields will populate as well, based on the Bill of Material.
Quantity + UoM: The quantity to be produced based on the Unit of Measure, shown on the next line down. Changing this quantity will update the quantities on the Components tab. The Units of Measure field does not have a label, but it will default to the Unit of Measure the product has been configured with. You may choose to manufacture the product using a different UoM in the same UoM Category, and Odoo will do the calculations for you.
Scheduled Date: The date you can start the manufacturing process. It will default to the earliest date possible but should be based on the availability of your workcenters, if defined.
Responsible: The name of the contact responsible for the oversight of this manufacturing order.
Under the Components tab:

Product: The products are populated based on the BoM selected above. You can click the component to modify the initial demand for this MO.
To Consume: The amount of product that will be consumed with this production. This number reflects the UoM specified in the Quantity field at the top of the form.
Unit of Measure: The UoM the product is configured with.
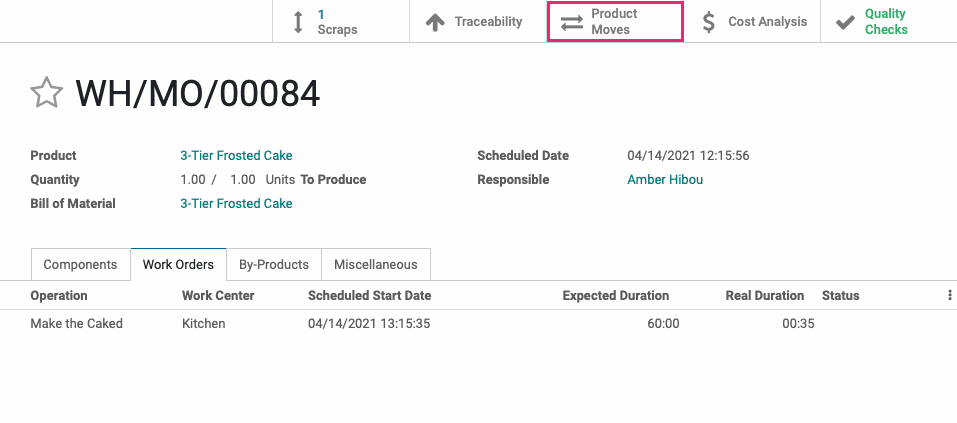
The WORK ORDERS tab will display if Work Orders are enabled in the Manufacturing configuration. The Operation lines are populated from the selected Bill of Materials.

Operation: A short description of the manufacturing step.
Work Center: Where this work will be taking place.
Scheduled Start Date: The date this operation is scheduled to start. This will not populate until the Manufacturing Order is planned (covered in next sections).
Expected Duration: The time estimated for this step to complete.
Real Duration: Once this step is complete, the actual time the step took will show here.
Status: The status of this step.
You can use add a line to add another step to the Manufacturing Order without altering the Bill of Materials.
The by-products tab will display if By-Products are enabled in the Manufacturing configuration. This tab displays products that you've configured on the BoM. Once this manufacturing order is complete, the configured by-products will enter your inventory and can be sold or consumed in other operations.

The Miscellaneoustab shows details of the manufacturing order, stock locations, and its operation type:

Operation Type: The operation entity manufacturing this product.
Components Location: The location where the components are stored pre-production.
Finished Products Location: The location where the finished product will be stored post-production.
Source: If this manufacturing order was generated from another operation (e.g. sale order or reordering rule), the reference to that operation will display here.
Good to Know!
There are three types of Manufacturing methods: 1-step, 2-step, and 3-step, which are configured on individual warehouses in the Inventory app, then go to Configuration > Warehouses.
These methods incorporate picking and transferring. Because they can range from simple to intricate, we've created separate documentation to outline the full workflow of each. For those details, please refer to Manufacturing Workflow documentation.
Options on a Confirmed Manufacturing Order
Since the full workflow will be explained in the Manufacturing Workflow documentation, we'll briefly go over what the options are on a Confirmed Manufacturing Order here.
Check Availability
You can immediately see if component products are available by looking at the Reserved column of the Components tab. In this screenshot, we've adjusted the quantity to produce to 200 to see what some of the different messages are.
From this image, we can see that we do have enough flour in stock because the icon is green; however, some or all of this quantity has surpassed its expiration date. For the brown sugar, we can see we don't have enough in stock because the text and icon are in red.

If we decrease the Quantity to produce to 1, we'll see that we do have enough of each component in stock.

To reserve the available stock, click Check Availability. This step is required before you start the process of manufacturing.
This will reserve those component products for this operation. Once reserved, you'll have the option to Unreserve to release the components and set them as available.

Plan
This button will only display if there are Work Orders on this manufacturing order. The Plan button will add your job to the work center's schedule, regardless of component availability. Once planned, you'll also have the option to Unplan and remove the job from the schedule.
Scrap
The Scrap button will allow you to mark some or all components as damaged or unusable (e.g. expired). In this example, we're showing that .25 lbs of brown sugar will be scrapped.
You can Scrap a component before or after checking availability.

Now that this amount is scrapped, you'll see a Scraps smart button on the manufacturing order.
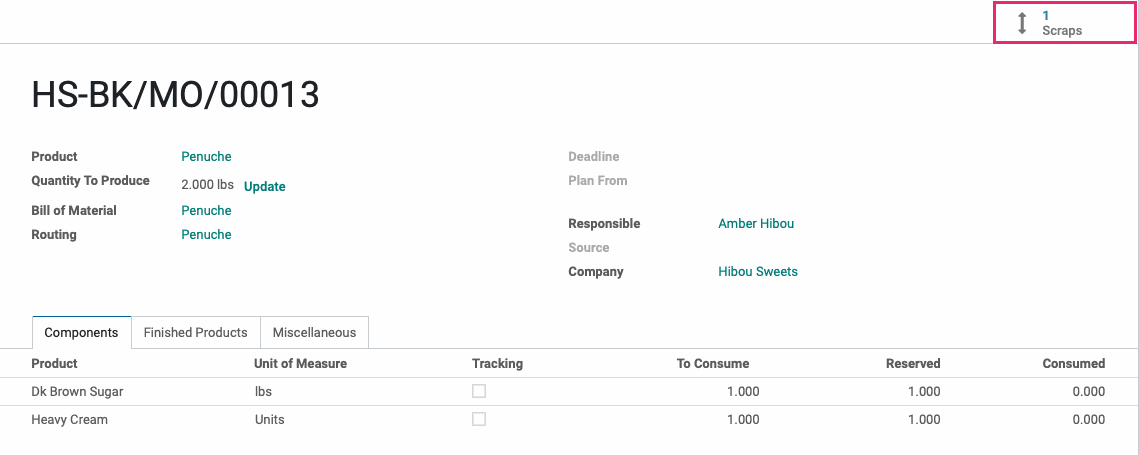
Additionally, Odoo will re-reserve that scrapped quantity if it's still in stock.
Unlock
This button displays if Lock Quantities To Consume is enabled in Manufacturing settings.
Use Unlock to modify a confirmed manufacturing order. Once clicked, you can do the following:
Adjust the quantity to produce
Add products to the components tab not included in the BoM
Increase the quantity for existing components by clicking the individual line items
Adjust the deadline date
Adjust the Plan From date
Change the responsible contact
Modify the Source field
When you're done modifying, click Lock to save your changes. Note that, depending on your database configuration, regular users may not have this option.
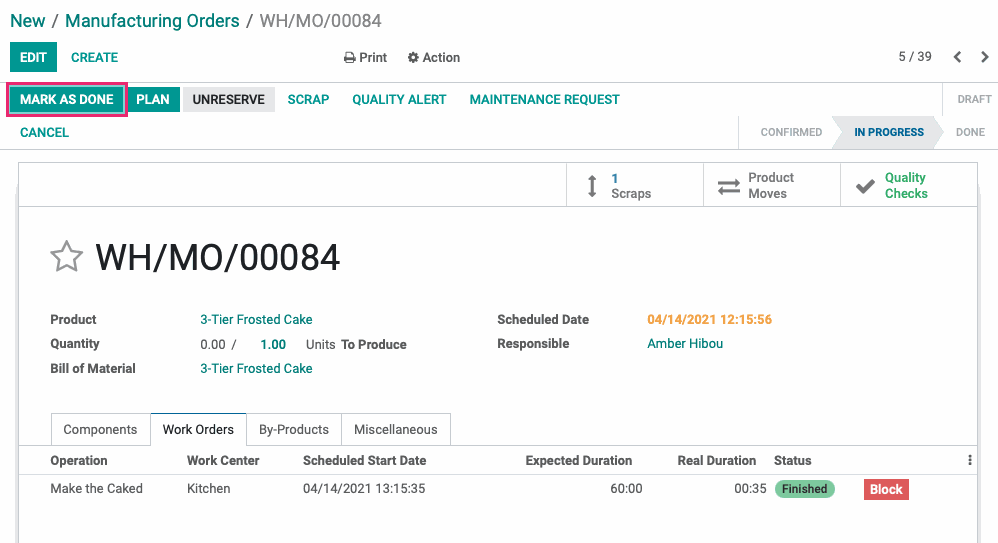
Mark as Done
When the manufacturing order is complete, click Mark as Done. This button will display whether or not you have Work Orders.
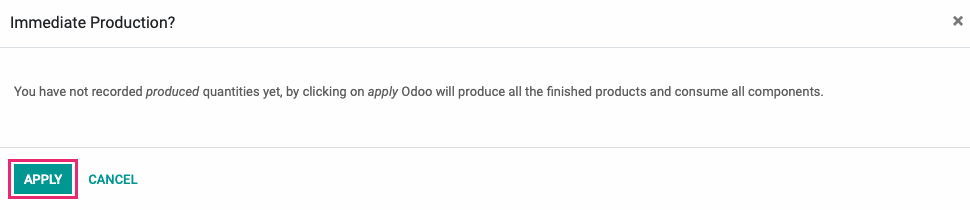
If you haven't yet recorded the quantities done, you can confirm that all quantities were produced by clicking Apply on the modal window that displays.
Important!
Record By-Products Manually
Using the Immediate Production shortcut will not record by-products. If your process has resulted in by-products, they must be manually recorded on the By-Products tab before marking as done.
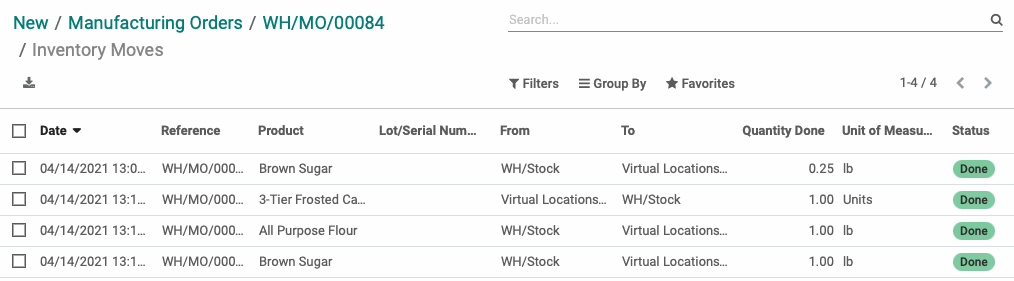
Once the order is complete, click Mark as Done. Your manufacturing order will now show new smart buttons for your reference. Click the Product Moves smart button to see the results of this manufacturing order.