Manufacturing: Manufacturing Workflows: Intro to Manufacturing
Purpose
This document will review creating Bills of Materials in detail, and assigning them to product variants. The second half of the document will cover basic configurations in the Odoo Manufacturing app, creating workstations and organizing work routes between them, and how to add quality checks as needed.
Product Variants and Bills of Material were covered briefly in the Product Creation Workflow document, so please review that first as this information will be more in-depth.
Process
To get started, navigate to the Manufacturing app.
Manufacturing
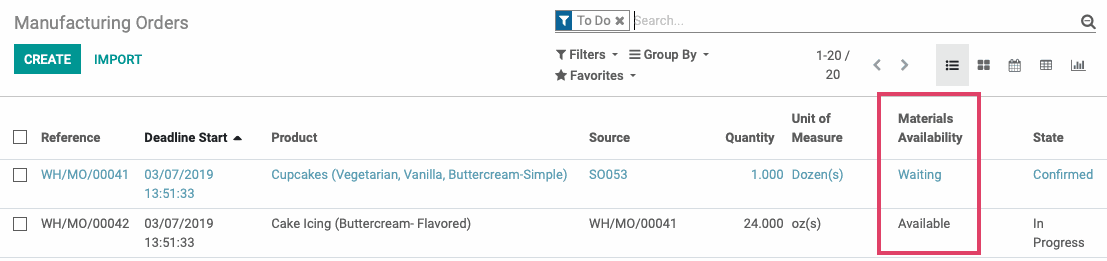
When you open the app, you will see your open manufacturing orders and their stages. By default, the manufacturing orders will populate in list form and show the following fields:
Materials Availability:
Waiting: Components are not yet reserved for this order.
Partially Available: Some components are not available or reserved in full.
Available: All components are reserved for this manufacturing order.
State:
Confirmed: The default state for a manufacturing order.
In Progress: One or more items on the manufacturing order have been produced.
Complete: The manufacturing order is complete; the manufacturing order is moved to this state when the “Mark As Done” button is clicked.
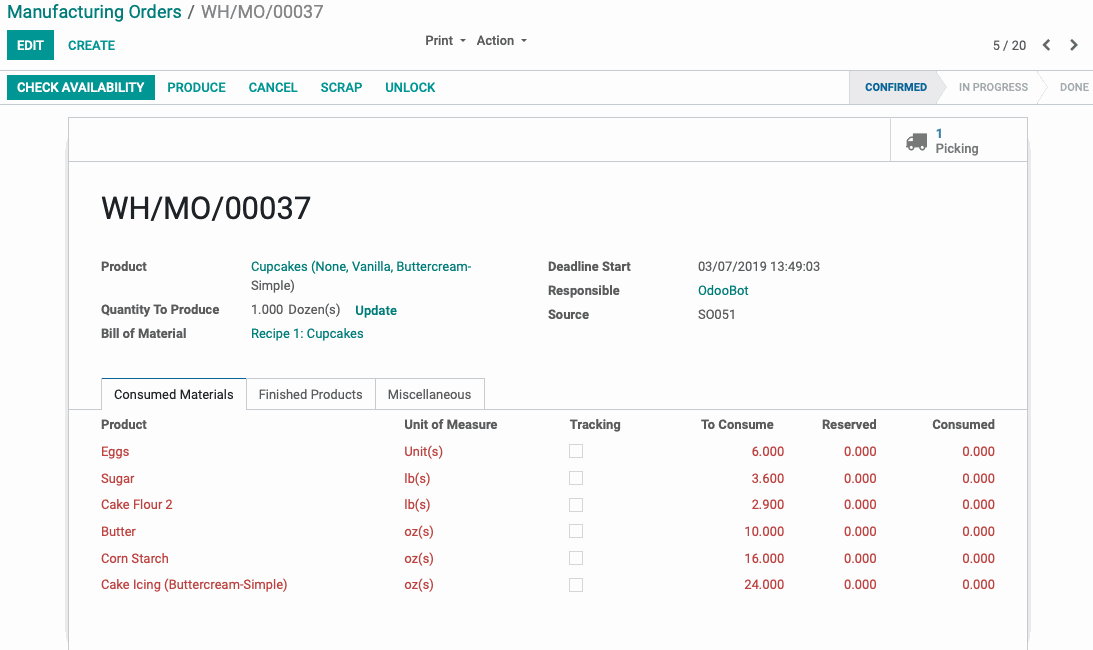
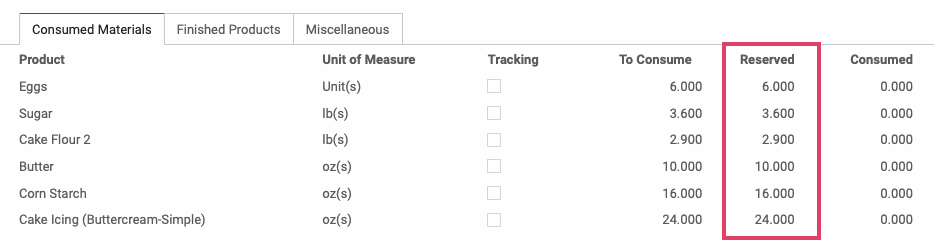
Opening a manufacturing order will show you the availability of the components needed to complete it.
Click Check availability to reserve the components to the MO. If you have configured multi-step manufacturing (picking components and then manufacturing), you will see a Picking smart button on the manufacturing order. When you Validate the transfer, you will be asked to set the Done Quantities and Create a backorder if any of the components are not reserved in full. Validating the transfer will reserve the components on the associated manufacturing order.
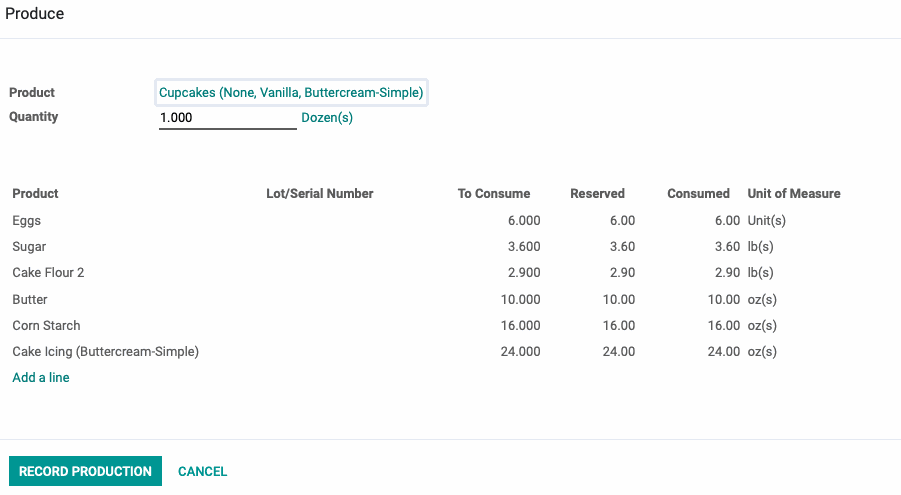
When you are ready to create the product, click Produce in the top left corner of the record, There will be a pop-up window for you to review the components and their yielded products one final time.
Click Record Production. This will create, but not complete, the Inventory Moves for the component and finished products. When using work stations and routes, explained later in this document, this will be the start of the allotted build time for efficiency reporting.
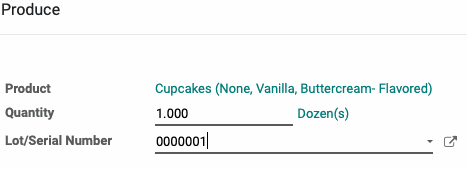
If configured to track lots and serial numbers, you will be able to specify the lot you are producing on the MO. After clicking PRODUCE on the available manufacturing order, you will see a drop down list of the lots currently available to you. Select one, and continue the normal steps to complete the MO.
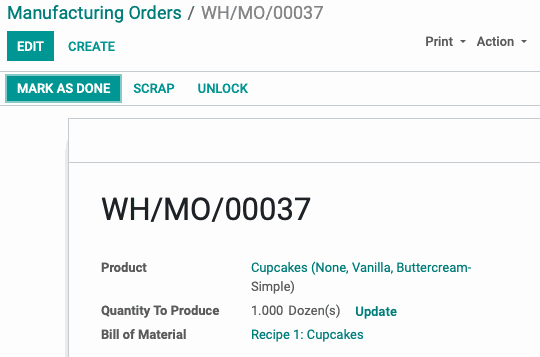
As production ends, you will click Mark As Done in the top left corner of the record to complete the inventory moves, moving the finished products to their post-production location.
A series of smart buttons will appear in the top of the record:
Traceability Report for products consumed or created by the manufacturing order.
Inventory Moves created in the production of the item.
# Picking button may or may not appear depending on your warehouse configurations.
Cost Analysis report based on your BOM's associated costs and any work center cost (if configured).

Bills of Materials
Simple
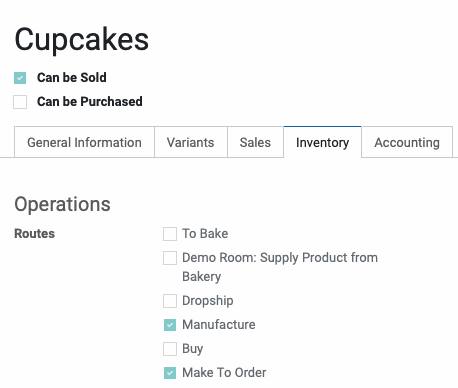
In order to manufacture a product, you will be required to create a Bill of Materials. Navigate to the product you wish to create and make sure that under the Inventory tab, the Manufacture box is checked.
In the top right corner of the product, there is a smart button for Bill of Materials. It may be under the More dropdown, if you don't see it immediately.
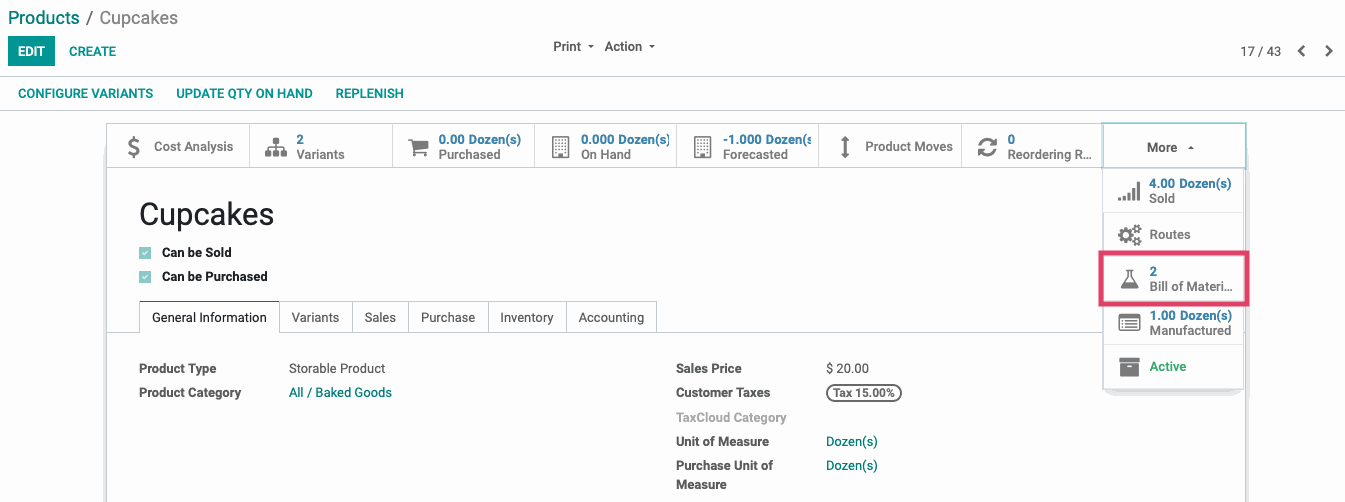
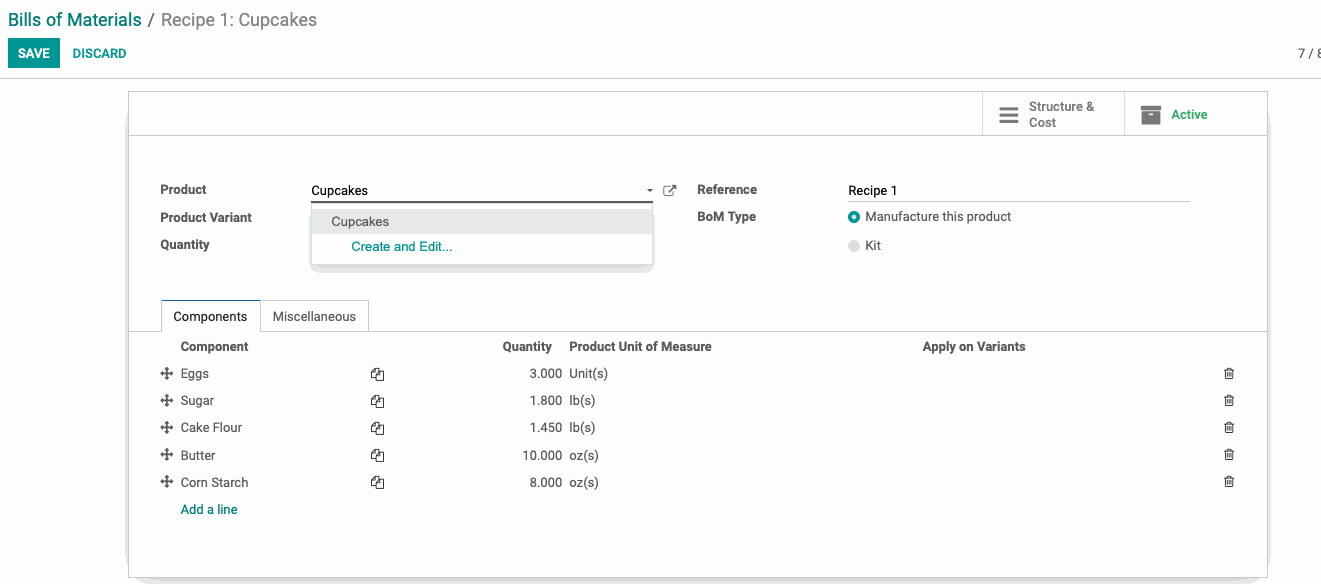
This smart button will only appear on manufacturable items. Every manufacturing 'run' of this product will require a bill of materials. When you create a bill of materials, you will be asked to list the component products you need to use to create the item.
The type designates whether this product has to be produced prior to shipping, or is a 'Kit'. A kit is a compilation of other products already in your inventory that do not require production, I.e. accessory or cleaning kits, and the component products will be represented as individual lines on the delivery order.
Once you have completed this list click SAVE.
Good To Know
When creating products with multiple variants, a BOM can be configured to only apply certain components when the appropriate attribute combination is used.
If the attributes are set to only be added from a sales order, Odoo will not allow a BOM to be set before the combination is added as a line on a sales order. Hibou offers a wizard that will force Odoo to recognize all possible attribute combinations for a product.
The manual way to force recognition is to create a Quote for the item and save it, but do not confirm. Archive the quote instead. That will allow Odoo to recognize them without affecting inventory.
Complex or Layered BOMs
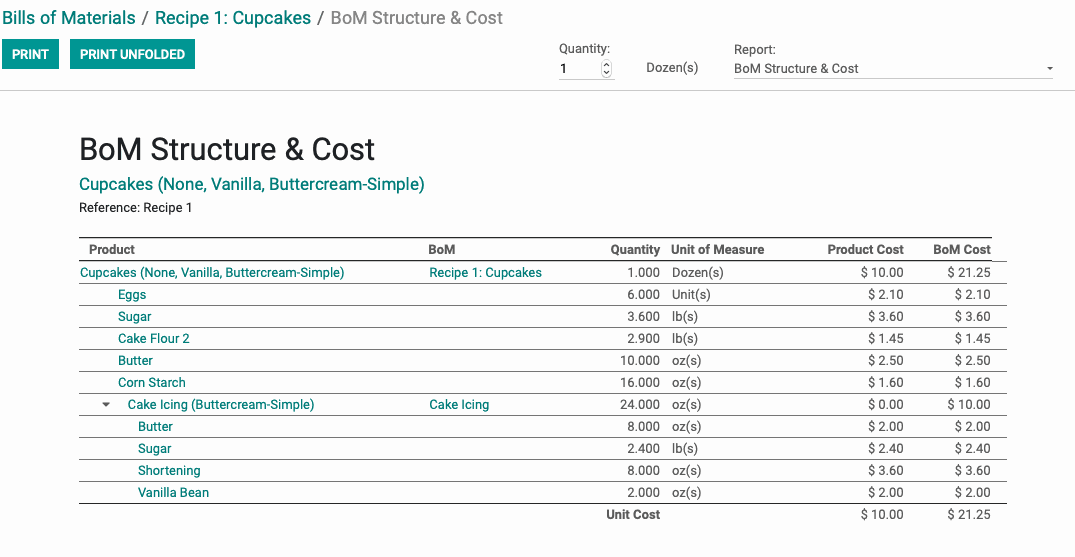
When a manufacturing order relies on components that must also be produced, the BoM for one product can trigger a second MO for the production of components. For our example, we need to create a batch of icing every time a sales order is confirmed for cupcakes. First, we're going to create the BOM for the Icing.
To get started, go to Master Data and Bills of Materials. Click Create

To create a base template to work from, leave the Product Variant field blank and set the quantity of Items yielded. If creating a Kit, such as for accessories, check the BoM Type: Kit.
Use the Add a Line button to add the components needed to create the item. When done, click Save.
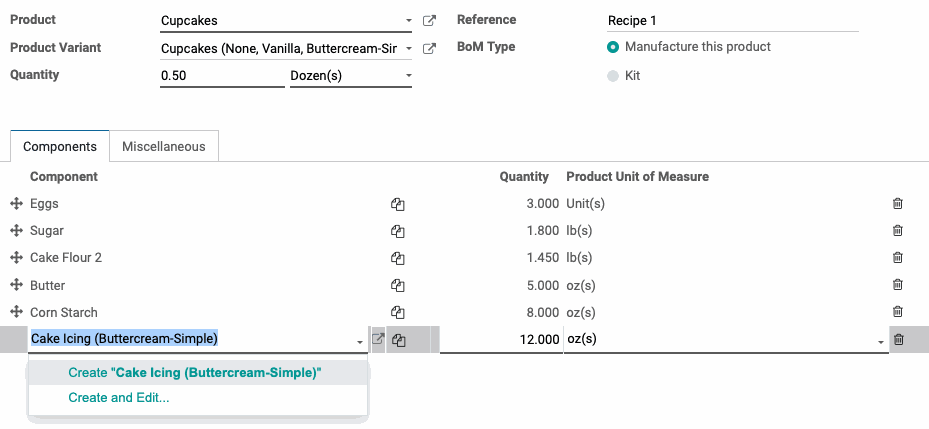
Now, we're going to add the icing to the BOM for cupcakes.
Return to the list of BOMs, and select the product you've created this component for. Edit the record, and use the Add a Line function to find the component and add it to the list. You can set the quantity needed for the production run, and the MO that it generates will calculate the materials needed to fill the order.
When done, click Save.
Take a look at the Structure and Cost Analysis of the completed BoM. You will see a staggered breakdown of the cost of materials, including those used to produce the component needed first.
Now, when a Sales Order is placed for a product with a Complex BoM, two manufacturing orders will be created, reflecting that a component must be produced in order to move forward with the SO's production schedule. You can see below that the two orders are sequential in list view.

Work Centers and Routings Configuration
It is possible to outline your production workflow through various stations and assigned specific routes to products. For our example, Hibou Sweets is a commercial bakery that works in conjunction with catering companies and event coordinators. Some of our products will require baking, and quality checks before moving on to the final decorating stage.
If Quality is selected during configuration, Odoo will install the Quality Checks app to your dashboard, but the functions are accessible here in manufacturing as well. Odoo refers to quality checks as 'steps' in the operation.
Good to Know!
Once built, the routings for individual products are assigned on the BOM.
To access these options go to the Configuration menu, and click Settings. Choose the options that you would like to use, and click Save.

Work Centers
Now, click on Work Centers, and then Create. This can also be found under Master Data in the Manufacturing Navigation ribbon.
In our bakery for example, an order for a custom cake would need to be baked and cooled before it is moved on to decoration, while an order for Candied Roses could go straight to Decoration.
This work station will be our baking assembly where our employees combine ingredients and put them into the oven. You will be presented with the following screen.
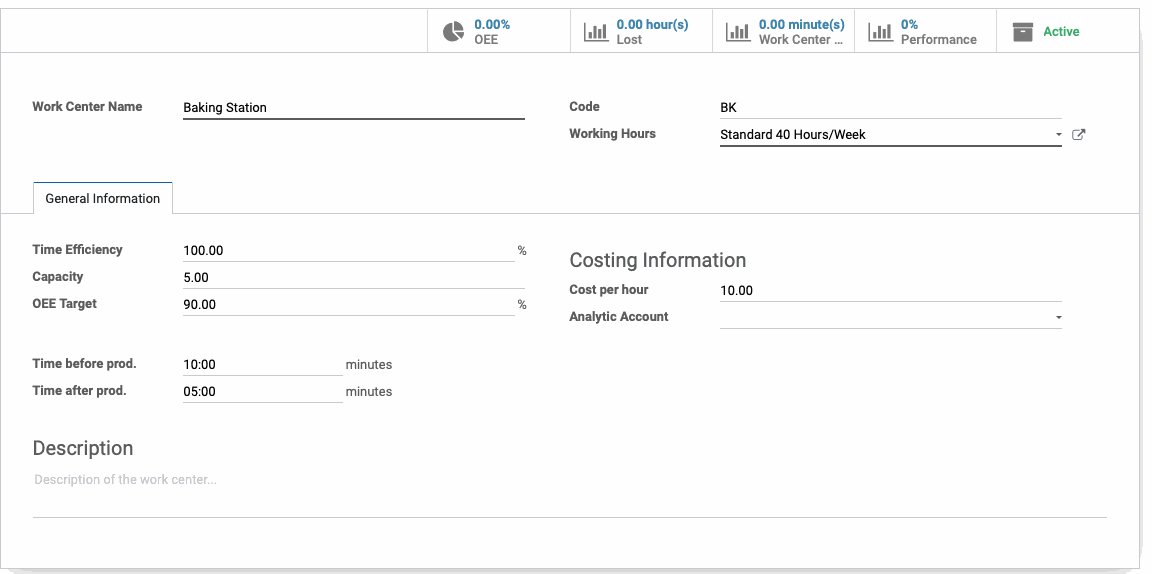
Name the Work Center and assign its Working Hours. You have the option to give it a Code for internal reference.
Under the General Information tab, you will see the following fields:
Time Efficiency: This field is used to calculate the expected duration of a work order at this station. For example, if a work order takes one hour and the efficiency factor is 100%, it will take the full hour. However, if the efficiency factor is set to 200%, then the expected duration will be 30 minutes.
Capacity: Number of pieces that can be produced in parallel. Our oven can only hold five cakes at a time.
OEE Target: Optimum Equipment Efficiency score as a percentage, calculated by time efficiency and capacity.
Time before Production: Time required to set up the work order for production, i.e. mixing cake batter.
Time after Production: Time to clean up after production, i.e. moving the cakes to a cooling rack and washing pans.
Costing Information
Cost per Hour: Average cost per hour of running this work center; this is often used as an average hourly cost for the employee(s) that run the work center and will be factored into the cost analysis on manufacturing orders.
Analytic Account: Allows you assign an analytic account to a work center. For more information on Analytic Accounting, please refer to the Accounting documentation.
Routings and Quality Control Points
We've created a Baking Station and a Decorating station to illustrate Routings.
To create a new routing go to Master Data > Routings. Click Create.
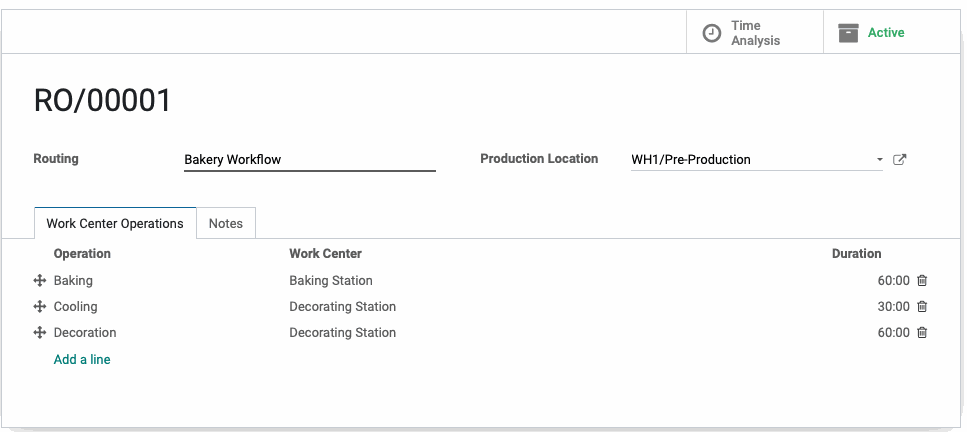
Name your route and write out the planned operations you need to include in your route by clicking the Add a line button in the Work Center Operations tab.
When you add a line, you will see the following window where you can outline the operation.
Set the Work Center where production will occur and then select whether you'd like to calculate the Duration Computation based on real time feedback, or set it manually. Real Time calculations will overall be more accurate, tracking the time between the produce and Mark as done functions. Once the operation is complete, Click save.
When the operation is outlined to your satisfaction, save the Route.

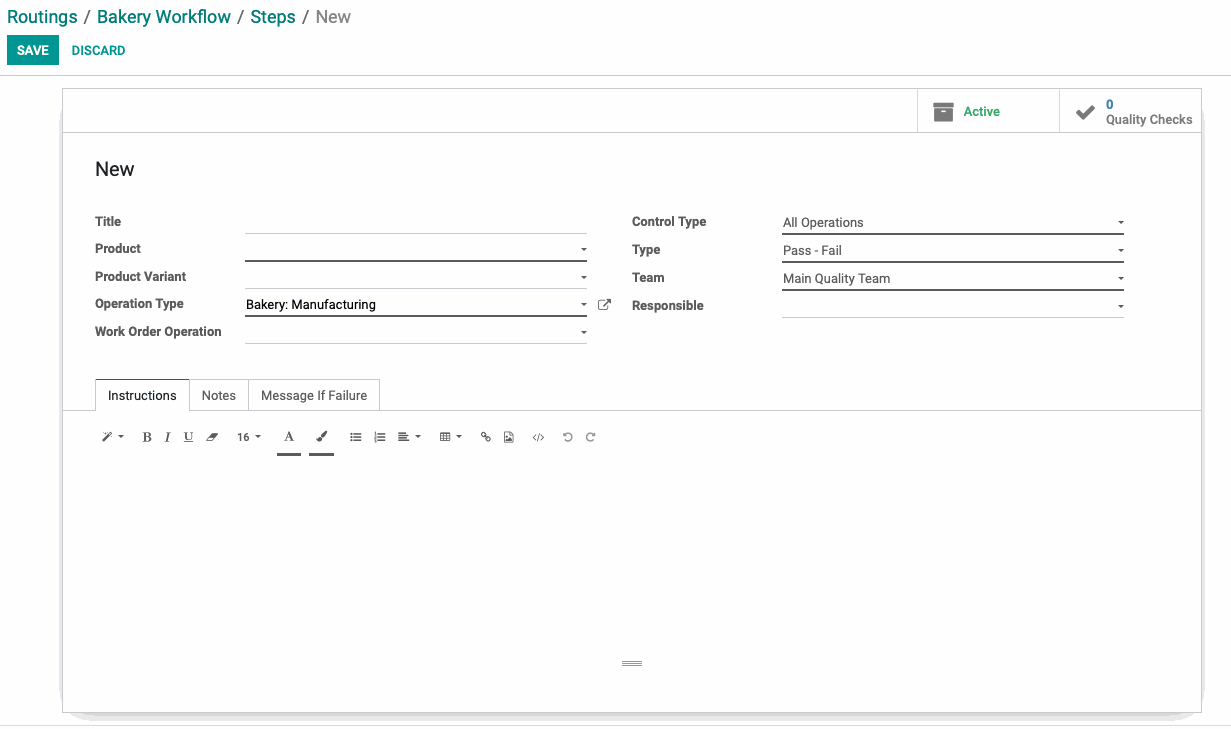
Once saved, you will acquire a new smart button in the top right corner, called Steps. These 'steps' are the stages at which the production will be inspected. Opening steps, you will be prompted to create them.
You will be prompted to give it a Title, and select the Product and Variant if applicable, the Operation Type, and assign the Work Order Operation.
In the right column:
Control Type: Determine whether the quality check will be done every time this procedure is done, randomly, or occasionally.
Type: Determine whether the check is pass/fail or a measure of accuracy in machining. You will have the option to set an error tolerance with this type of check.
Team: Decide the Quality Team responsible for the check.
The Instructions, Notes, and Message if Failure are all editable text fields to be filled. In the top right, you will see a smart button with the number of quality checks that have been performed on the procedure.