Sales: Products: Pricelists: Creating + Using Pricelists
Purpose
Pricelists are a way to provide different prices on individual products, and they can be configured in several ways. In this documention we'll go over the configuration options, as well as creating a pricelist, in Odoo 13.
Process
To get started, navigate to the Sales app.
In the following sections we'll go over how to enable and create a pricelist for each pricing method; therefore, the sections are organized by Pricing Methods.
Important!
Selecting a Pricing Method
It's important that you select one pricing method and stick with it. Once you have established pricelists, Odoo will allow you to change the method but it will cause problems in existing lists.
If you need to change the pricing method, you should first archive all existing lists and plan to start from scratch with new lists under the chosen method.
Multiple Prices per Product
This method is useful to manually set multiple flat-rate prices per product, depending on the buyer.
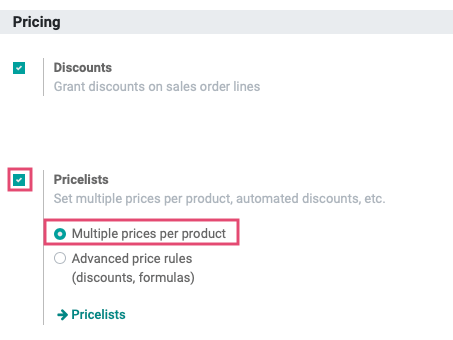
To enable this method, click Configuration > Settings. Under the Pricing section, enable Pricelists with the Multiple prices per product option.
Create a Pricelist with Multiple Prices per Product
From this configuration page you can reach the Pricelists page in one of two ways: either click the Pricelists button or navigate to Products > Pricelists.
Once there, click Create to bring up the New Pricelists modal window.
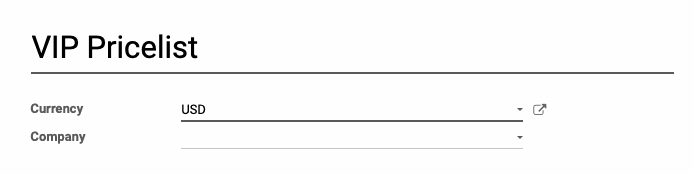
Name: Give your Pricelist a name.
Currency: If your database has multiple currencies configured, you can select your preferred option.
Company: This applies to a multi-company configuration. Leave this field blank if the pricelist should be available to all companies, or select a company to only apply it to one in particular.
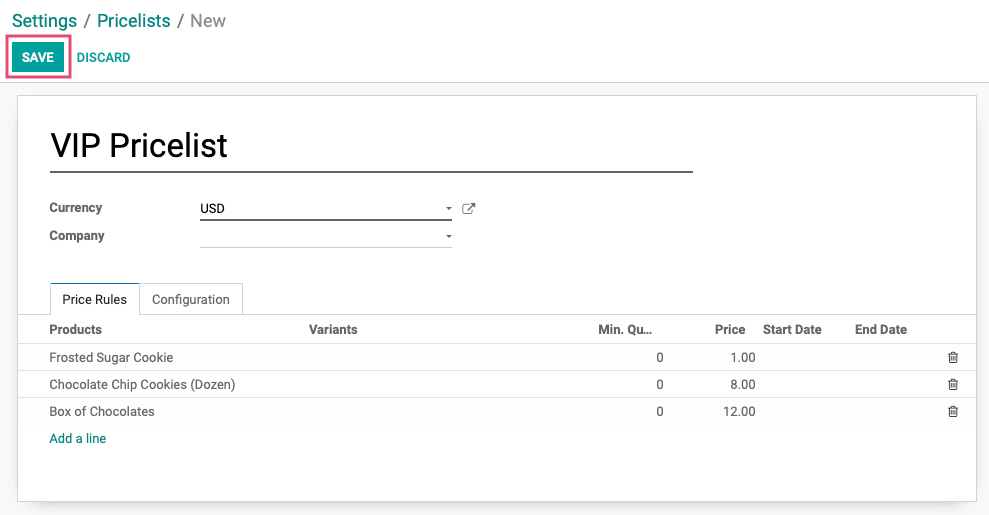
With the Multiple Prices per Product model, you'll add products individually to the Price Rules tab. Under this tab, click Add a Line.

This will open a new line in this section with the following fields:
Products: Select the product name.
Variant: This will make the pricing effective on a single product variant that you choose.
Min. Quantity: Input a minimum quantity that must be purchased for this pricing to take effect.
Price: Set the price for this product.
Start Date: Choose if you want this pricing to start on a specified date.
End Date: Choose if want this pricing to expire on a specified date.
Once you've added all pertinent products, click Save.
Once you've added all pertinent products, click Save.
Good to Know!
Adding New Prices from the Product Level
You can also add a special price to a pricelist directly from a product page. To do so, navigate to PRODUCTS > PRODUCTS. Select any product that you would like to define a new price for.
Under the GENERAL INFORMATION tab, click the EXTRA PRICE option.
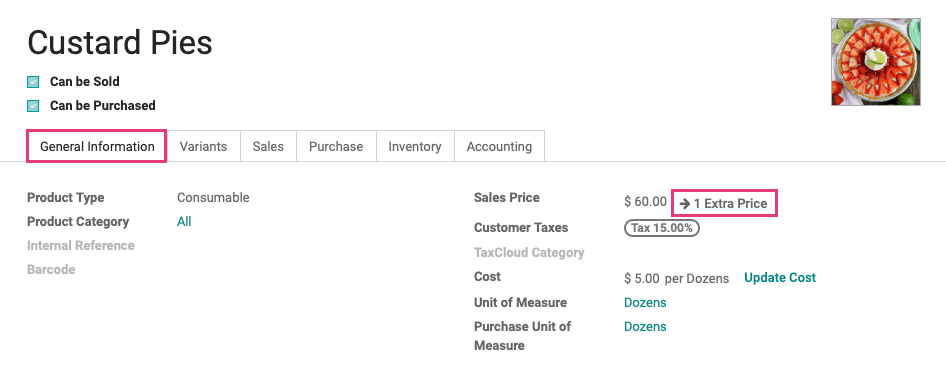
On this page, click CREATE.

A new line will open where you'll enter the Pricelist name along with the price that should be reflected on this list.

When you're done, click SAVE.
Advanced Price Rules
This method is useful when you're dealing with a lot of product and it would be too tedious to set them individually. It allows you to create a formula for subsets of products.
To enable this method, click Configuration > Settings. Under the Pricing section, enable Pricelists with the Advanced price rules option.
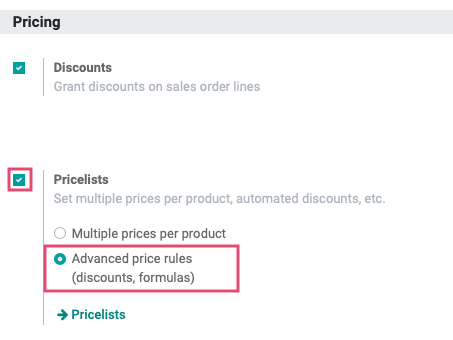
Click Save.
Create a Pricelist
From here, you can reach the Pricelists page in one of two ways. Either click the Pricelists button or navigate to Products > Pricelists.
Click Create and give your Pricelist a name.
Under the Price Rules tab, click Add a Line.

This opens the Create Pricelist Items modal window where you'll have several options to configure your pricing.
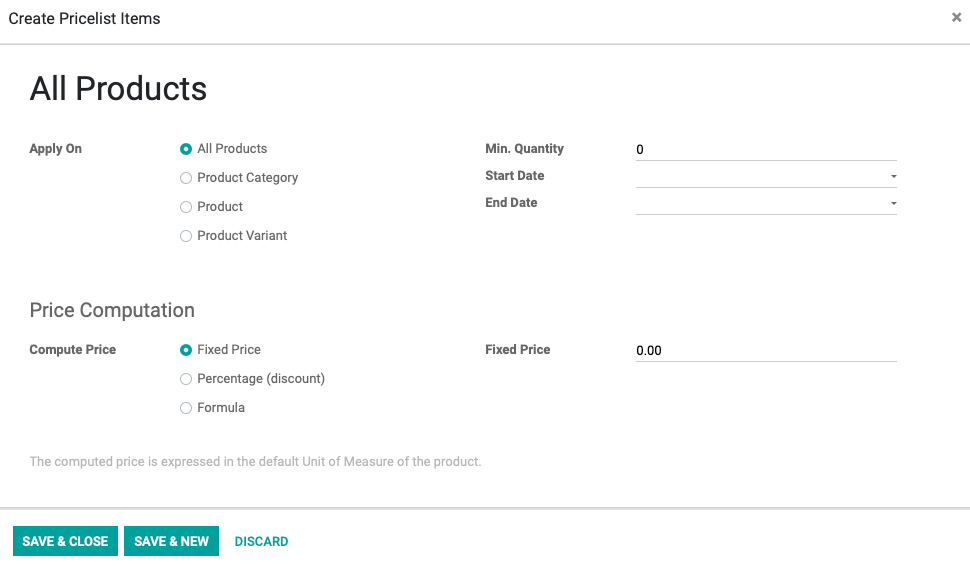
Apply On
All Products: This option will apply the pricing rules on all products.
Product Category: This option allows you to apply pricing only on a specific category or subcategory of your choosing.
Product: This option allows you to select an individual product to set the pricing on, and will include all variants of that product.
Product Variant: This option allows you to apply pricing on any product that is assigned a specific variant.
Min. Quantity: Enter the number of items that must be purchased in order to qualify for this pricing.
Start Date: Choose if you want this pricing to start on a specified date.
End Date: Choose if want this pricing to expire on a specified date.
Price Computation: Compute Prices
Fixed Price: This option will set one price to all products in the criteria you've set.
Percentage (discount): This option will set one discount to all products in the criteria you've set.
Formula: This allows you to create a formula that computes the price of each product within the criteria you've set. See the section below to understand what each field on the formula rules will do.
When you've set your formula, click Save.
Pricing Formula
New Price: The New Price is always based on the product's original price, less a calculated amount.

Price Discount: You can enter a discount percentage as your entire formula, or simply as a starting point.

+ Surcharge: Here you can enter a flat-rate fee to add to each product in the subset.

Rounding Method: Indicate the nearest dollar amount to round up to. This field will not accept anything under 1.00.

Min. Margin: Use this field to indicate what your minimum margin requirement is.
Max. Margin: Use this field to indicate what your maximum margin requirement is.

Pricelist Configuration
With either pricing method, the Configuration tab offers even more options for applying your pricelist(s).
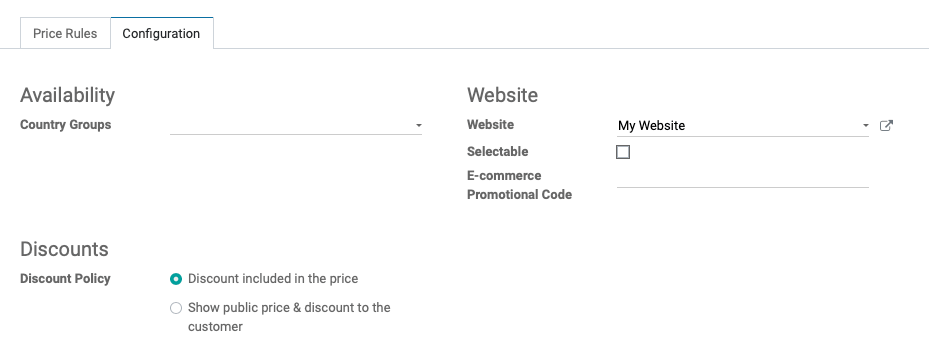
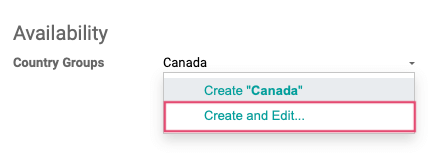
Availability
Country Groups: Select or create a Country Group that will automatically apply a pricelist based on the location of the customer.
Important!
Simply creating a country group with a country name is not sufficient to apply it by a customer's location. If you're creating a Country Group from within the Pricelist, be sure to click Create and Edit...
On this page, enter the Country Group Name again (Canada), then select the Countries to be included in this group. Leave the Pricelists section as-is because you're already within a record and it will connect once that pricelist is saved.
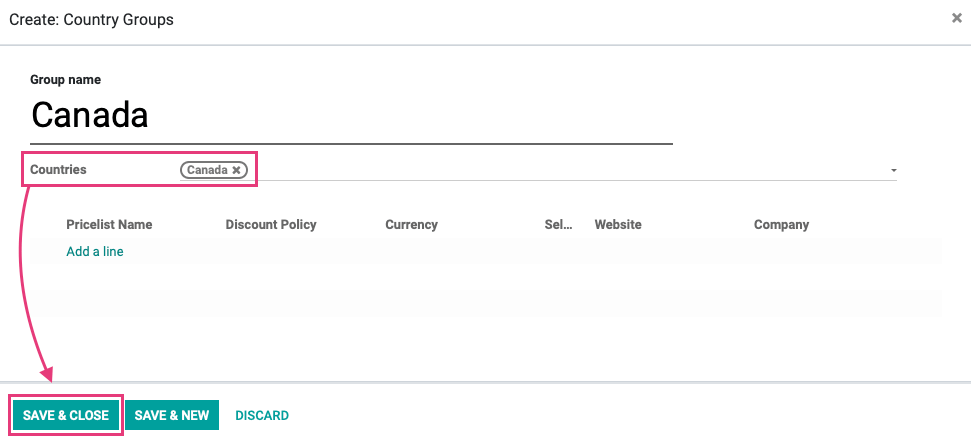
Click Save & Close. This Pricelist will now automatically apply to customer sales in the specified country(ies).
Note: You can edit your Country Groups from the Odoo Contacts application.
Website
Website: If you have more than one website on your Odoo account, you can select which this pricelist applies to.
Selectable: This option lets the customer choose which pricelist they'd like to be included on.
E-Commerce Promotional Code: Use this field to create a code that will apply this pricelist. This code will be applied using the Coupon button during checkout.
Discounts
Discount included in the price: Select this option to have the price reflect the discount.
Show public price & discount to the customer: Select this option to show both the original price and discounted price to the customer.