Odoo Connectors: Available Connectors: OpenCart Connector
Purpose
This documentation outlines the processes associated with Hibou's OpenCart Connector. OpenCart Connector allows you to synchronize your products, pickings, and sale orders.
This process also requires a third party API extension. Hibou has used Rest API successfully.
Getting Started
First things first, we need to install the module! Navigate to the Apps application and search "OpenCart Connector". When ready, click the Install button.

Good to Know!
This module requires the Invoicing, Products & Pricelists, Delivery Costs, Sales and Warehouse Management, and Connector for E-Commerce modules. However, if you do not already have these modules installed, Odoo will install them for you during this modules installation.
All `connector` modules require a significant number of OCA modules as well as python packages. For the easiest time, use the bundled/linked versions of all of the libraries found in this repository and Hibou's maintained Docker Images.
Editing Configuration Files
Configuration Files: Your Odoo configuration (typically at /etc/odoo/odoo.conf ) will need a couple of things to function properly.
Add `queue_job` as a server wide module like so
server_wide_modules = web,queue_job
Configure the number of queue workers by appending a section like this to the end of your file.
[queue_job]
channels = root:1,root.magento:1,root.opencart:1
Important!
Make sure that you restart your Odoo installation after getting all of the requirements and configuration in order.
Gathering OpenCart API Credentials
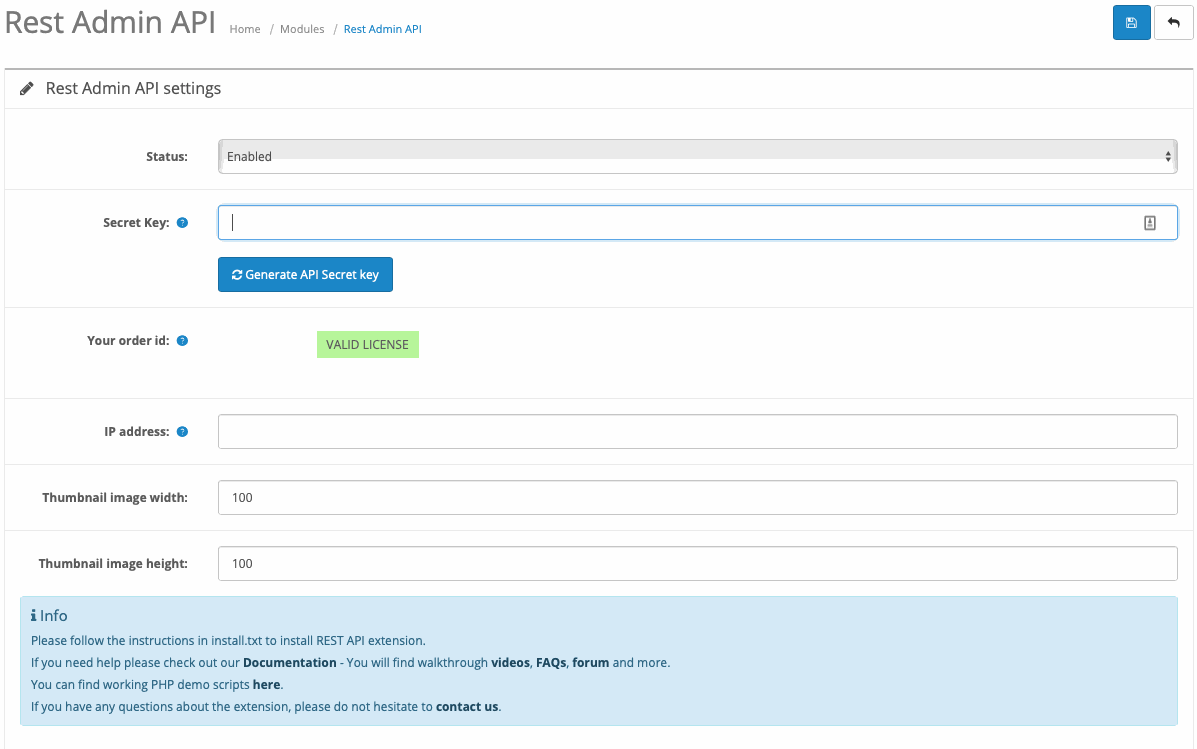
Rest API will provide a license once the order is confirmed. This is your order ID number. Use this to validate the extension in OpenCart and generate a secret key used to connect to Odoo.
Process
Navigate to the Connectors app.

Creating an OpenCart Backend
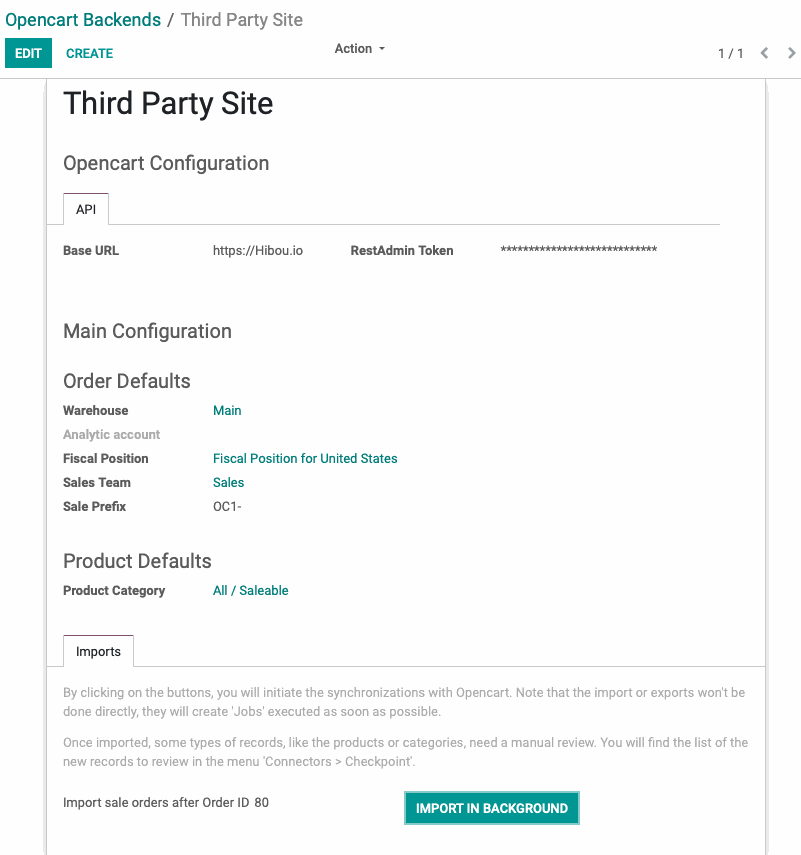
Once the new record is opened, you will need the following data:
Base URL: The URL of the website you're pulling data from via the API connection.
RestAdmin Token: The password that allows Odoo to connect to the API.
Order Defaults
Warehouse: Select the warehouse the products will be delivered from.
Analytic Account: If desired, set an analytic account to track order data for reporting.
Fiscal Position: If the taxes are collected prior to import, create and set an appropriate fiscal position.
Sales Team: If desired, set a salesteam to track order data for reporting.
Sale Prefix: Set the prefix for the order number as it is imported for grouping/filtering purposes.
Product Defaults
Product Category: If there is not a matching product in your Odoo database, the connector will create a new one. Set the desired category for the new product record here.
Coupon Product: Indicate the Odoo product that should represet coupon discounts.
SO Require Product Setup: This will prevent an order from being confirmed if it has an open checkpoint.
Under the Imports tab, you can set the order ID after which you'll start importing orders in the Import sale orders after Order ID field.
Click Save.
You are ready to import orders by clicking Import in Background. Note that orders will not be imported directly, as they will have to be compared against Odoo's record requirements using the information stored in this backend record. Instead, orders will appear in the Job Queue, which can be configured to flag a variety of exceptions such as incorrect tax data or fields that don't meet the parameters set. Incomplete or missing phone numbers, zip codes, etc. are good examples of order data that will be flagged in the job queue for resolution.