
When it comes to running a business that provides a physical product to the masses, you're one of two things... a manufacturer or a distributer. You either create a product people want, or you're the person who stores what what the manufacturer makes and sells it to the populous. In either case, you have a purchasing department, with a hero or heroes hunched over a keyboard and calculator, working hand in hand with your warehouse manager and your accountant to ensure your shelves are stocked and your books are balanced. Wouldn't it be nice if there was just something you could do to make these employee's work day flow a bit more smoothly? Maybe get some of those stacks on stacks of papers, sticky notes, and discarded spreadsheets off their desk? Oh, if only...
Odoo can do that! With its Purchase application, all of your Request for Quotations and Purchase Orders will be kept neat and tidy in one place. You'll be able to create your own Purchase Agreement Types, set reordering rules, create vendor bills and register payment. All changes and activity regarding an RFQ or PO is recorded in the chatter, keeping a trail of its history. The Purchase app's reporting capabilities make referencing and presenting a breeze by allowing customization of data layout and display. When working hand in hand with your other Odoo apps, this thing is a real timesaver!
Purchase Overview
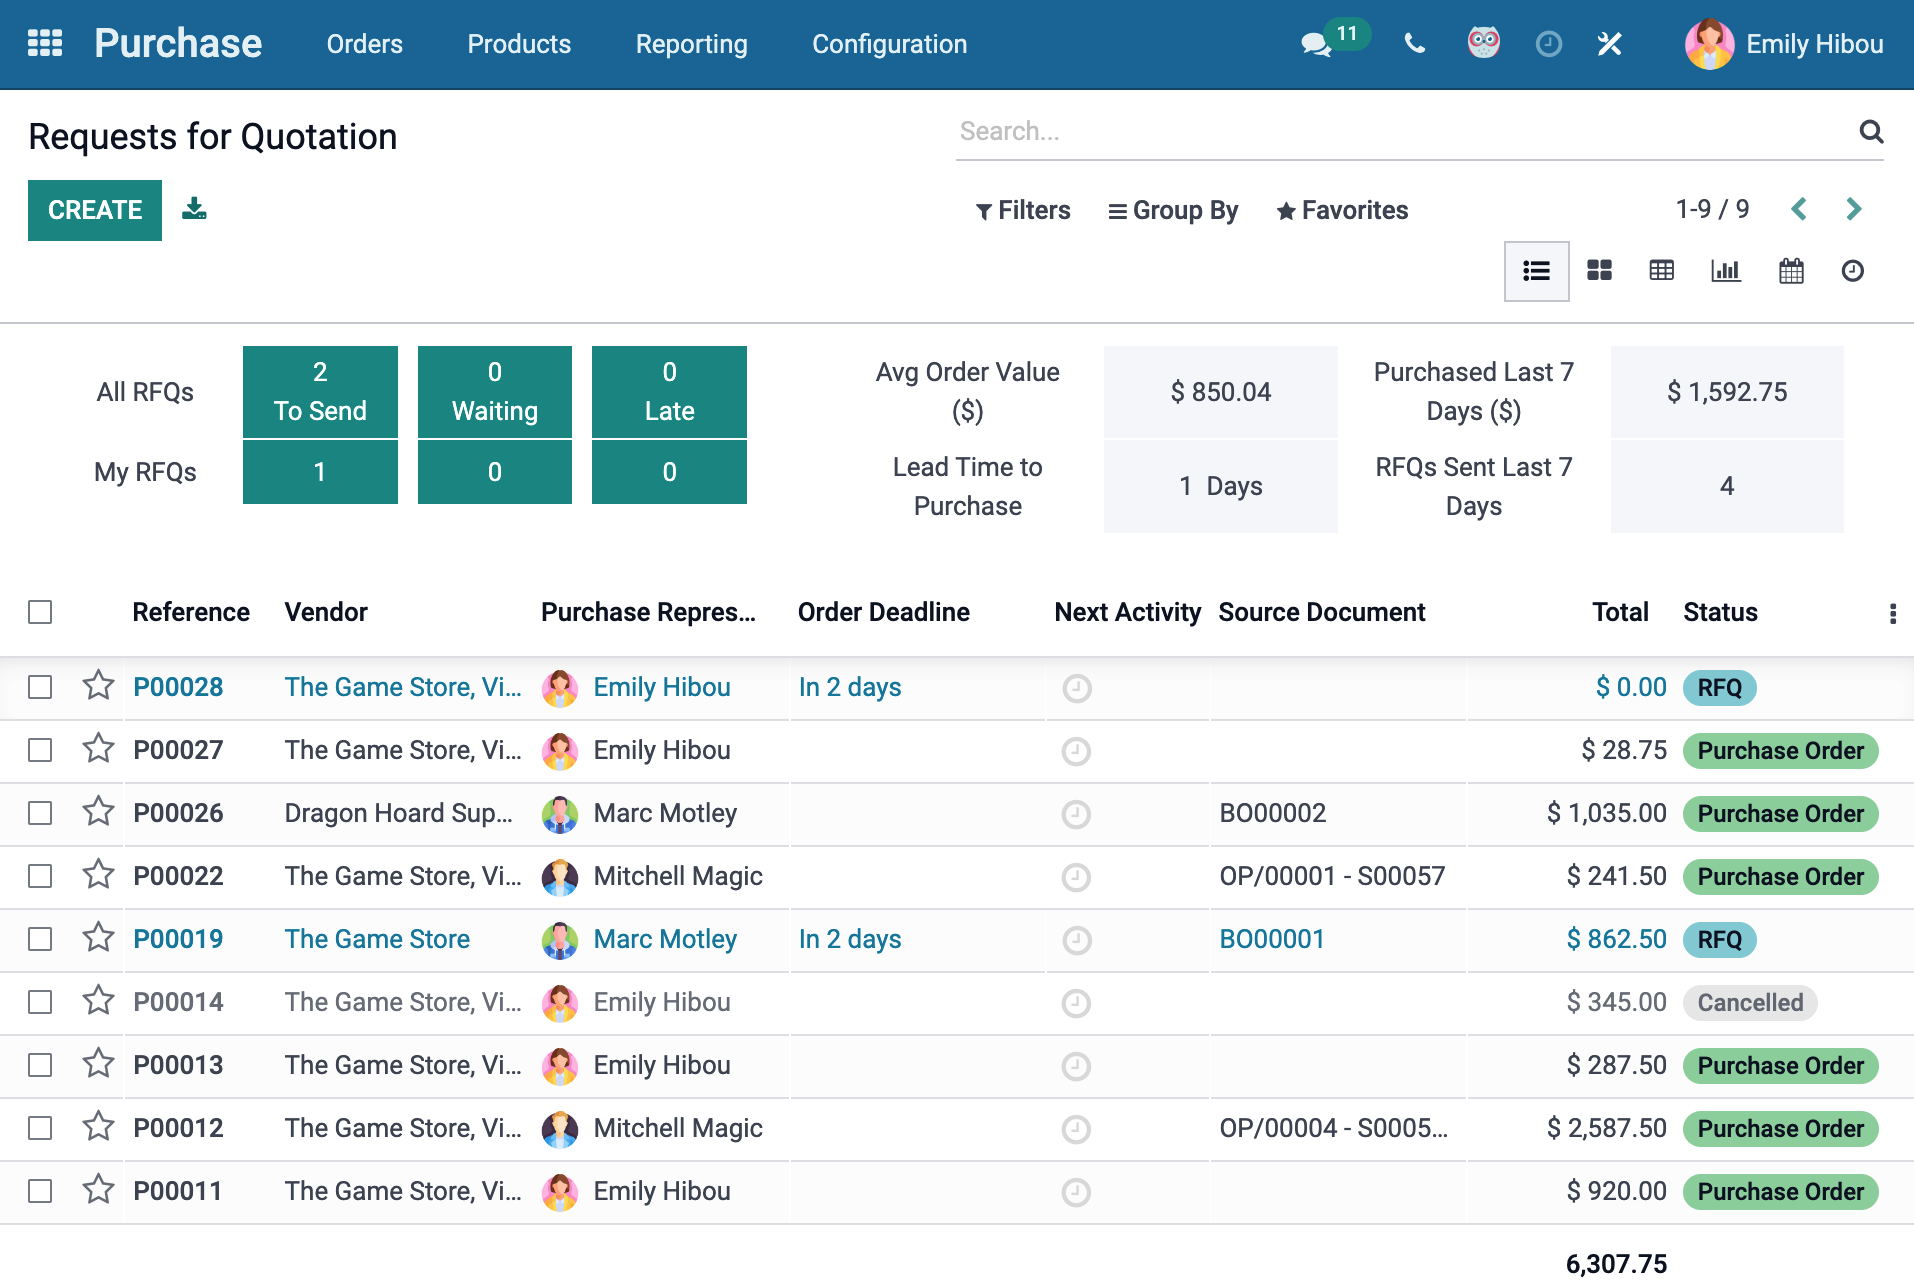
When you first open the Purchase application, Odoo immediately filters down to RFQs and POs related to the current user. This setting can be removed if you so choose. From the front page, we're able to see all of our active RFQs and POs as well as cancelled orders. We can see who placed to order. If the RFQ has not received a vendor response, its deadline will appear under Order Deadline. If an activity is scheduled for an order (such as a manager review), it will appear in the Next Activity column with the color code: red=past due, yellow=due today, green=due in the future. The Source Document column tells you whether the RFQ was generated using a previously configured Purchase Agreement, by a backorder created from a Sale Order, or by Reordering Rules placed on a product.
Purchase Agreement Types
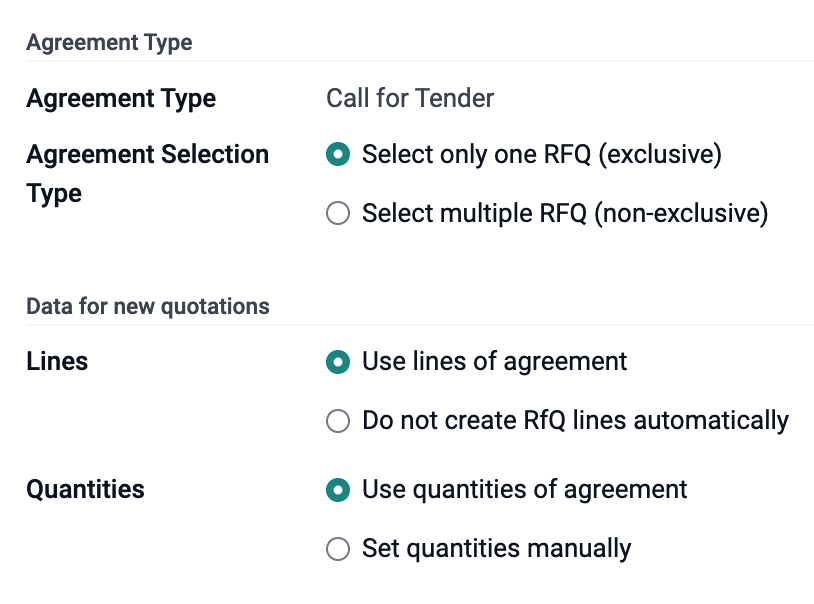
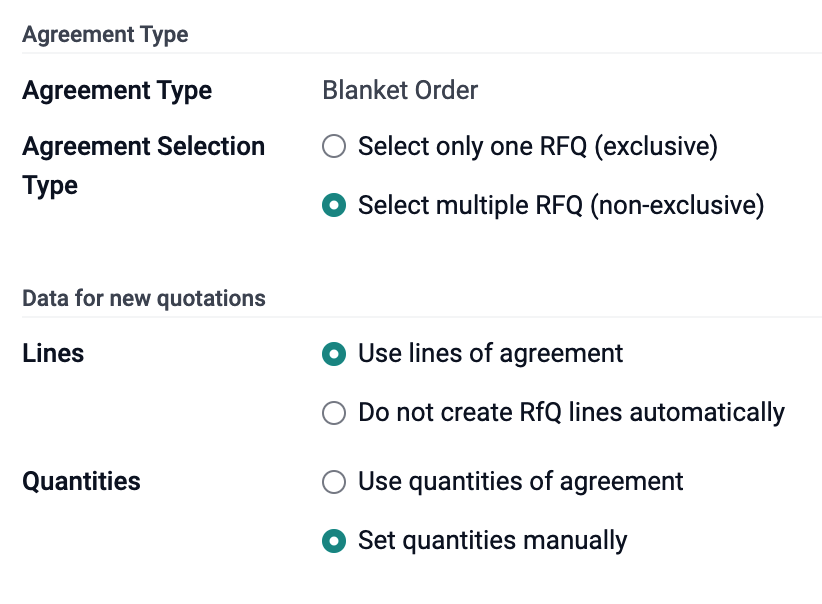
Odoo comes with two default and generic Purchase Agreement Types (Call for Tender and Blanket Order), but these can be customized or replaced based on your company's needs. Call for Tender is used when you want to send out RFQs to multiple vendors to see who will give you the best price, delivery time, or both. A Blanket Order is used when you wish to place a bulk order to be received in increments either from one vendor or from multiple vendors (very handy for when supply chains are experiencing issues, amirite).
Reordering Rules
Utilizing your Reordering Rules will automate the Purchasing process for items you always want on hand, meaning less back and forth for your warehouse team and purchasing team. You set a minimum quantity and a maximum. When stock on a product falls below the minimum amount set on it, Odoo automatically generates an RFQ for that item with an order quantity that will bring it back up to the set maximum. This isn't to say you are limited to ordering whatever maximum you have set. This limit is only for automated orders placed by Odoo. For example: Dice Sets have a minimum of five and maximum of ten. Should stock fall to four, Odoo will generate an RFQ for six dice sets to bring stock back up to ten. Should stock fall below zero, and create a backorder, Odoo will create an RFQ with a quantity high enough to both fill the backorder and bring stock back up to ten. However, it is still possible to manually up the quantity past ten or have more than ten in stock.

Workflow
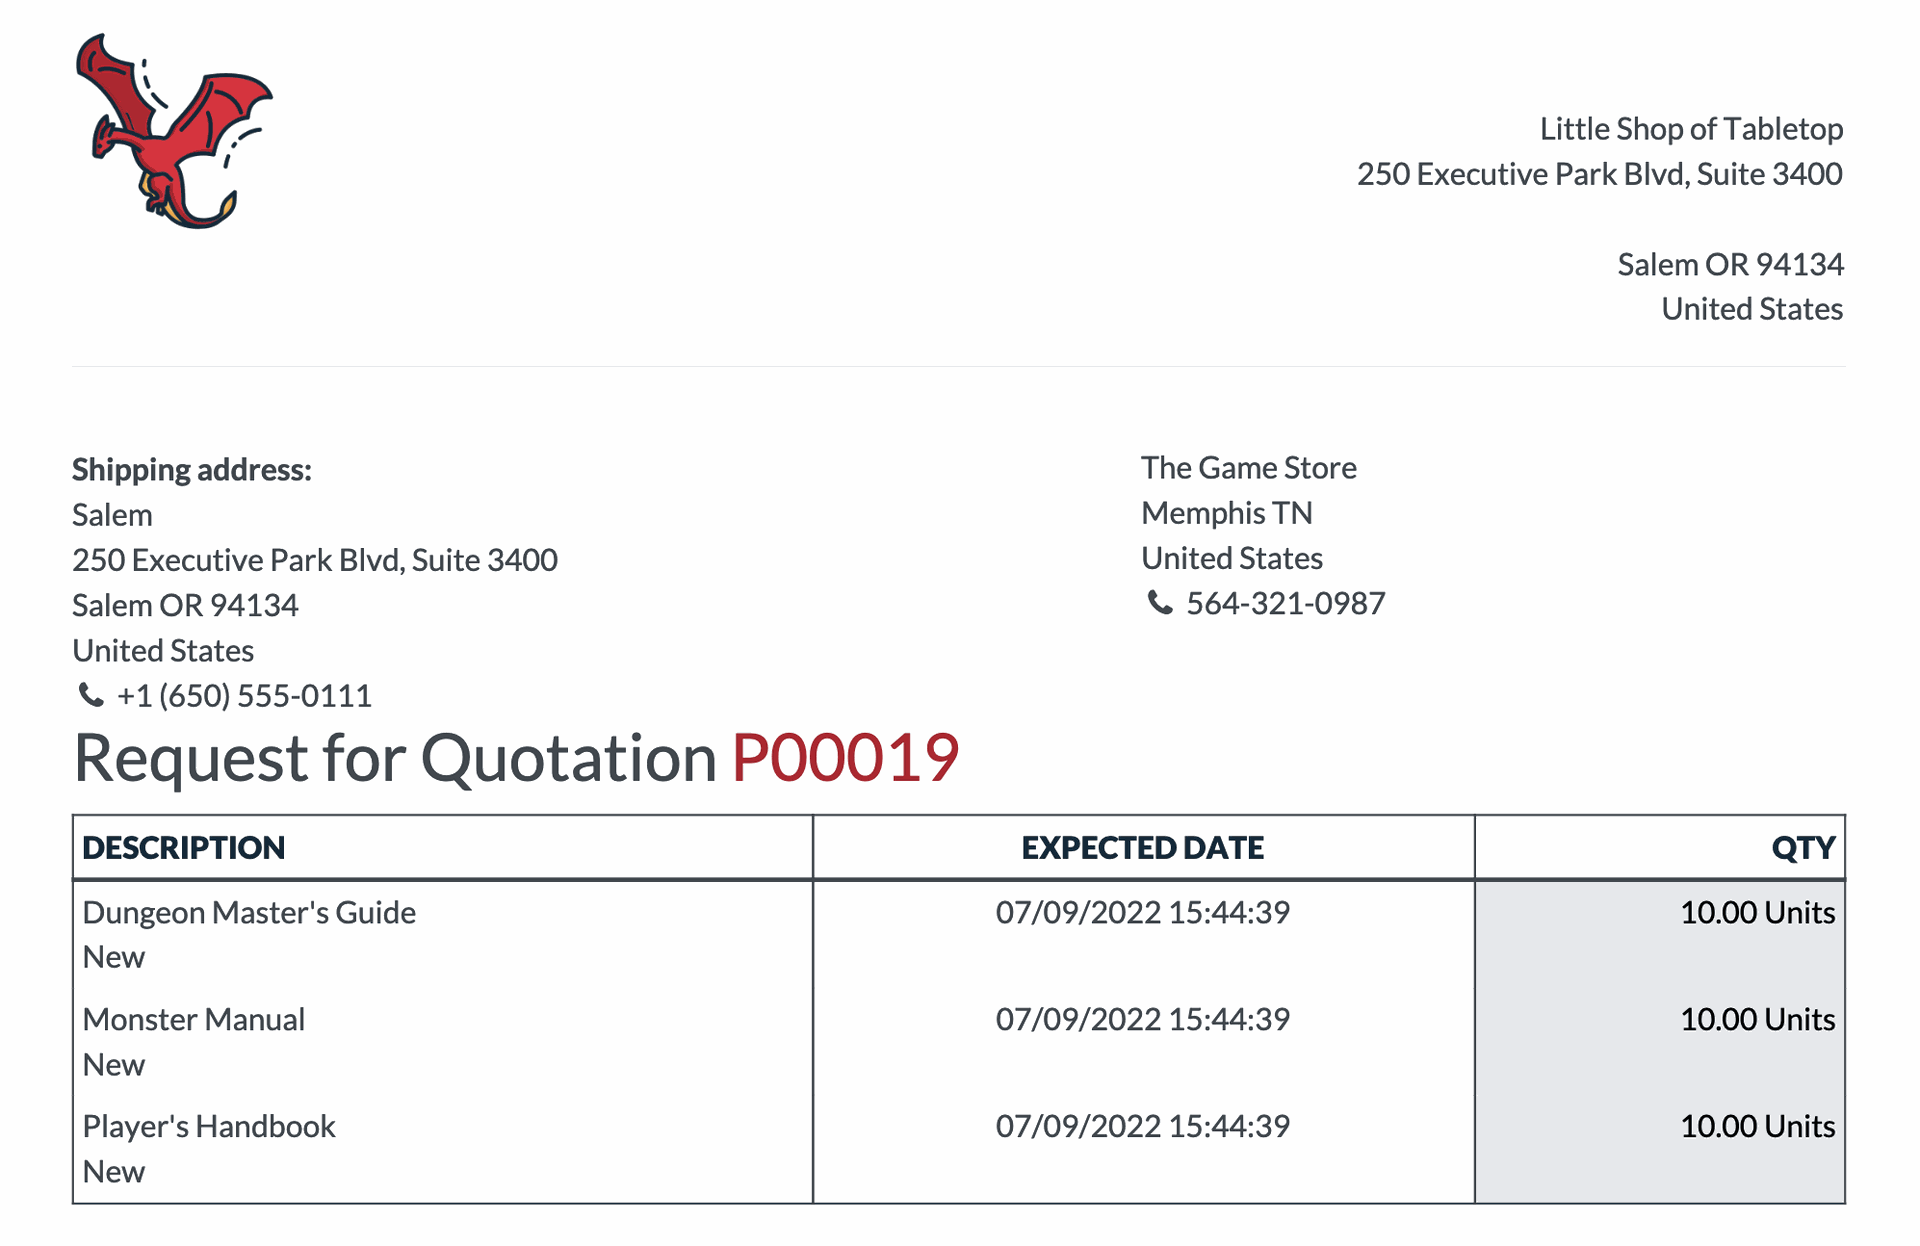
This brings us to the big question: How do we get from an RFQ to a Paid Vendor Bill? Starting by selecting the Create button up in the top right of our Purchase homepage, we're going to open a blank RFQ. We're going to select a vendor, a deadline, and add the products we need to the order.
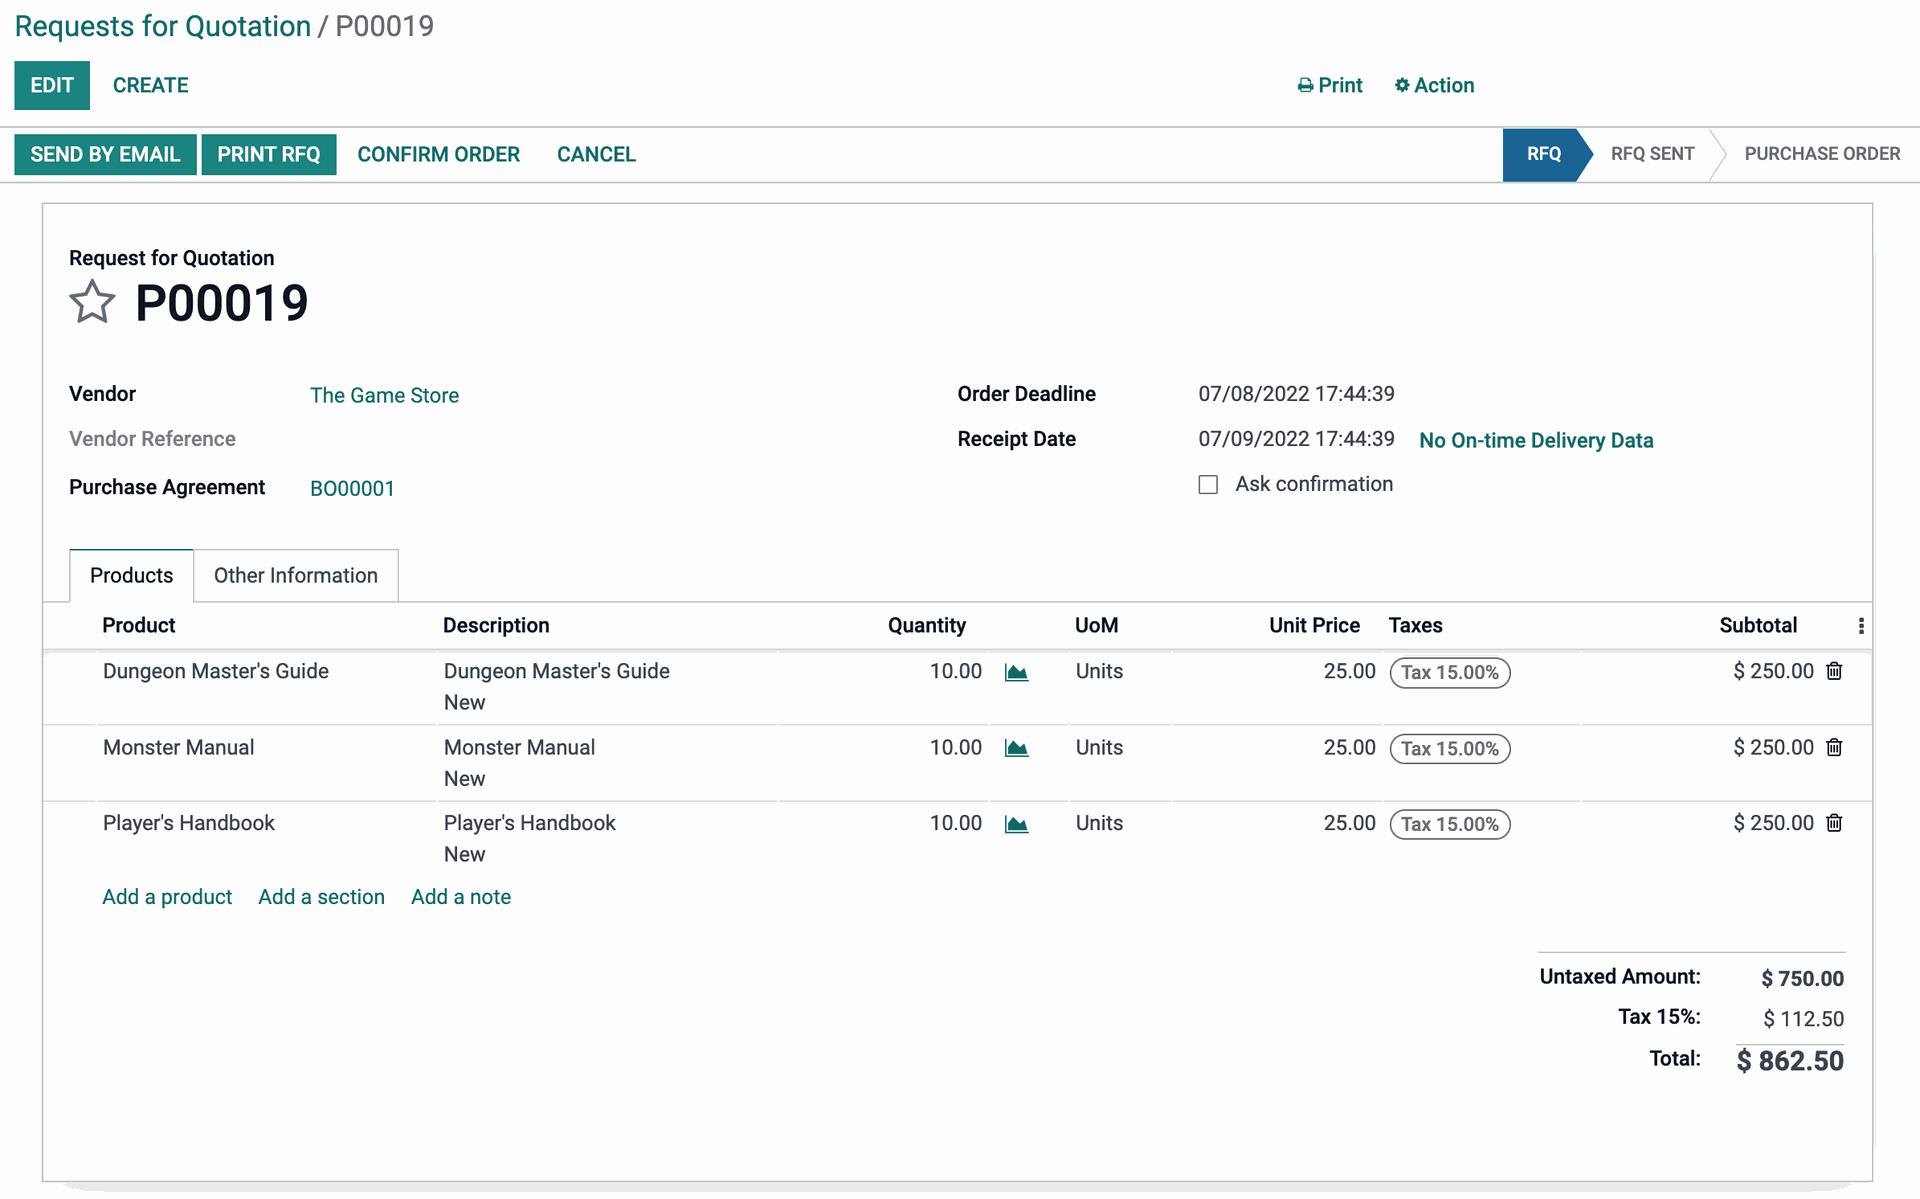
Then we select Send by Email. This is going to open a modal window with the email (which can be customized) and a PDF of the RFQ attached.
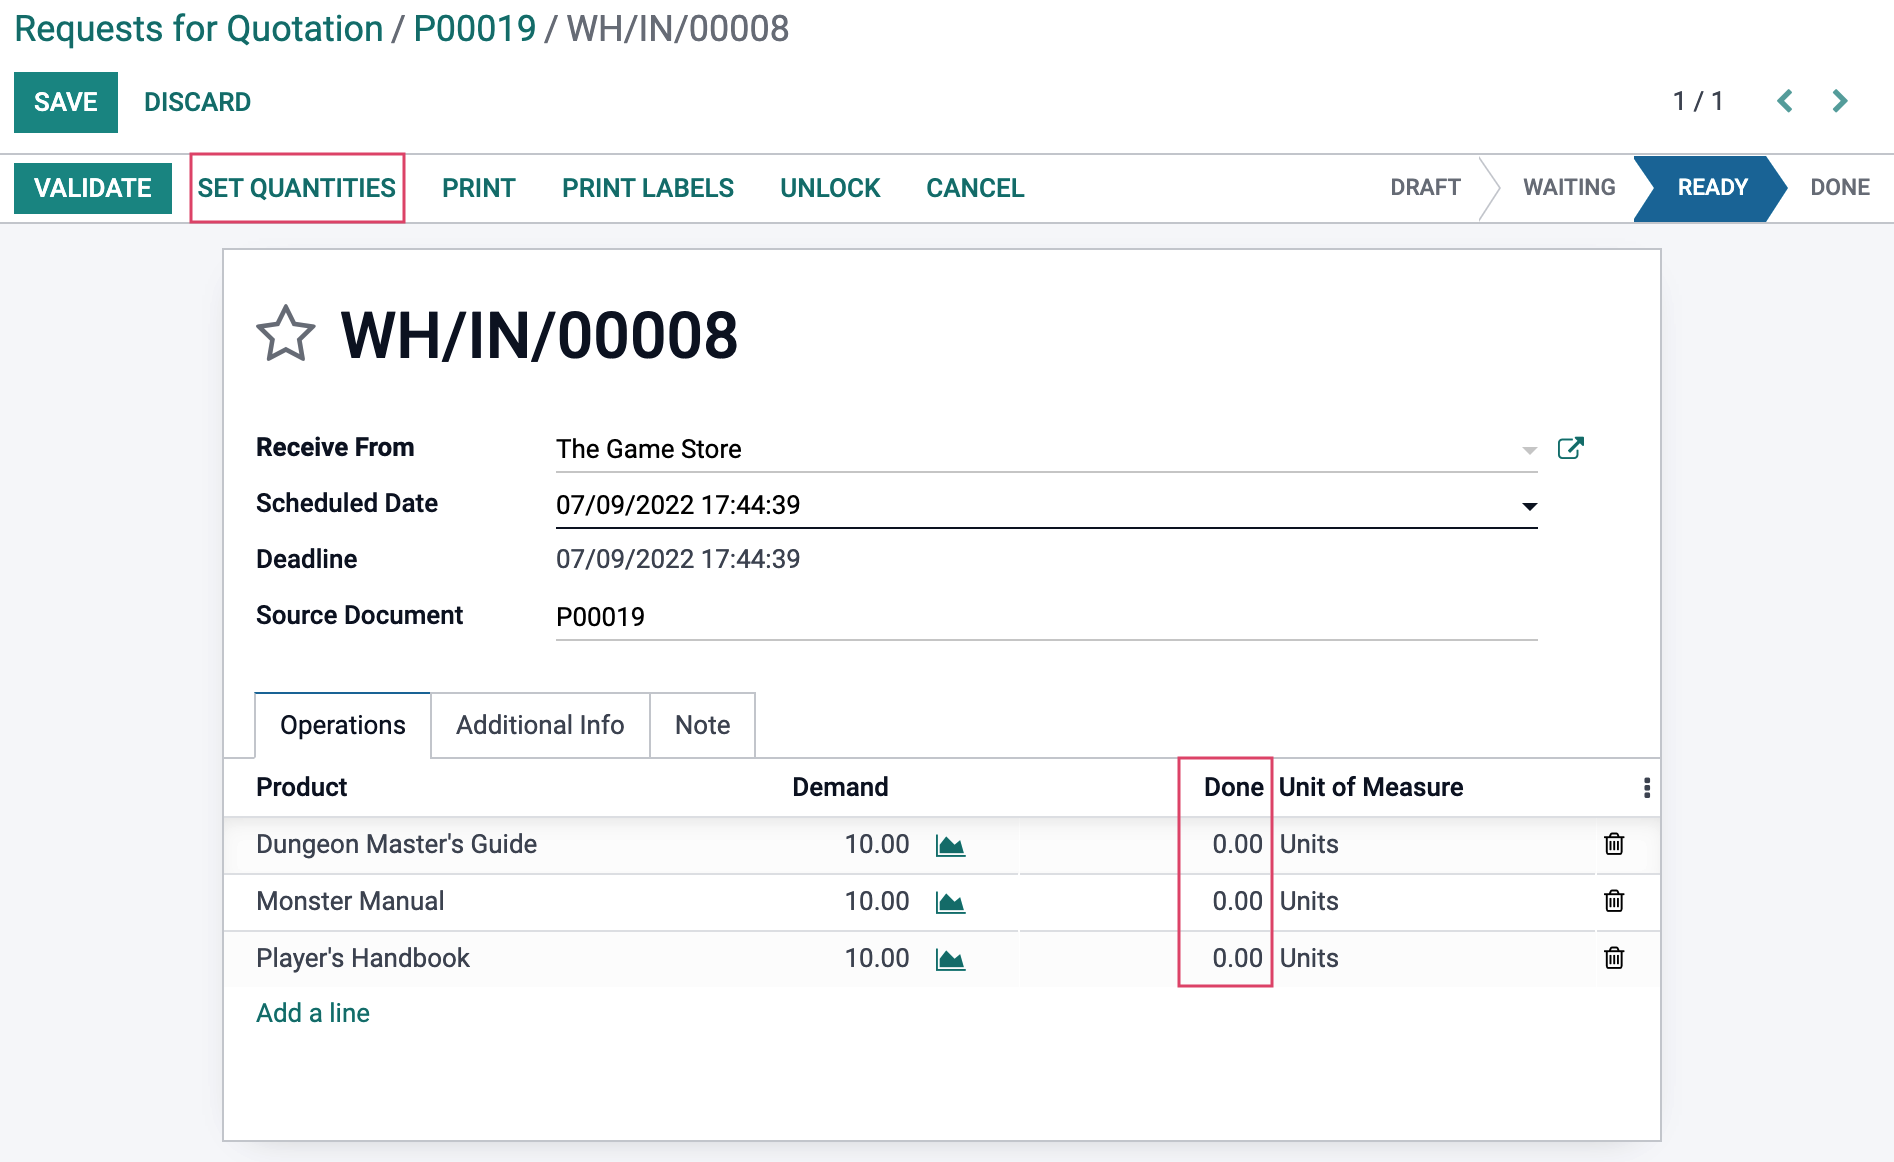
This will move the order from RFQ to RFQ Sent status. Once you receive the all clear from the vendor, you can select Confirm, which will move this from RFQ to PO status. Then (once we receive our shipment) we can open this PO and select either the Receive Product button or the Receipt smart button.

This will take you to a new page for a stock transfer. When you are receiving product, you can set the Done quantities manually by either clicking directly into the field on the page or selecting the set quantities, which will automatically fill all done quantities to match the demand.
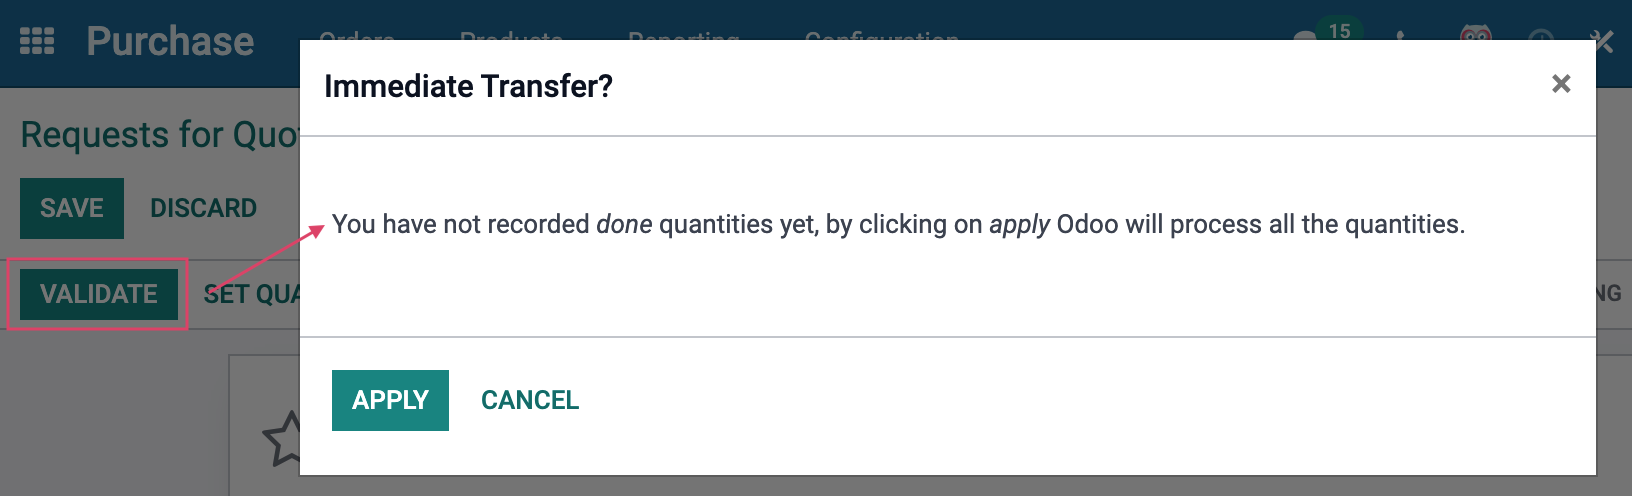
Then we need to validate. Should you select the validate button before setting the done quantities, Odoo will request that you do so. Selecting apply will also match the Done quantity to the Demand.
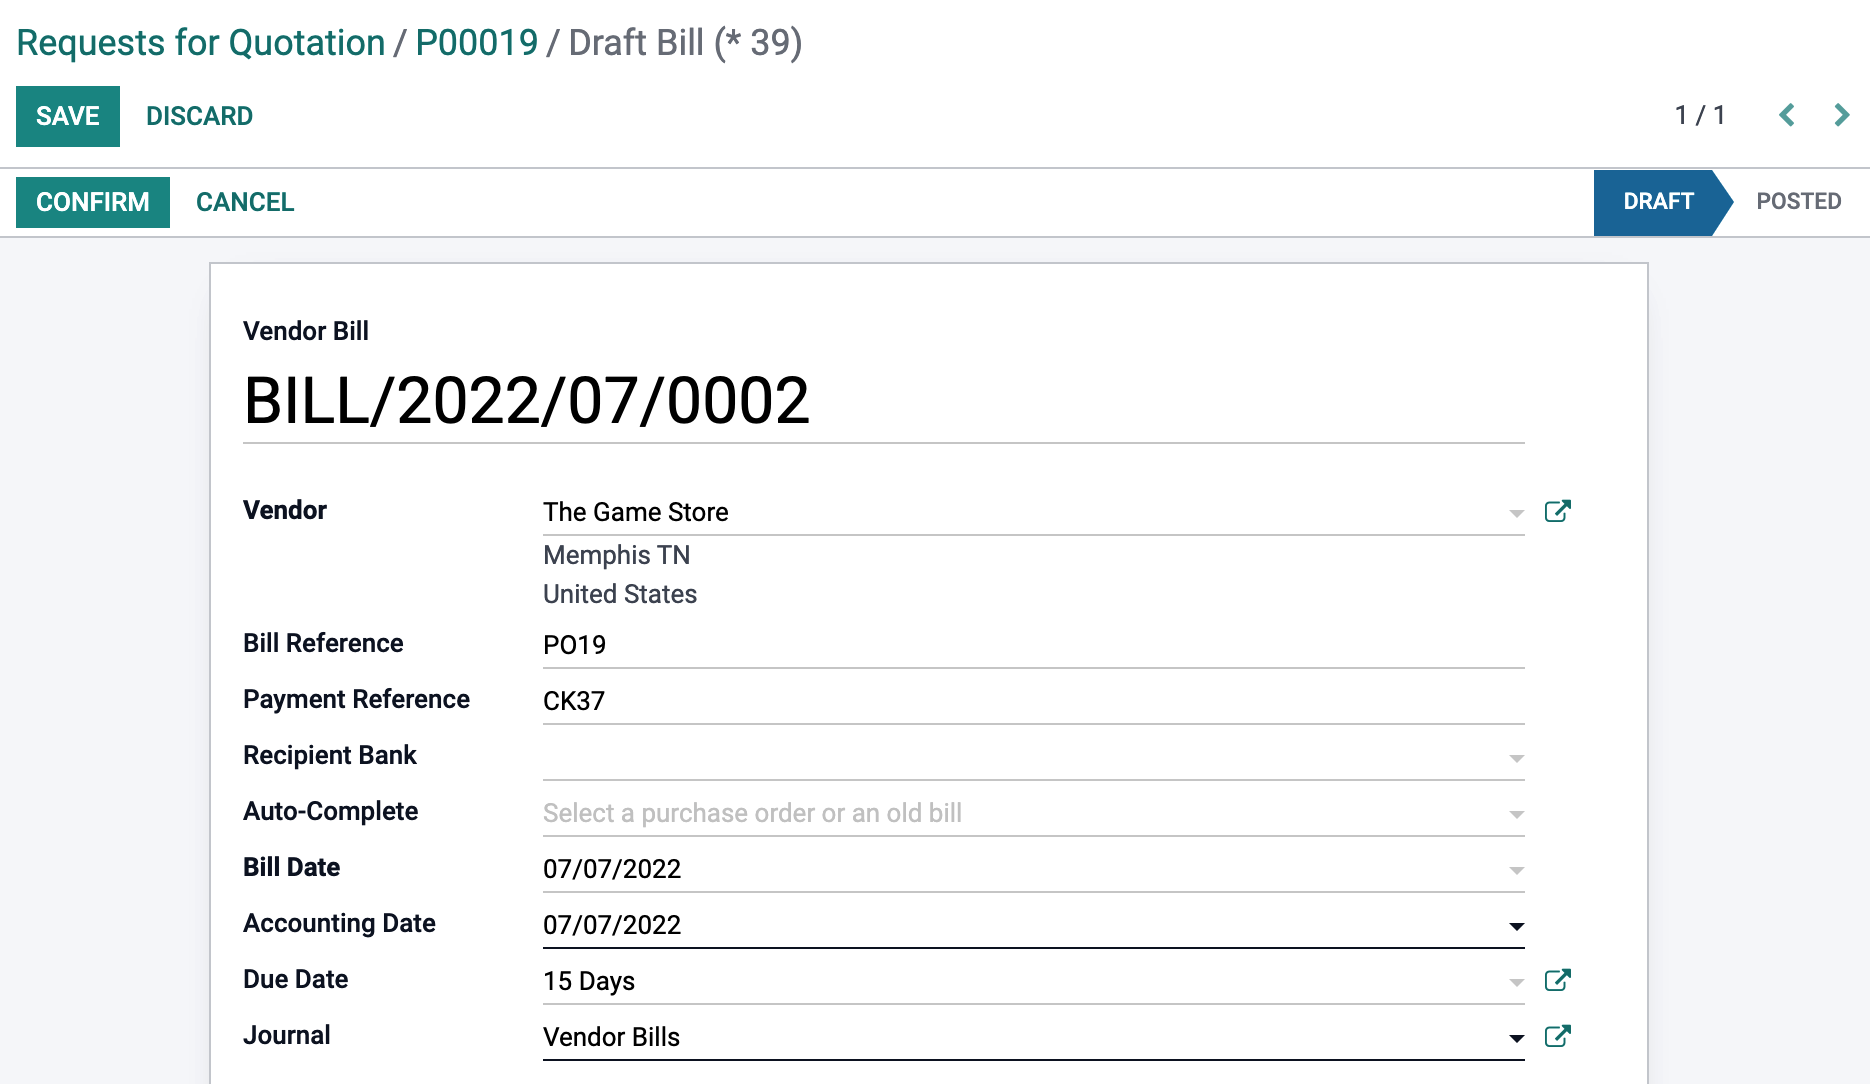
Returning to the PO, we can now have a button for Create Bill, which we will select. This will bring us to draft of the bill so we can review and make necessary changes. Before we can confirm this bill, we need to set the Bill Date. So we're going to select Edit, and set the current date. The Bill Date should match the Accounting Date, however a manager can override this function if necessary. The journal will auto-populate with whichever journal is set as the default in your settings but can be changed if need be. We are then going to select Confirm.
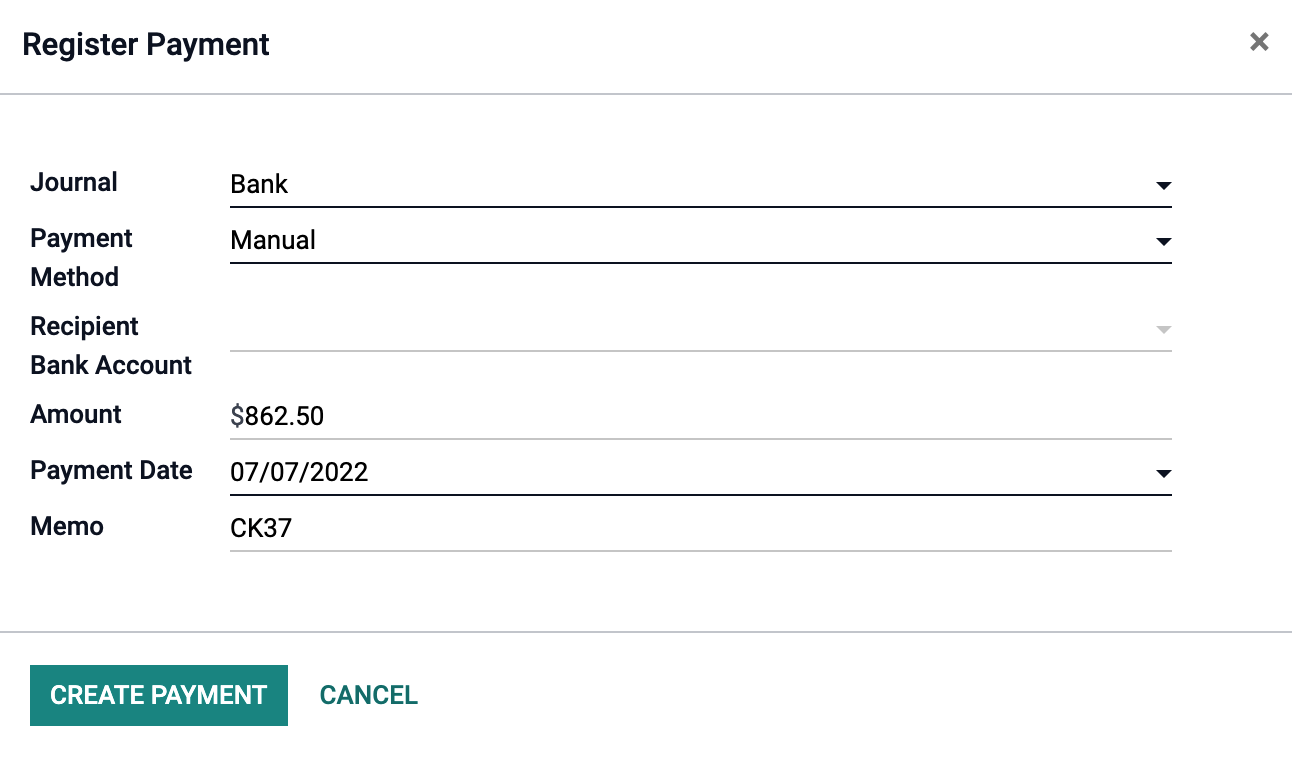
The Confirm button will then change to Register Payment button. Selecting this will open up a modal window where we can confirm all of the necessary information for our accountant. now we can select Create Payment.
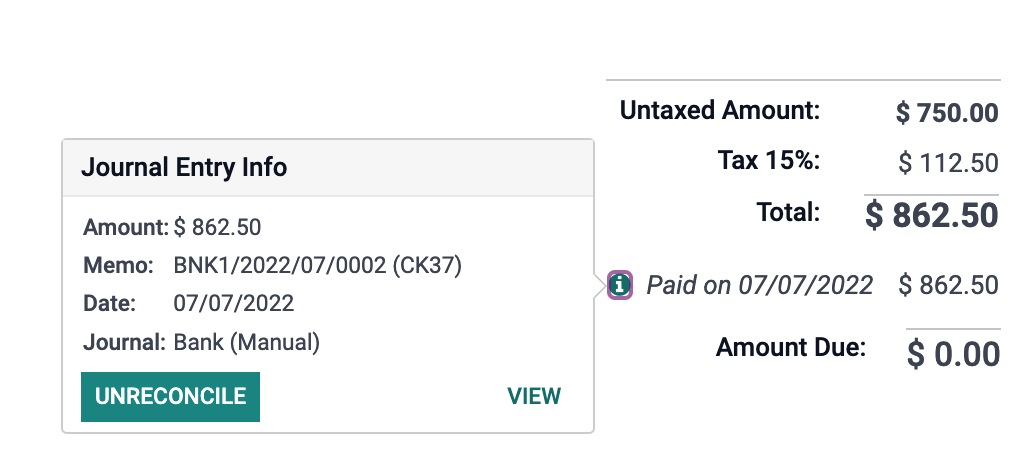
Once the payment is created, a green banner will appear on the top right of the bill stating that it is In Payment. If we scroll down to the bottom we will also see some new additions regarding the payment date and amount due. If we select the "Info" button, a small window with more information on the payment will open providing the option to undo this reconciliation, or view it in the journal.
There you have it! A few goodies to present to your Purchasing Team and the step by step workflow. If you would like to learn more, contact us at Hibou and be sure to check our courses and documentation for a more thorough look at these features! Thank you for reading and have an awesome day!