Odoo Essentials: Odoo Navigation Overview
Purpose
The purpose of this document is to provide an overview of how to navigate in Odoo, what the various Filters, Settings, and Views available within the applications do and how to use the Activities and Reporting functions, along with some handy tips and tricks for easily getting around the system and making the most out of your experience with Odoo.
Processes
Apps
When you first land on your database's homepage, you may not see very many apps installed. To get started with building out your business's database, you will need to load the necessary apps for your business's needs. You do this by clicking on the Apps application.
This will take you to the app repository where you can browse around for the apps that you want to install.

From this screen, you can see which apps your database has installed already and you can browse through the available apps to install. If you click on the Learn More button on each application, you can see the application's overview page to see if you would like to use it before installing it. When you're ready to install an app, simply click the install button and wait for the application to load.
Please Note: For larger apps, this process could take several minutes.
Once the app is installed, you will be routed to either the initial setup screen of the application to begin configuring it or to your database's homepage where you can see your newly installed apps. Some new applications will appear on your home screen with a blue teardrop underneath it, indicating there is an Odoo tour available to help you learn how to use the app.
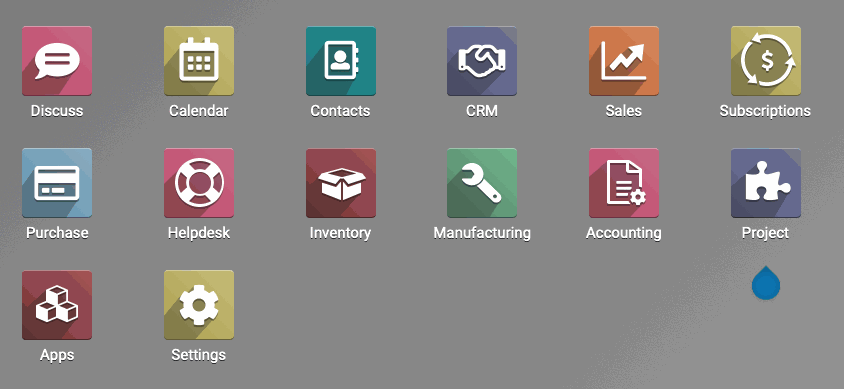
For this example, you can see that we installed the Project application and it is highlighted on our homepage.
Good to Know!
From any screen within any application, you can always get back to your homepage by clicking the waffle icon at the top left.
Application Settings
Every application within Odoo has its own configurable Settings and options that will effect its functionality. There are two ways to get to any application's settings.
Option 1: From the Settings application on your homepage.
From inside of the Settings application, click General Settings. Once the page loads, you will see the General Settings for your Database on the main screen. On the left hand side, you will see all of your installed and configurable apps. To get to the Settings of any of your installed apps, just click on the app that you want to modify and its settings will appear.

Once you've modified the desired Settings in your app, make sure you click Save before clicking any other applications or any of the sub-menus on the page, as navigating away will cause you to lose your changes.
Good to Know!
From the General Settings page of the Settings application you can search for any setting in the Search bar at the top right of the screen. Odoo will automatically search through the settings of all your installed applications simultaneously, so you can see which applications have that setting and modify it accordingly.
Option 2: Once a configurable application is launched, simply click on CONFIGURATION and select the component you want to modify from the dropdown menu. Some applications will also have a general Settings menu option. If there is no general Settings menu option, then the app is dependent on other components in the database such as Calendar or Notes.
Search
The Search area is persistent in every application in Odoo and gives you the ability to easily find information.
Search is a very straightforward feature. By typing in the name of a customer, project, employee, or other object, you can retrieve that to view within the application that you're using. For the purposes of this document, we want to highlight an enhanced search feature in Odoo that will make searching even easier.
As you type in the search bar, you will see a dropdown menu appear with different options available to help you quickly locate your desired information.
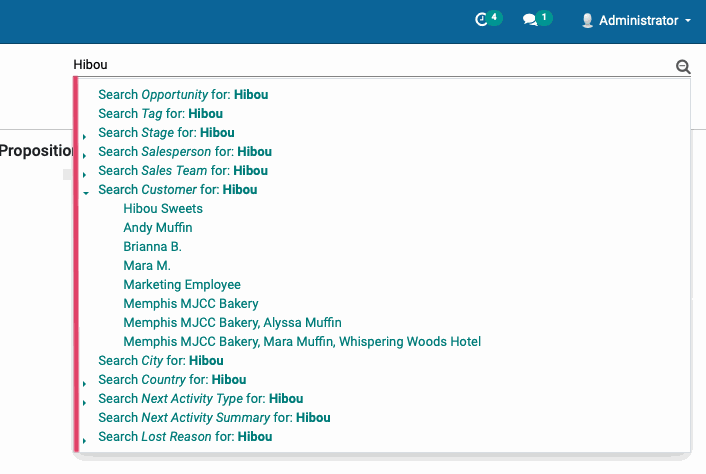
As you can see, we are searching our CRM application for "Hibou" and we are looking for a client "Hibou Sweets". As we begin typing in the search bar, Odoo gives us options to search specific locations within the CRM application for our desired keyword.
Any option with a icon next to it can be selected and Odoo will show you the available items for that information type that match your keyword. We chose to expand the "Customer" section and, as we can see, all customers with the keyword Hibou in their profile appeared.
From here we can either select the specific customer record we want to see or we can select the SEARCH CUSTOMER FOR: HIBOU option and we will be given all of our customers with Hibou in their profile.
Filters
Filters appear directly beneath the Search bar and allow you to customize the data that is displayed on a given page within any application in Odoo. While the filters themselves will vary depending on what application you're using, for the purposes of this document we will go over the basics of how to use filters and we will be using the CRM application as an example.
To get started, navigate to the CRM application.
Once you've launched the CRM application, let's take a look at the Search area at the top right of the screen.

Good to Know!
If you do not see the Filters Group By Favorites selections underneath the search bar, select the spyglass icon with the + sign and they will appear.
If you want to hide them from view, simply select the spyglass icon with - sign and they will become hidden again.
Let's click on the Filters option and review what you'll find there and how to make the most out of your Filters.
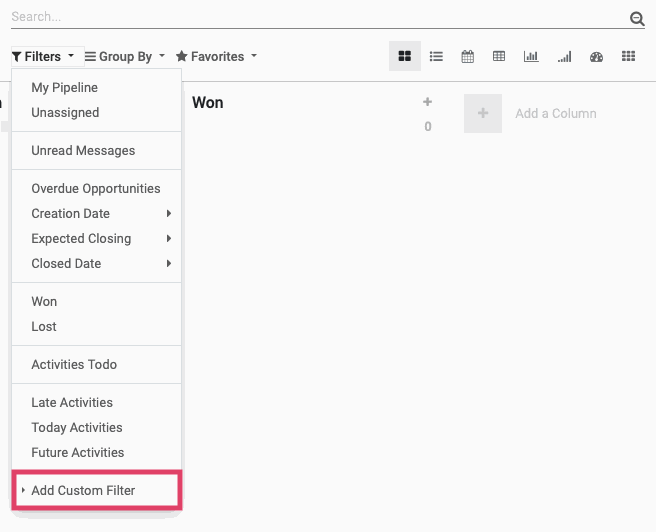
When you review the Filters that are available within each application, the options will be specific to the data that's housed within that application. We are using the CRM application for this example, so the options you see in the menu are specific to our CRM data. There will typically be a set of default filters that are present in the dropdown menu for you to choose from. If you do not see the data that you want to view in the default filters, you can use the Add Custom Filter option to create your own filters.
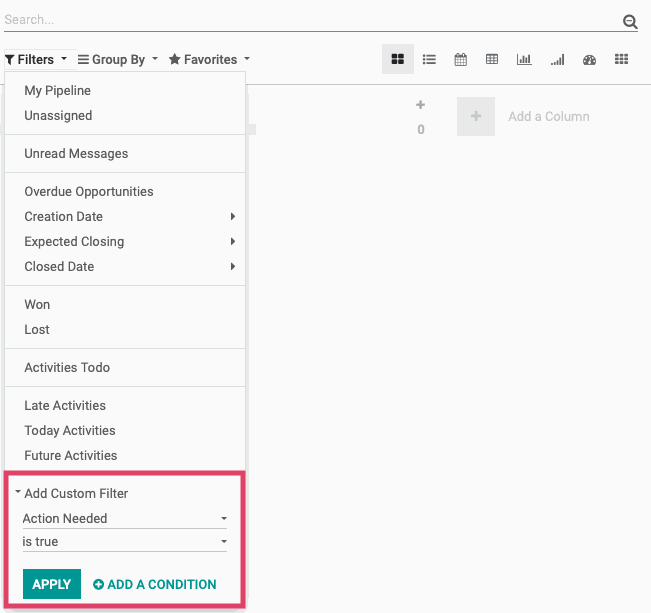
When adding a custom filter, you can set as many conditions as you would like for the information that you need to pull. When you add multiple conditions to the same custom filter, Odoo automatically adds the "or" parameter to the search. So, if you wanted to search for customers who like Chocolate Icing OR Strawberry Icing, you would set both of those conditions in the same custom filter and select APPLY.
But, if you wanted to search for customers who like Chocolate Icing AND Strawberry Icing, you would create 2 separate custom filters (1 for Chocolate Icing and 1 for Strawberry Icing) and then apply both of those filters to the same search.
After you select the filters that you want to use, Odoo will automatically search the records in the model you’re on (in this case, Opportunities) for the information you've selected.
Important!
Custom filters by default will be lost once you leave the application that you're using. If you would like to save these custom filters for use in the future, then you will need to use the Favorites feature covered below to accomplish this.
Group By
This feature allows you to change how your data is grouped together to better visualize your information and inform your workflows. For example, you may want to see your pipeline data grouped by Salesperson, so that you can review which opportunities are being handled by which of your sales people. This is just one small example of what this feature can do.
Like the Filters function we discussed above, the ways that Odoo will allow you to group your data will depend on the application that you're using and the page that you're on within that application.
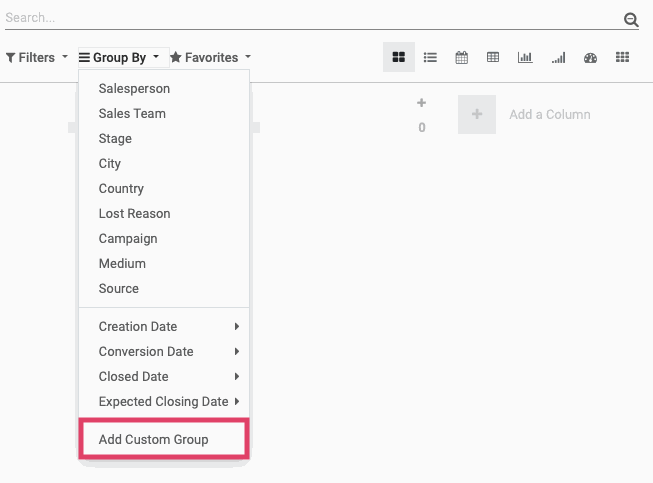
Also like the Filters option, you can use the Add Custom Group button to create your own groupings if the default options do not suit your needs. Unlike Filters, custom groupings will only allow you to add one parameter to a custom Group. If you need multiple custom Grouping methods for a single search, then you would create each custom group as needed and then apply them all to the same search. Odoo will add the grouping methods to one another and group the data as you've specified.
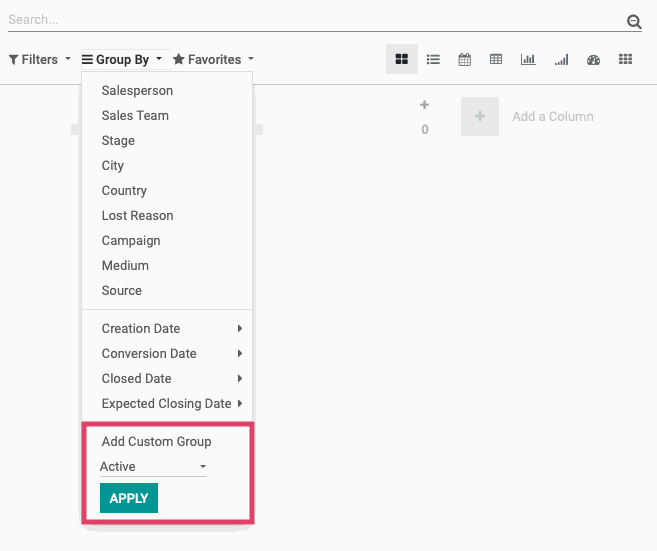
Important!
Custom Groups by default will be lost once you leave the application that you're using. If you would like to save these custom Groups for use in the future, then you will need to use the Favorites feature covered in the next section to accomplish this.
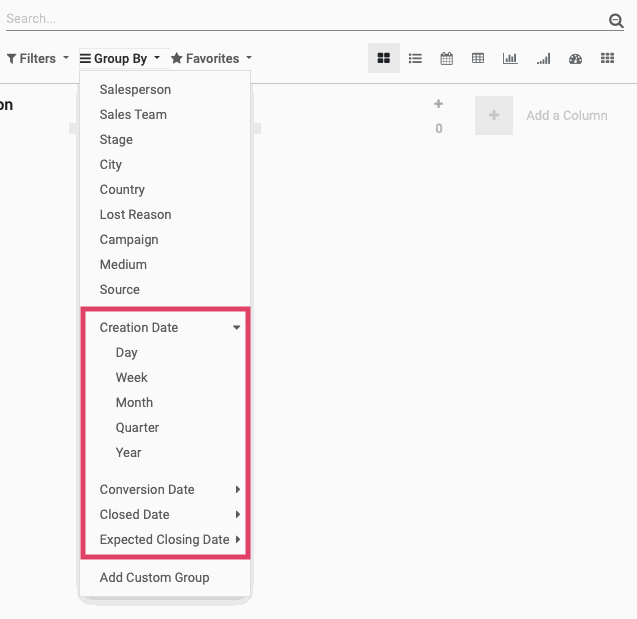
One new feature in Odoo 12 that we would like to highlight is the ability to group by date ranges in the Group By area. This was possible in previous versions of Odoo, but it was labor intensive. In Odoo 12, it's as easy as selecting an option from a drop down menu.
As shown below, for every Group By option that has the word 'Date' in the name, you will have the option to select your time range by Day, Week, Month, Quarter, or Year.
Favorites
This feature allows you to save custom searches that you've built using the Filters and Group By options covered above. Once you have your search or grouping parameters configured and selected, click the Favorites dropdown menu, then click Save current search and the following window will appear.
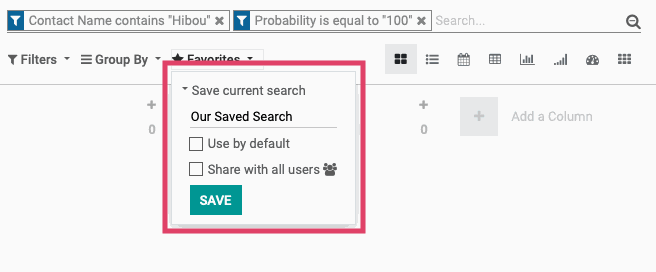
Once this window appears, just name your Search or custom Group whatever you'd like, select whether or not you want the system to default to this search when you open the application, and if you'd like to share this search with all other users of this application. Once you have made your selections, click Save.
After you've successfully saved your custom Search or Group to your Favorites, the next time you would like to apply it within this application, simply go to Favorites and select it from the dropdown menu.
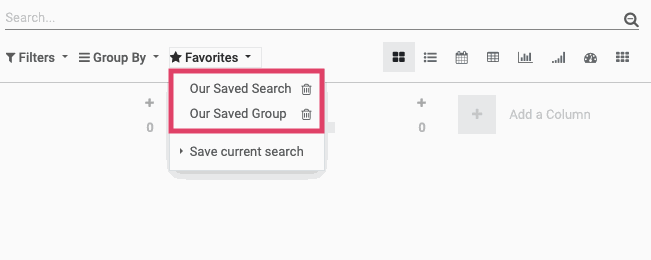
Good to Know!
If you would like to delete any of your Favorites, you simply click the trash can next to the name of the Favorite you want to delete and then confirm the deletion.
Views
This feature is similar to Group By, but instead of changing how the information is grouped on the page, it will change the method by which all of the data is displayed. Think of changing your Group By method like re-arranging information on a pie chart, while changing a View is like moving from a pie chart to a line graph.
Odoo has several different Views that you can choose from. Not all of them are available in every application, but we will cover all of them in this document so that when you come across a View you will know what it does.
For this section, we will be using the CRM application for all but the last View, where we will need to switch over to the Leaves application.
You can find the different Views that are available within any application tucked under the Search bar at the top right. Each View is denoted by an icon.
We will be going through each one and will provide examples of how the Views look when selected. For the purposes of this article, we will be using the same data for every view so that you can see the ways that your data can be manipulated simply by changing a View.
If you hover over each View's icon, you will see a little tag pop out that will tell you the name of the View.

Good to Know!
On certain Views, a new Filter will be added called Time Ranges. This filter allows you to view your data by a given time range and also compare that data to the previous period or from the same period last year. For example, you can compare your sales for the last 30 days to the previous 30 day period or from the same 30 day period last year to get a bench mark on your team's performance over time.
This filter is available on Pivot View, Graph View, Cohort View, and Dashboard View.
Kanban
This View will allow you to create a Kanban board to view your data. Kanban is an organizational method that (typically) uses columns and cards to visualize data. As each project, task, or item moves through the Kanban sequence from left to right, you can easily track where each item is in its lifecycle. Our example below is from the the Sales Pipeline within the CRM application. As you can see from the below screenshot, the Kanban View is selected from the View options and we have our Sales Pipeline organized by stages.
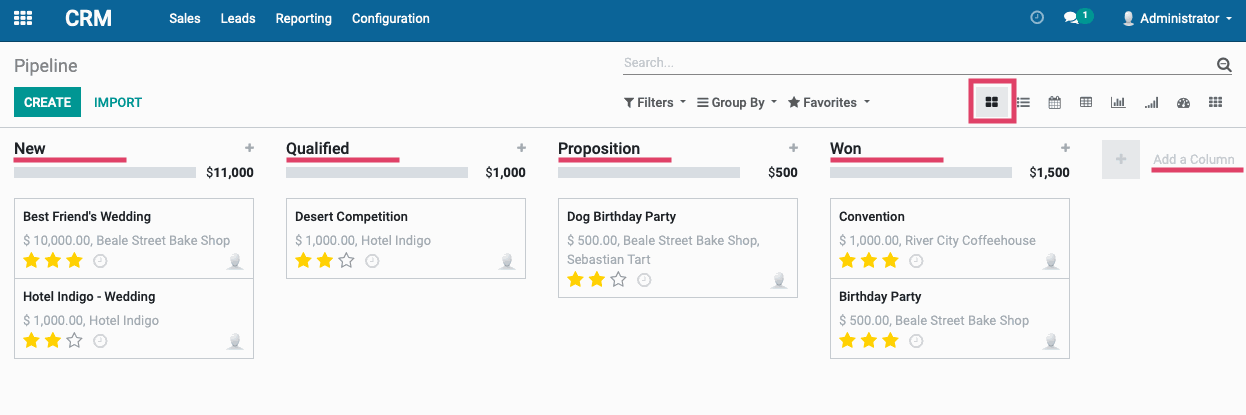
Each column represents a different stage in the Sales process and we can see the Opportunities under each stage. You can always change the stage that an item is in by dragging and dropping it into the correct column. You can also re-organize the columns by dragging and dropping them to the appropriate placement within the process flow.
All the way to the right, you also have the option to Add a Column which will allow you to create a new Stage of the process flow that you can drag and drop to wherever you'd like within the Kanban view. Once your stages are set up, you can begin assigning items to them.
List
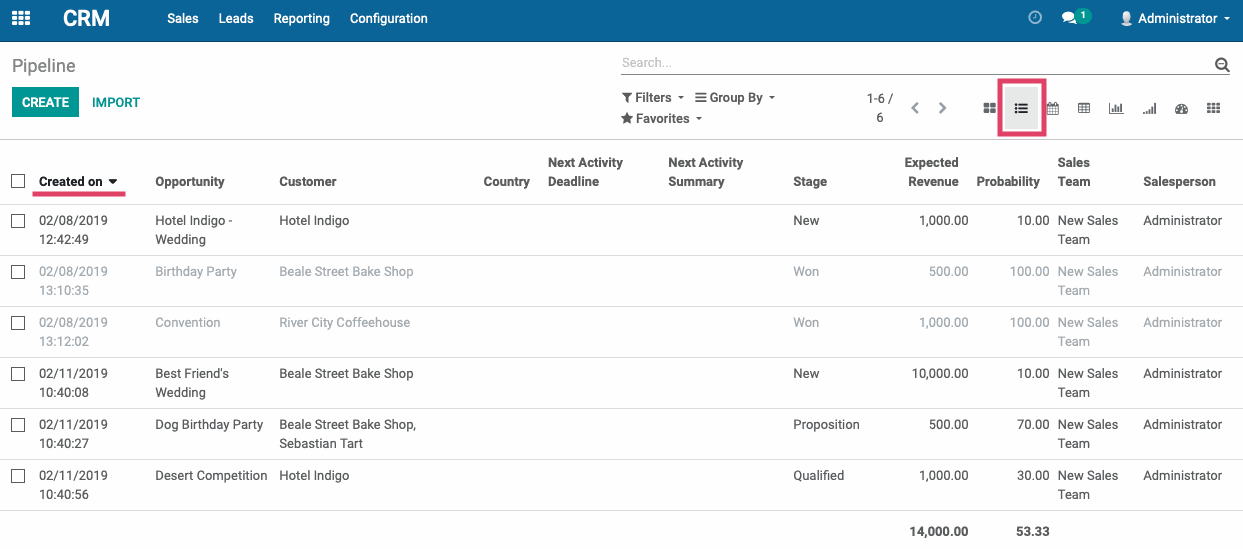
This View will organize your data into a list. As you can see below, all of the same information from the Pipeline View is still present in our List view (i.e. Stage, Expected Revenue, Opportunity Name, and Customer) and some new information has become visible in this view (i.e. Probability and Created On).
You can organize the data in this View by any of the header criteria by simply clicking on the header once and the information will automatically arrange itself by that parameter in either ascending or descending order. A second click on the same parameter will reverse the order that the data will be displayed in. Whichever header the list is organized by will have the Arrow Icon next to it.
Calendar
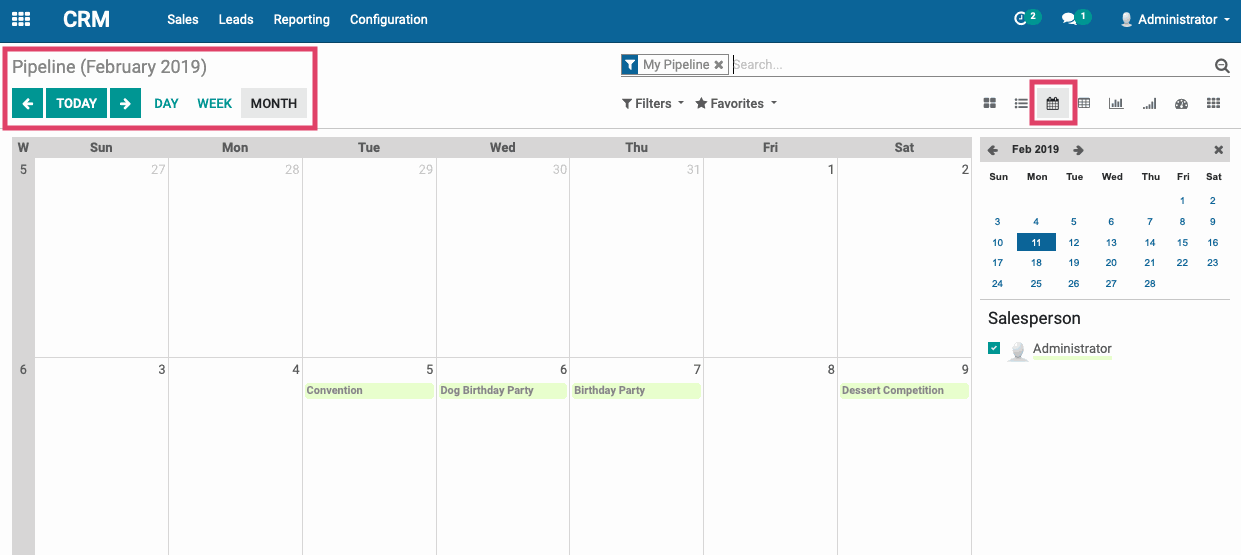
This View allows you to see your Scheduled Activities in a calendar. You can see your upcoming events by the Day, Week, or Month. The calendar will only show items that are created under the Schedule Activity section for each item listed in our Sales Pipeline.
As you can see from the screenshot below, we have the Calendar View selected from the View options and we have the calendar displayed by the Month.
Pivot
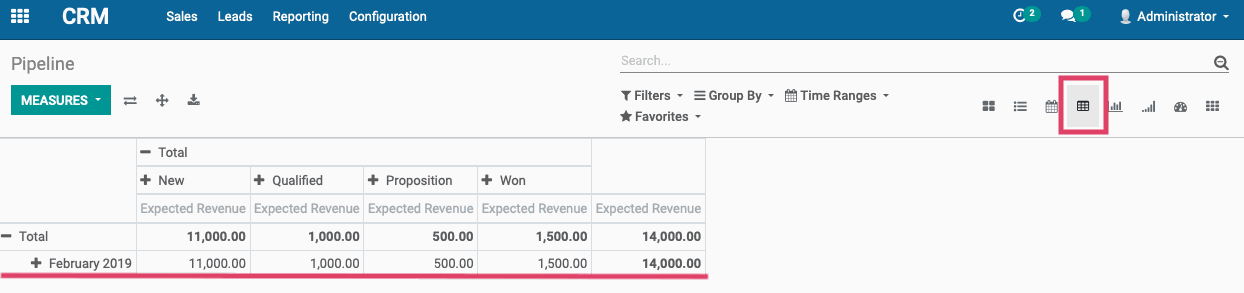
This View allows you to make a Pivot Table out of your data. As you can see below, we have the Pivot View selected from the View menu and our Sales Pipeline has been made into a Pivot Table that displays the Expected Revenue for February at every Stage.
Graph
This View allows you to create Graphs and visualize various data points in 3 different ways:
Bar Chart

Line Chart
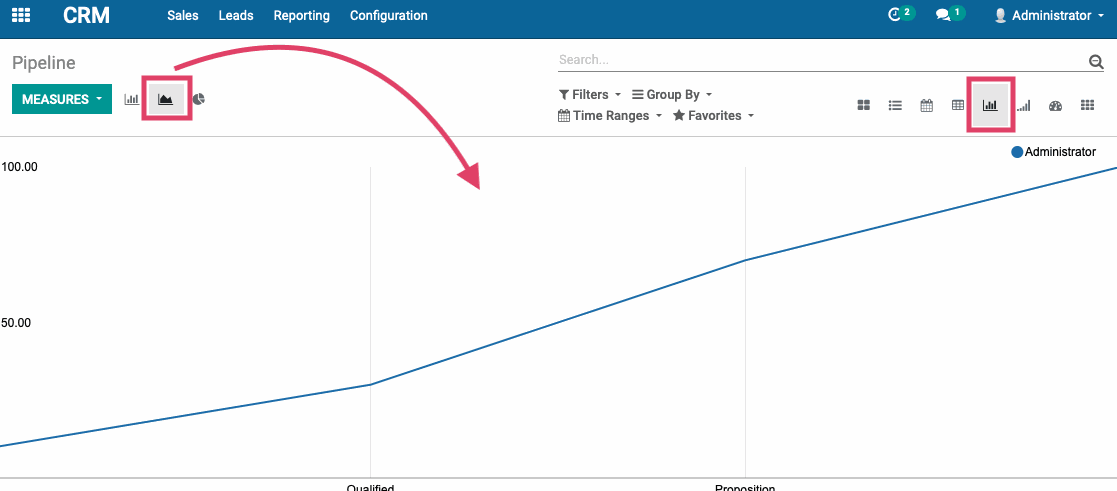
Pie Chart

To change the input data that gets used to create the different Graphs, click the Measures button and select the data that you would like to visualize from the dropdown menu.
Cohort Enterprise Only
This view is only available in Odoo Enterprise. It allows you to see how data changes over time. For example, if you have a subscription based product and you want to see how many customers you have gained or lost over a certain time period, you would review your sales in the Cohort view and these numbers would be broken down for you automatically.
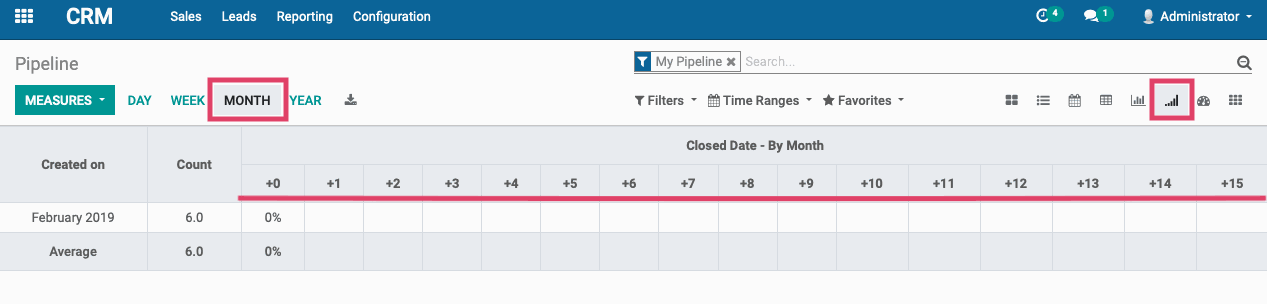
As you can see, our number tracking starts from February of 2019 because that's when our database was created and the data does not go back further than that. As we progress through each month, it would show us the percentage of change for our closed sales month over month so that we can track our progress.
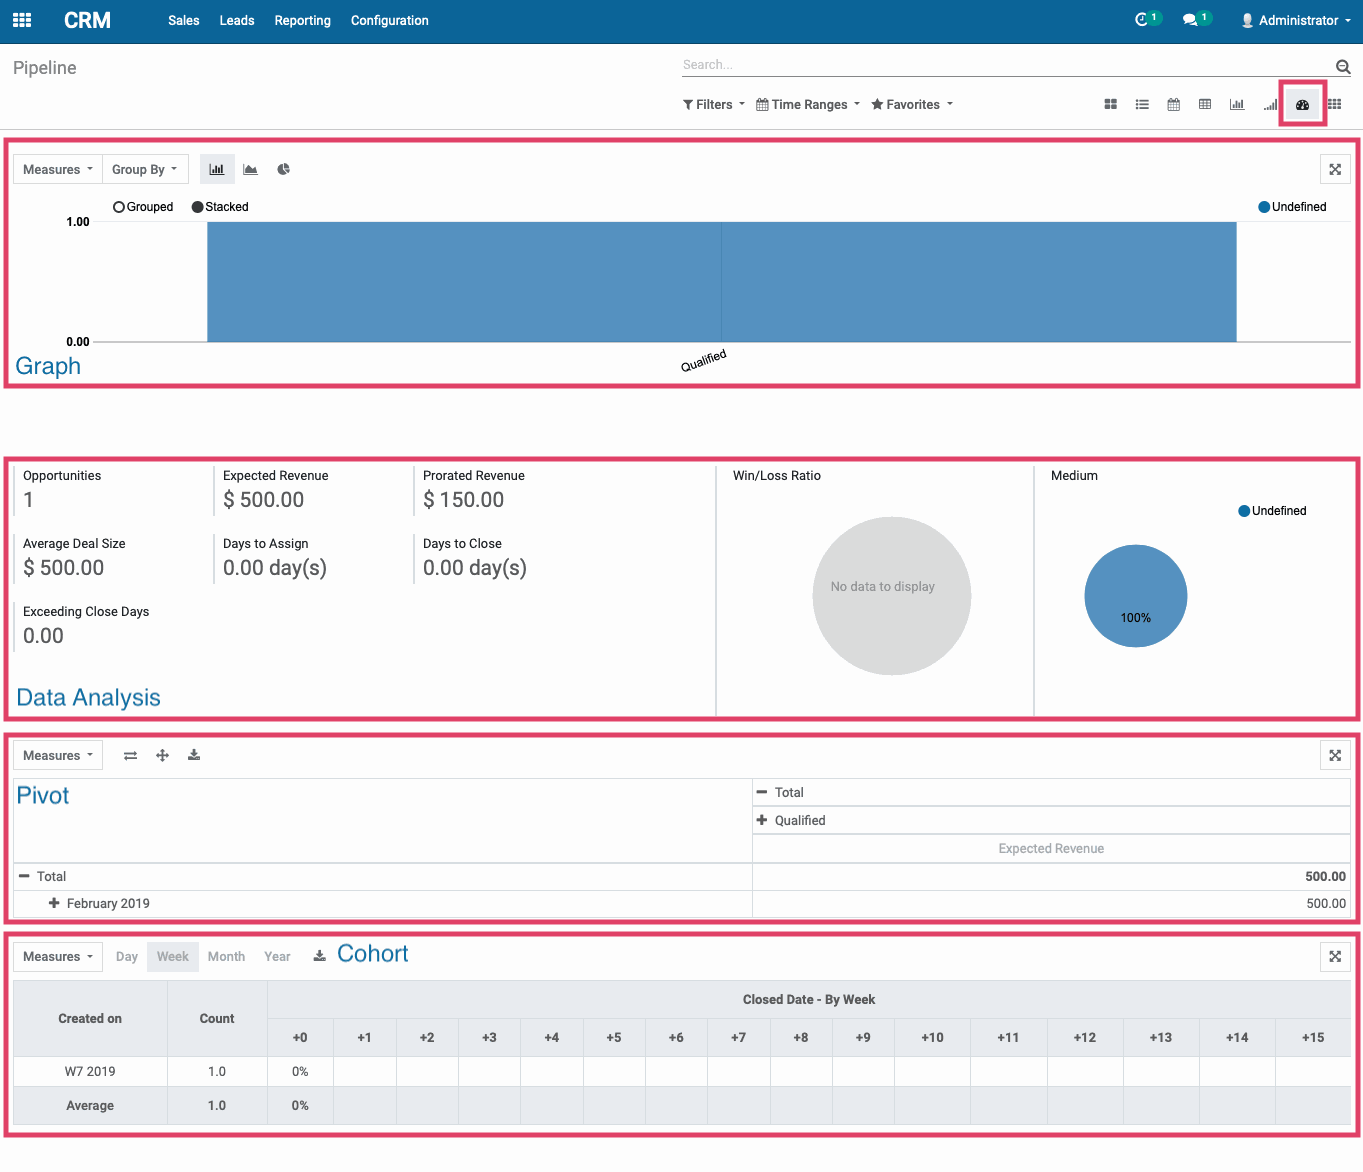
Dashboard
This view contains reporting elements already discussed in previous Views and combines different graphs, data analysis, and measures so that you can build your own custom reporting dashboard.
You can access each report independently of one another by clicking the icon at the top right of each section. To get back to the Dashboard view, just click on the left-most breadcrumb at the top left of the individual reporting screen.
As you can see from the below screenshot, we have a Graph area as the first section at the top, some data analysis below that, a Pivot area, and a Cohort area at the bottom.
You can change the Graph, Pivot, and Cohort areas by their individual controls as needed using the Measures, Group By, and date range filters they have at their top left of each respective area.
Activity
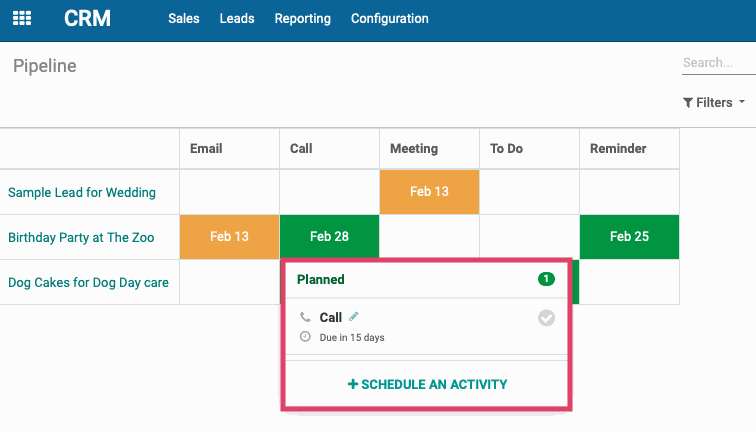
This View allows you to see all of your upcoming Scheduled Activities for your tasks, clients, leads, opportunities, or any other element in your Odoo applications. As you can see below, we're in the CRM application so these are the scheduled activities we have in our Sales Pipeline for three different Opportunities. Each Opportunity has its own row and we can see the dates of each scheduled activity going across it. Activities in orange are scheduled for today and activities in green are scheduled for a time in the future.
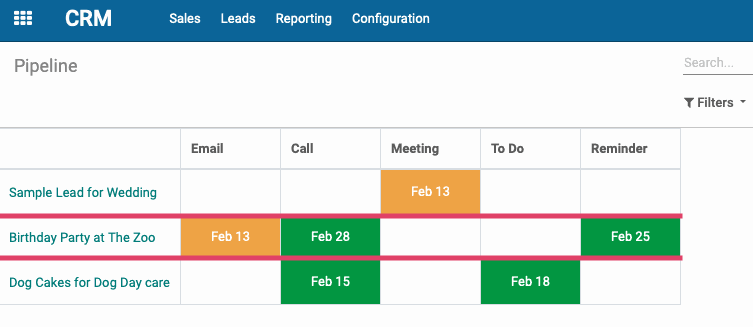
If we click on an Activity in our grid, we can see what the Activity is, when it is due by, we can mark it as Done by clicking the check mark icon that's greyed out on the right, and we can schedule additional activities for the row by clicking the Schedule an Activity button at the bottom of the pop-up.
Gantt
The Gantt View is not available in the CRM application. To get started, navigate to the Leaves application.
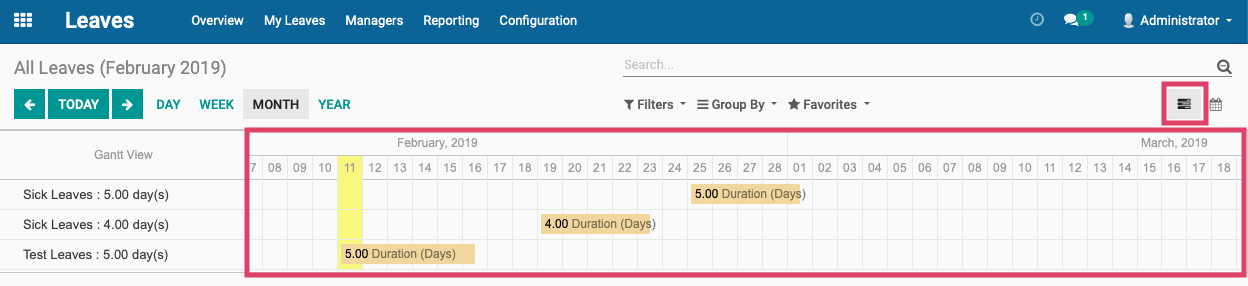
This View allows you to see scheduled blocks of time as rows going along a calendar. This is helpful for seeing how different schedules overlap, and provides you with an overview of your time blocks for more effective schedule management.
As you can see below, we have the Gantt View selected from the View options, and we have an employee with several different leave types scheduled across different weeks. Each leave type is listed to the left of the calendar and shows its title and duration. While none of the below scheduled leaves are overlapping, if you have scheduled time blocks that overlap, or need to re-arrange items you can do so by simply clicking and dragging the item to the desired date range on the calendar.
Actions
This feature allows you to take specific actions on an object within Odoo applications. This could be anything from setting up access to your system for your users, sending a customer an SMS message, or editing a customer record. To get started, navigate to the Contacts application.
The Action button will only appear with you have an object selected. Select any Contact from the main Contacts page. When you're on the resulting contact details page, you will see the Action button in the middle of the white bar as shown below.
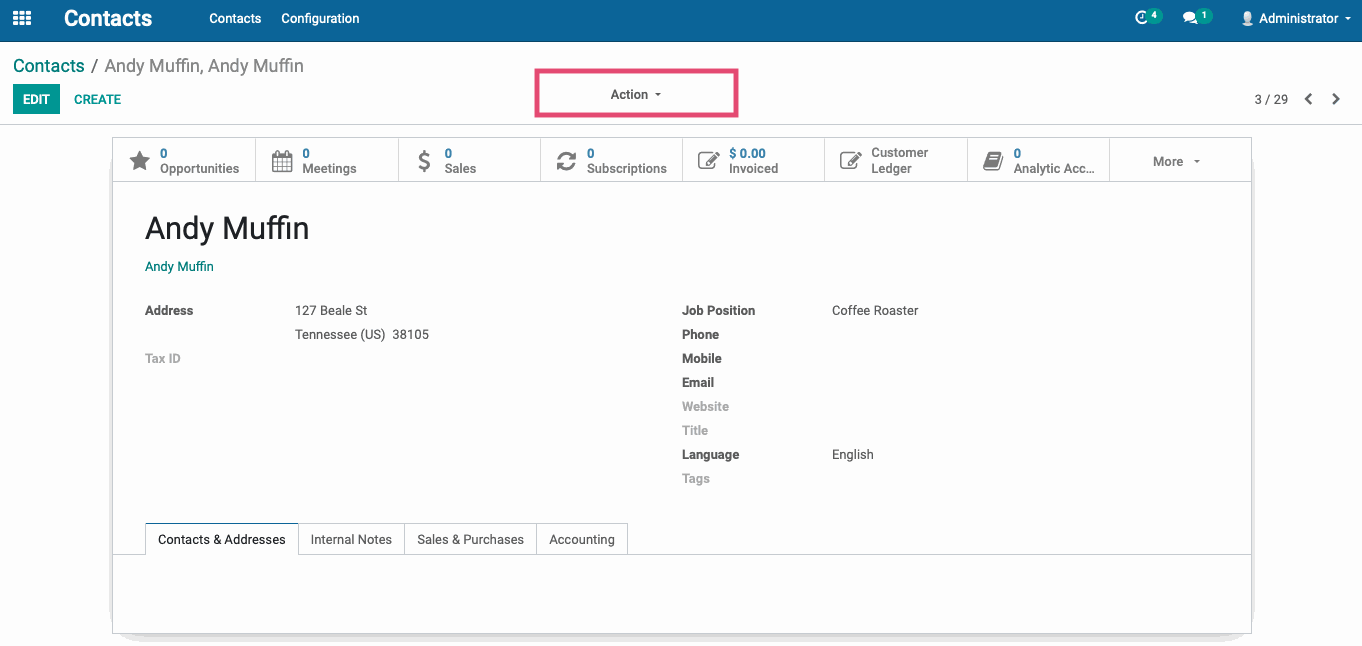
When you select the Action button, you will get a set of pre-determined actions that you can take to modify or interact with that object. These options will vary depending on the application that you're in, and what you are currently viewing or modifying. As you work in Odoo, keep an eye out for the Action button as it can be a great shortcut to what you're trying to do.
Reporting
From within almost any application in Odoo, you will see a Reporting tab. This page allows you to customize reports for different kinds of data within that application. The reporting pages are built using different combinations of Filters and Views that you can modify to your liking to build custom reports. Reporting is almost identical to the Dashboard View we covered earlier and by using the descriptions and information about each Filter and View from the sections above, you will be able to customize your reports and navigate through the reporting page in any application in Odoo.
Also like the Filters and Views sections above, once you have your reporting page set to your specifications, you can save it as a Favorite for later use. Please see the Favorites section above for more details on how to save a custom search as a Favorite.